12 Smokers on Nuke in CS2 to Win Solo Matches

On Nuke, smokes help you move down the street to the secret, cover the main, or get from the lobby to the vents. We’ve compiled 12 playbooks for attack and defense: Astralis and NAVI’s wall plays, two lurk smokes, and door grenades for A-side support players.
Smoke at the start of the street
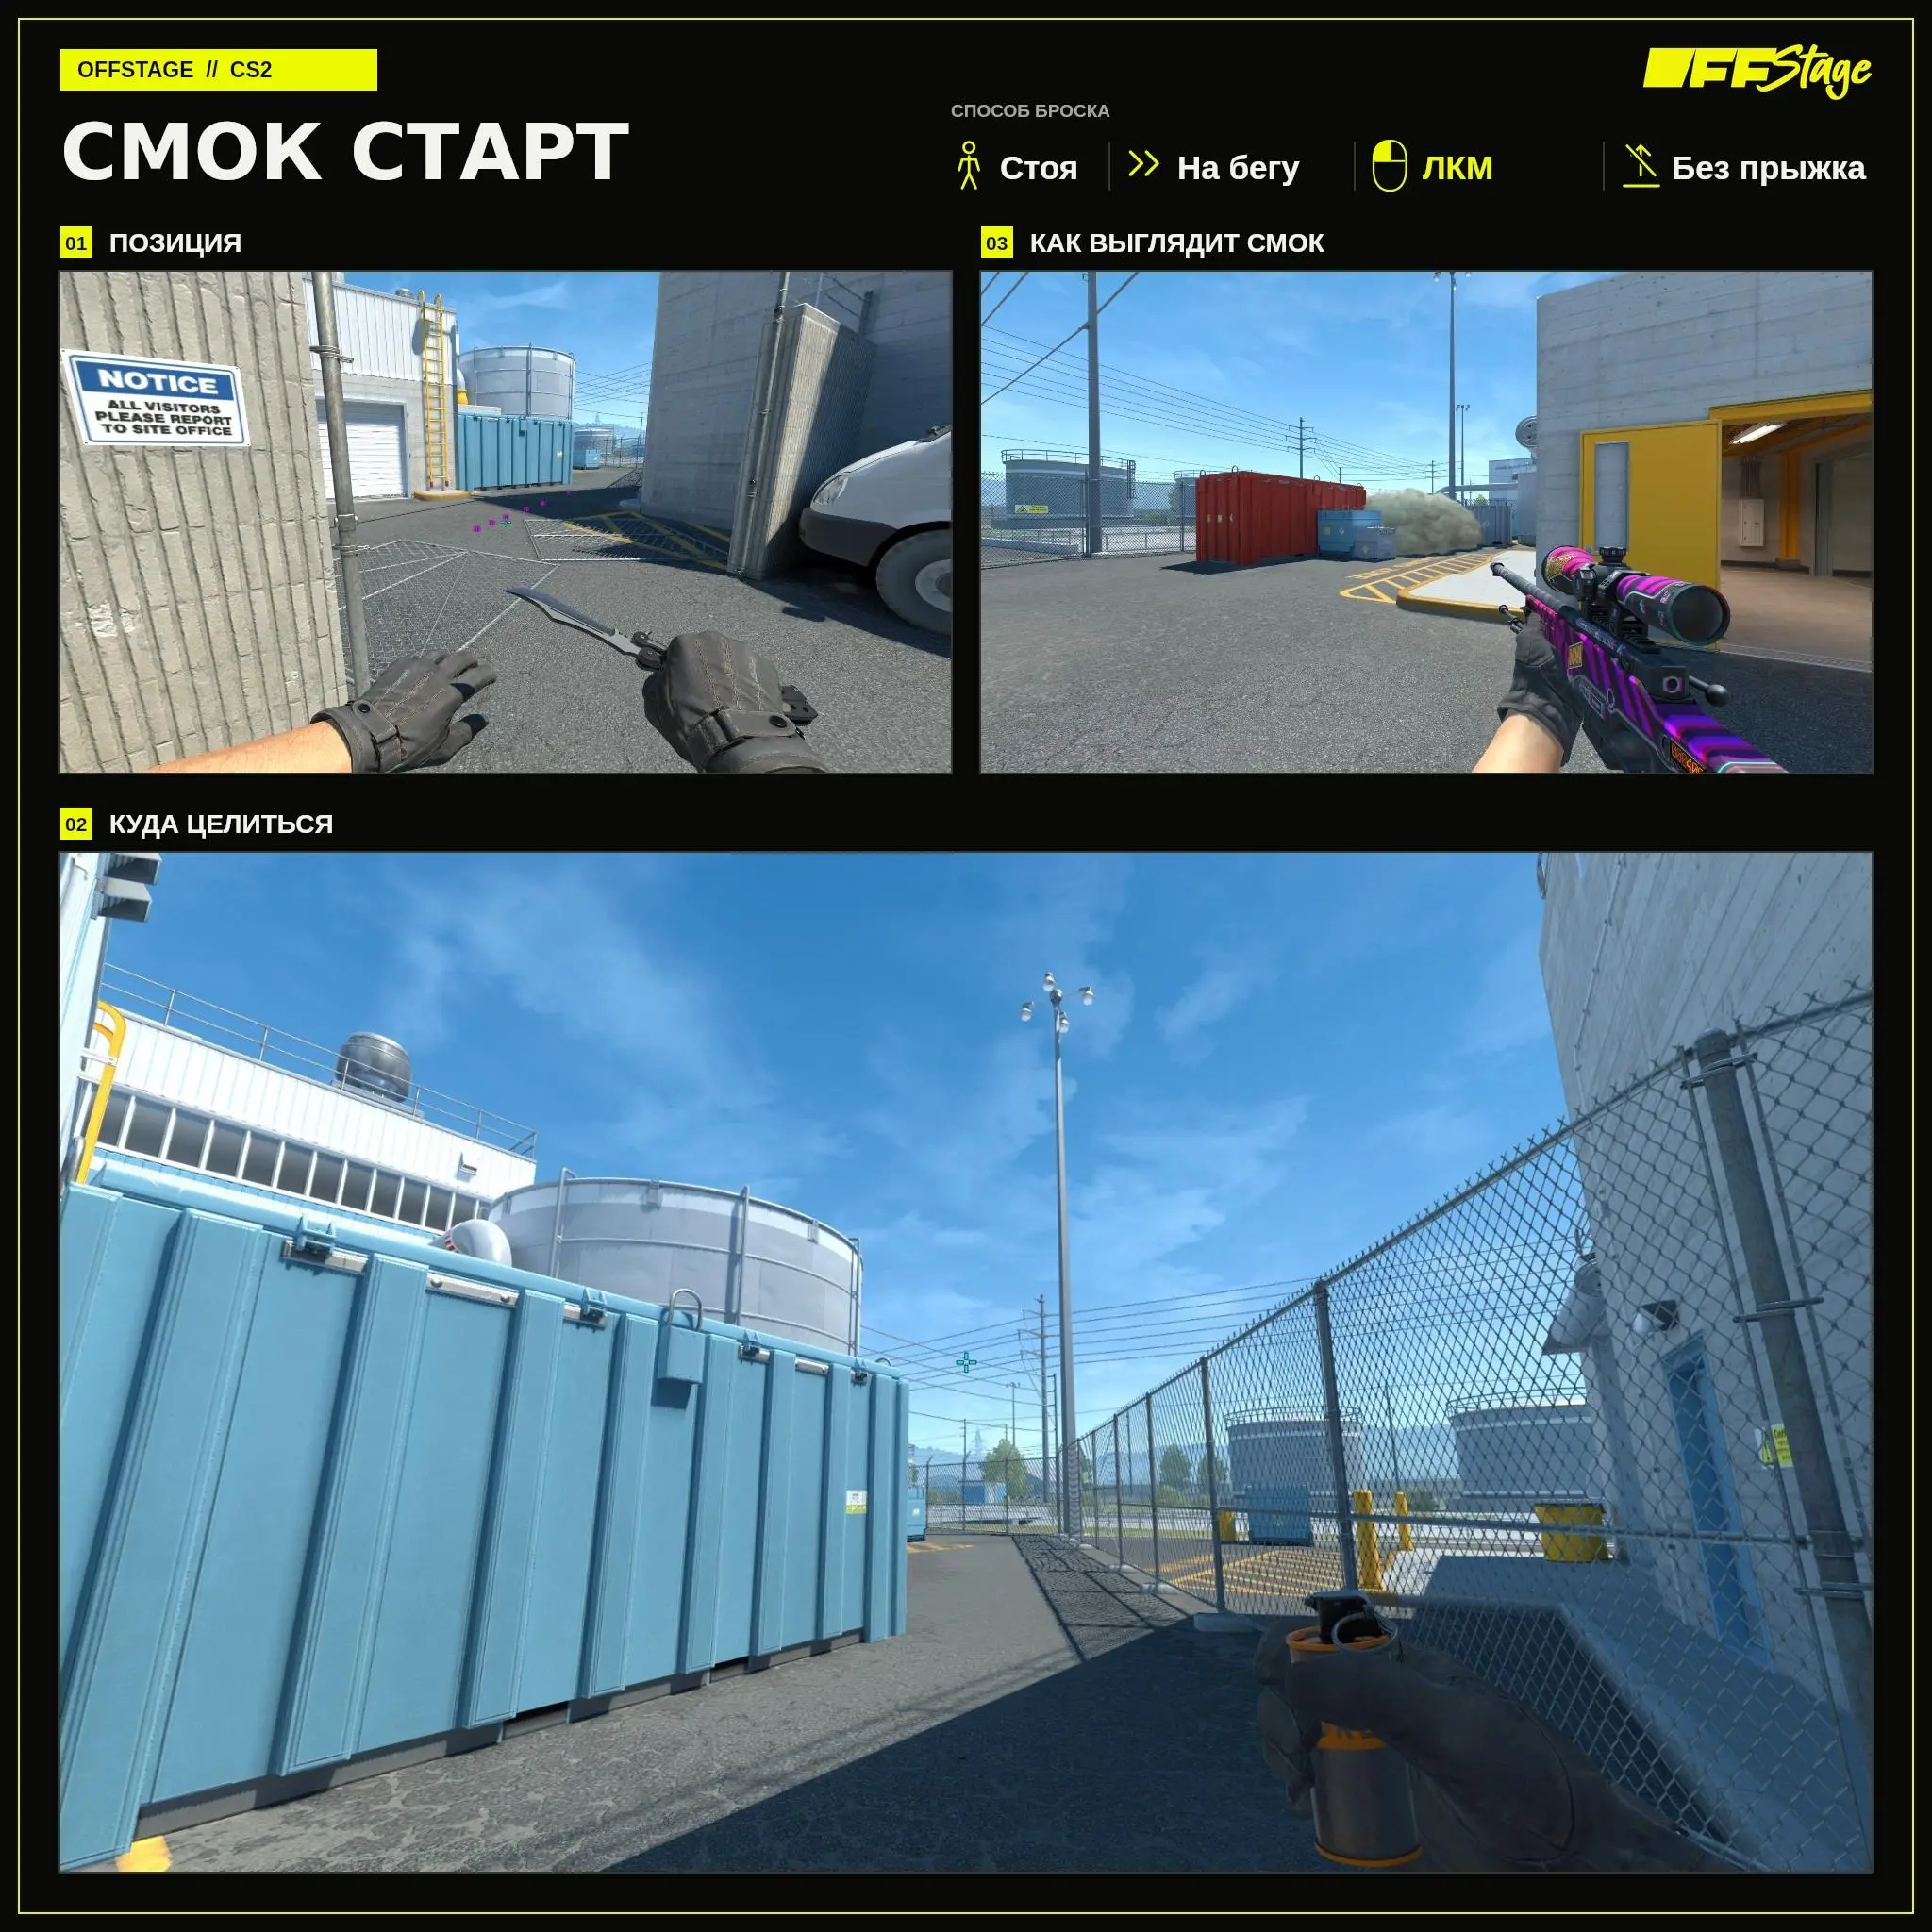
The starting smoke on Nuke is placed next to the red container and covers your first few steps down the street. Behind it, you can take up a position and prepare your next grenades. If you plan to go through the secret route, you’ll need a smoke screen: a single starting smoke won’t be enough for the entire crossing.
Start running from the exit at the T-spawn shown in the first frame. Aim at the area with the wires to the right of the blue container and throw the grenade with a left-click without jumping. Don’t stop before throwing. During practice, memorize not only the aim but also the exact point where you release the grenade.
Astralis’s first smoke from the blue door
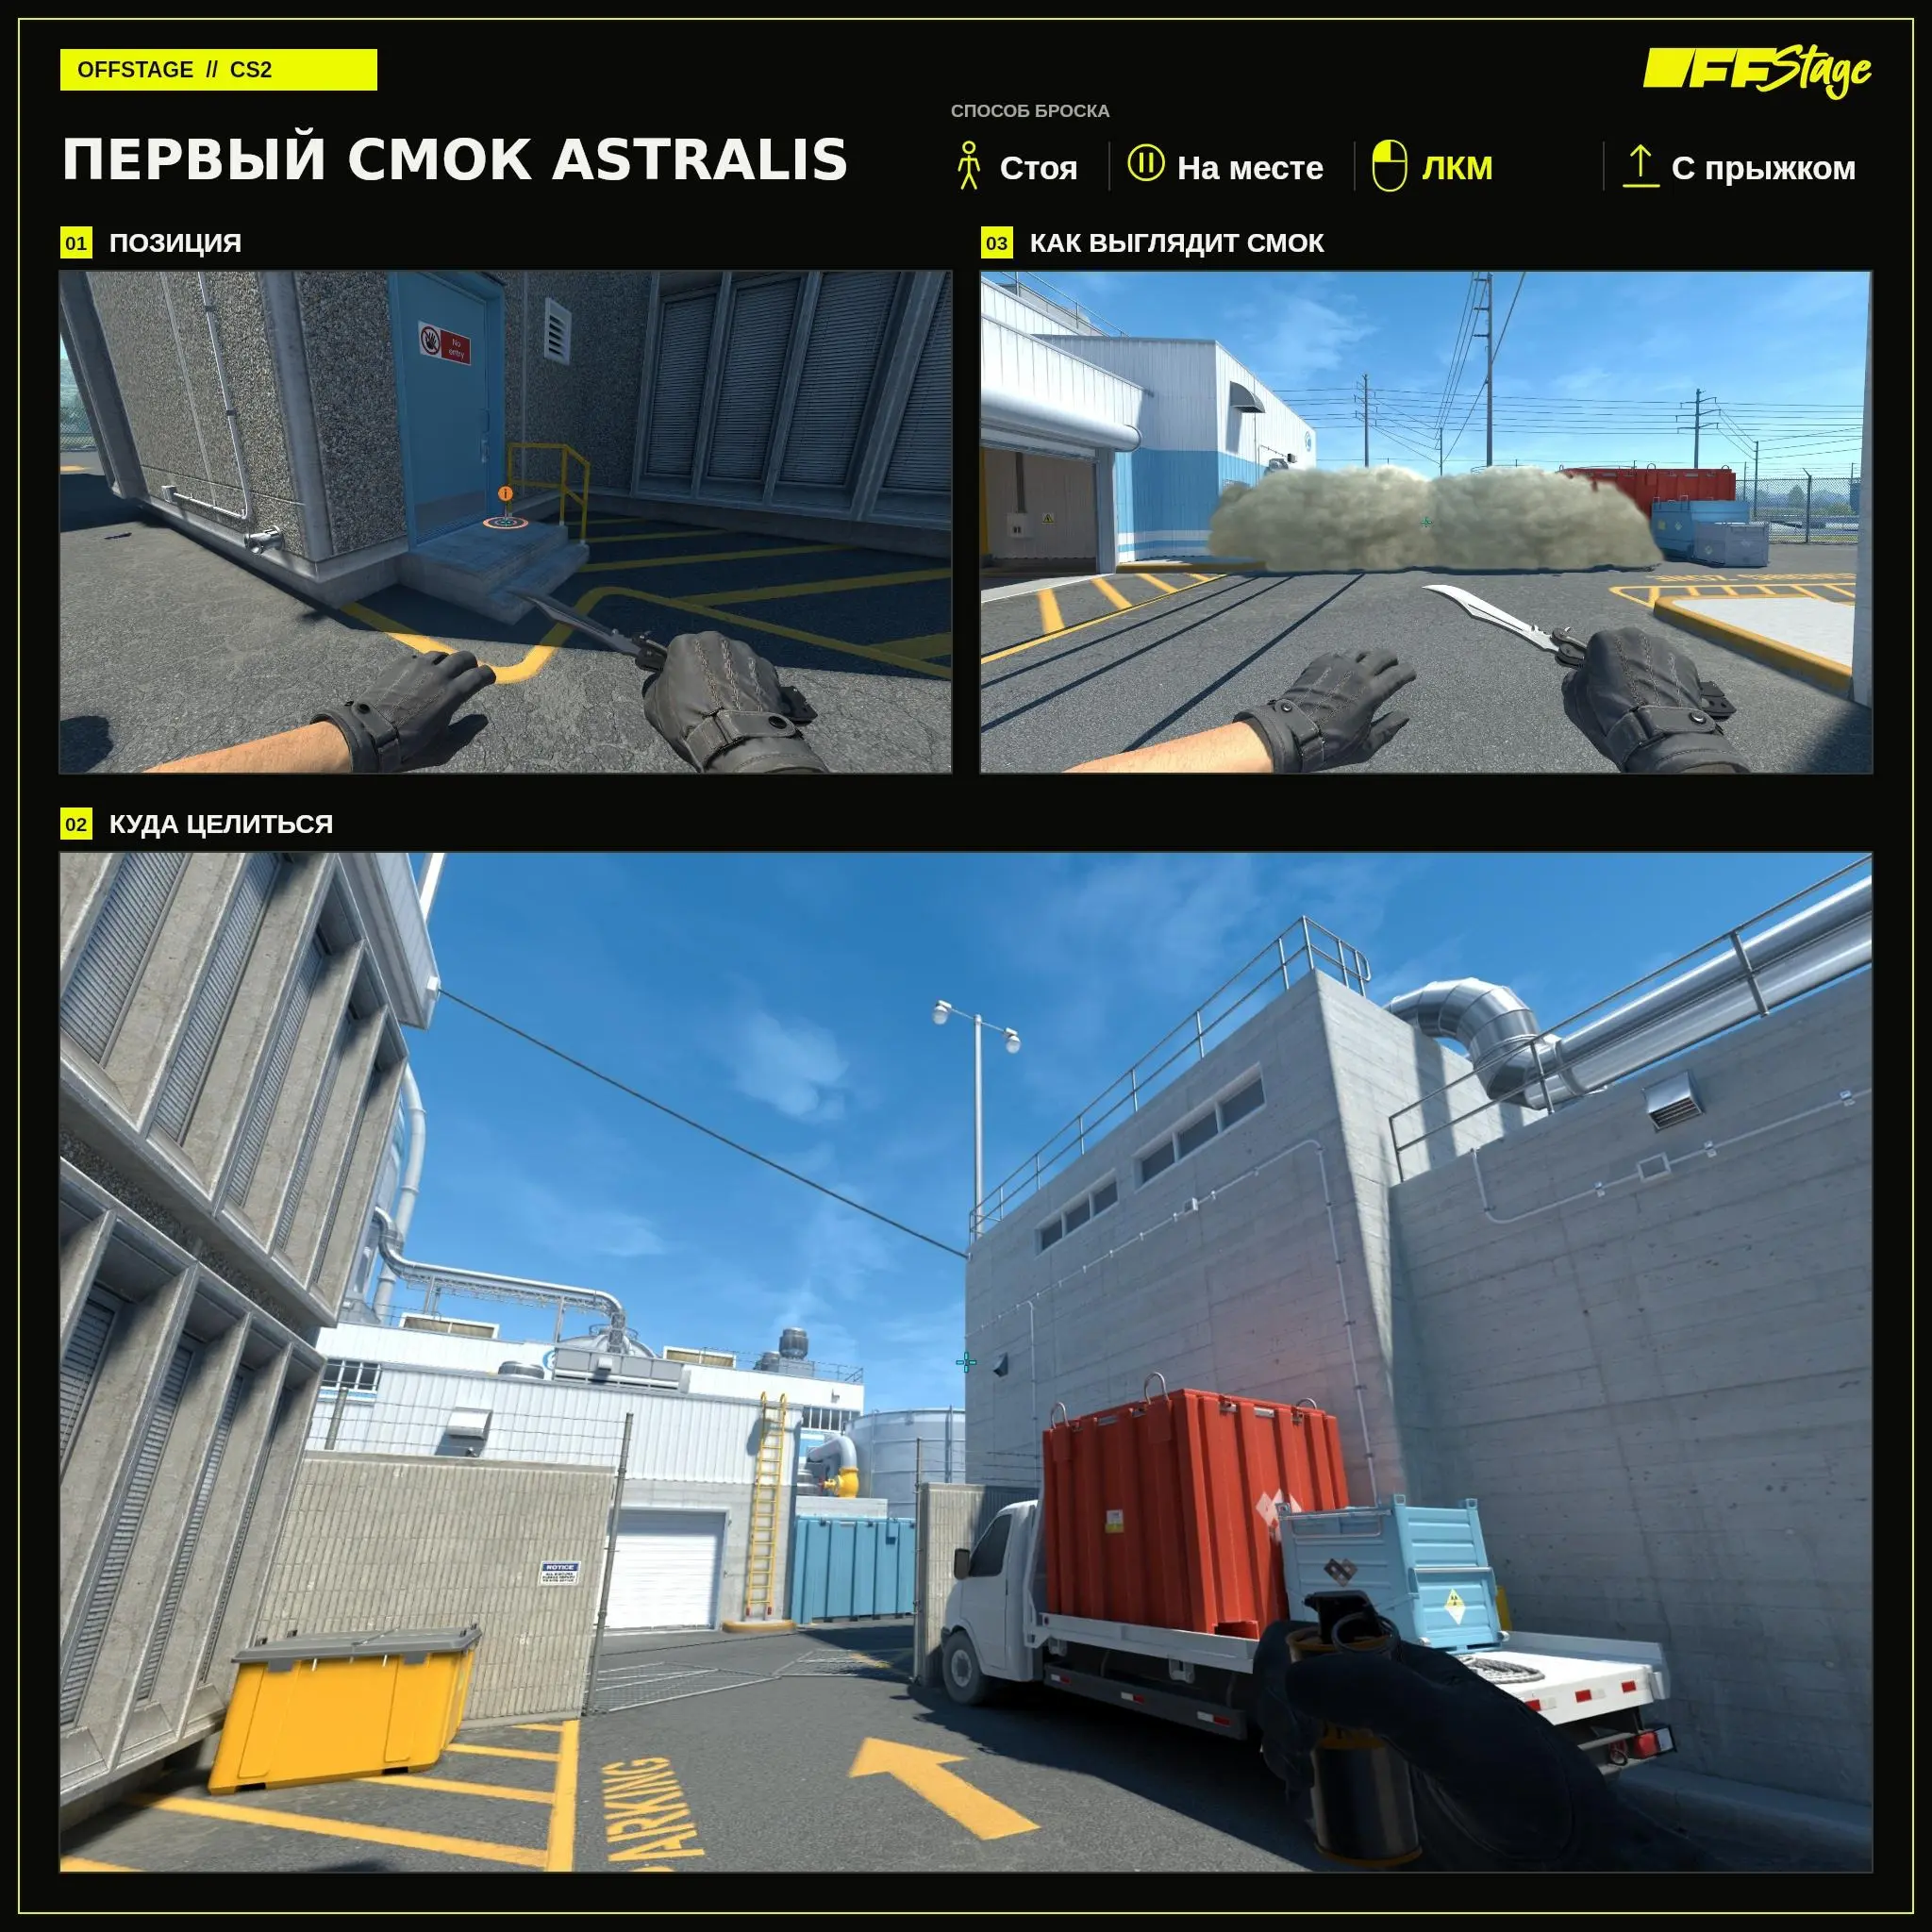
The smoke wall on Nuke blocks the street passage to the secret. In this setup, both smokes are deployed from the blue door at the T-spawn. The first smoke works in tandem with the second, so don’t rush out immediately after it deploys: the second part of the smoke wall may still be open to the CTs.
Stand at the marked spot near the blue door and the yellow railing. Aim for the edge of the tall building across the way as shown in the diagram and left-click while jumping from a standing position. If you’re setting up the wall as a duo, agree on the order at the door so you don’t get in each other’s way while taking position.
Astralis’s second smoke from the blue door
The second smoke complements the first, covering the wall on the street. It’s best to check this setup as a duo: one player moves toward the secret spot, while the other watches from the garage side. This way, you can immediately see if there’s a gap between the smokes or if a player is peeking from the edge of the wall.
The starting position is the same—by the blue door. Aim at the right edge of the round tank above the blue container, as shown in the diagram. Start moving while holding down Shift and left-click to jump. Unlike the first Astralis smoke, this one is deployed while moving: jumping from a standstill won’t work here.
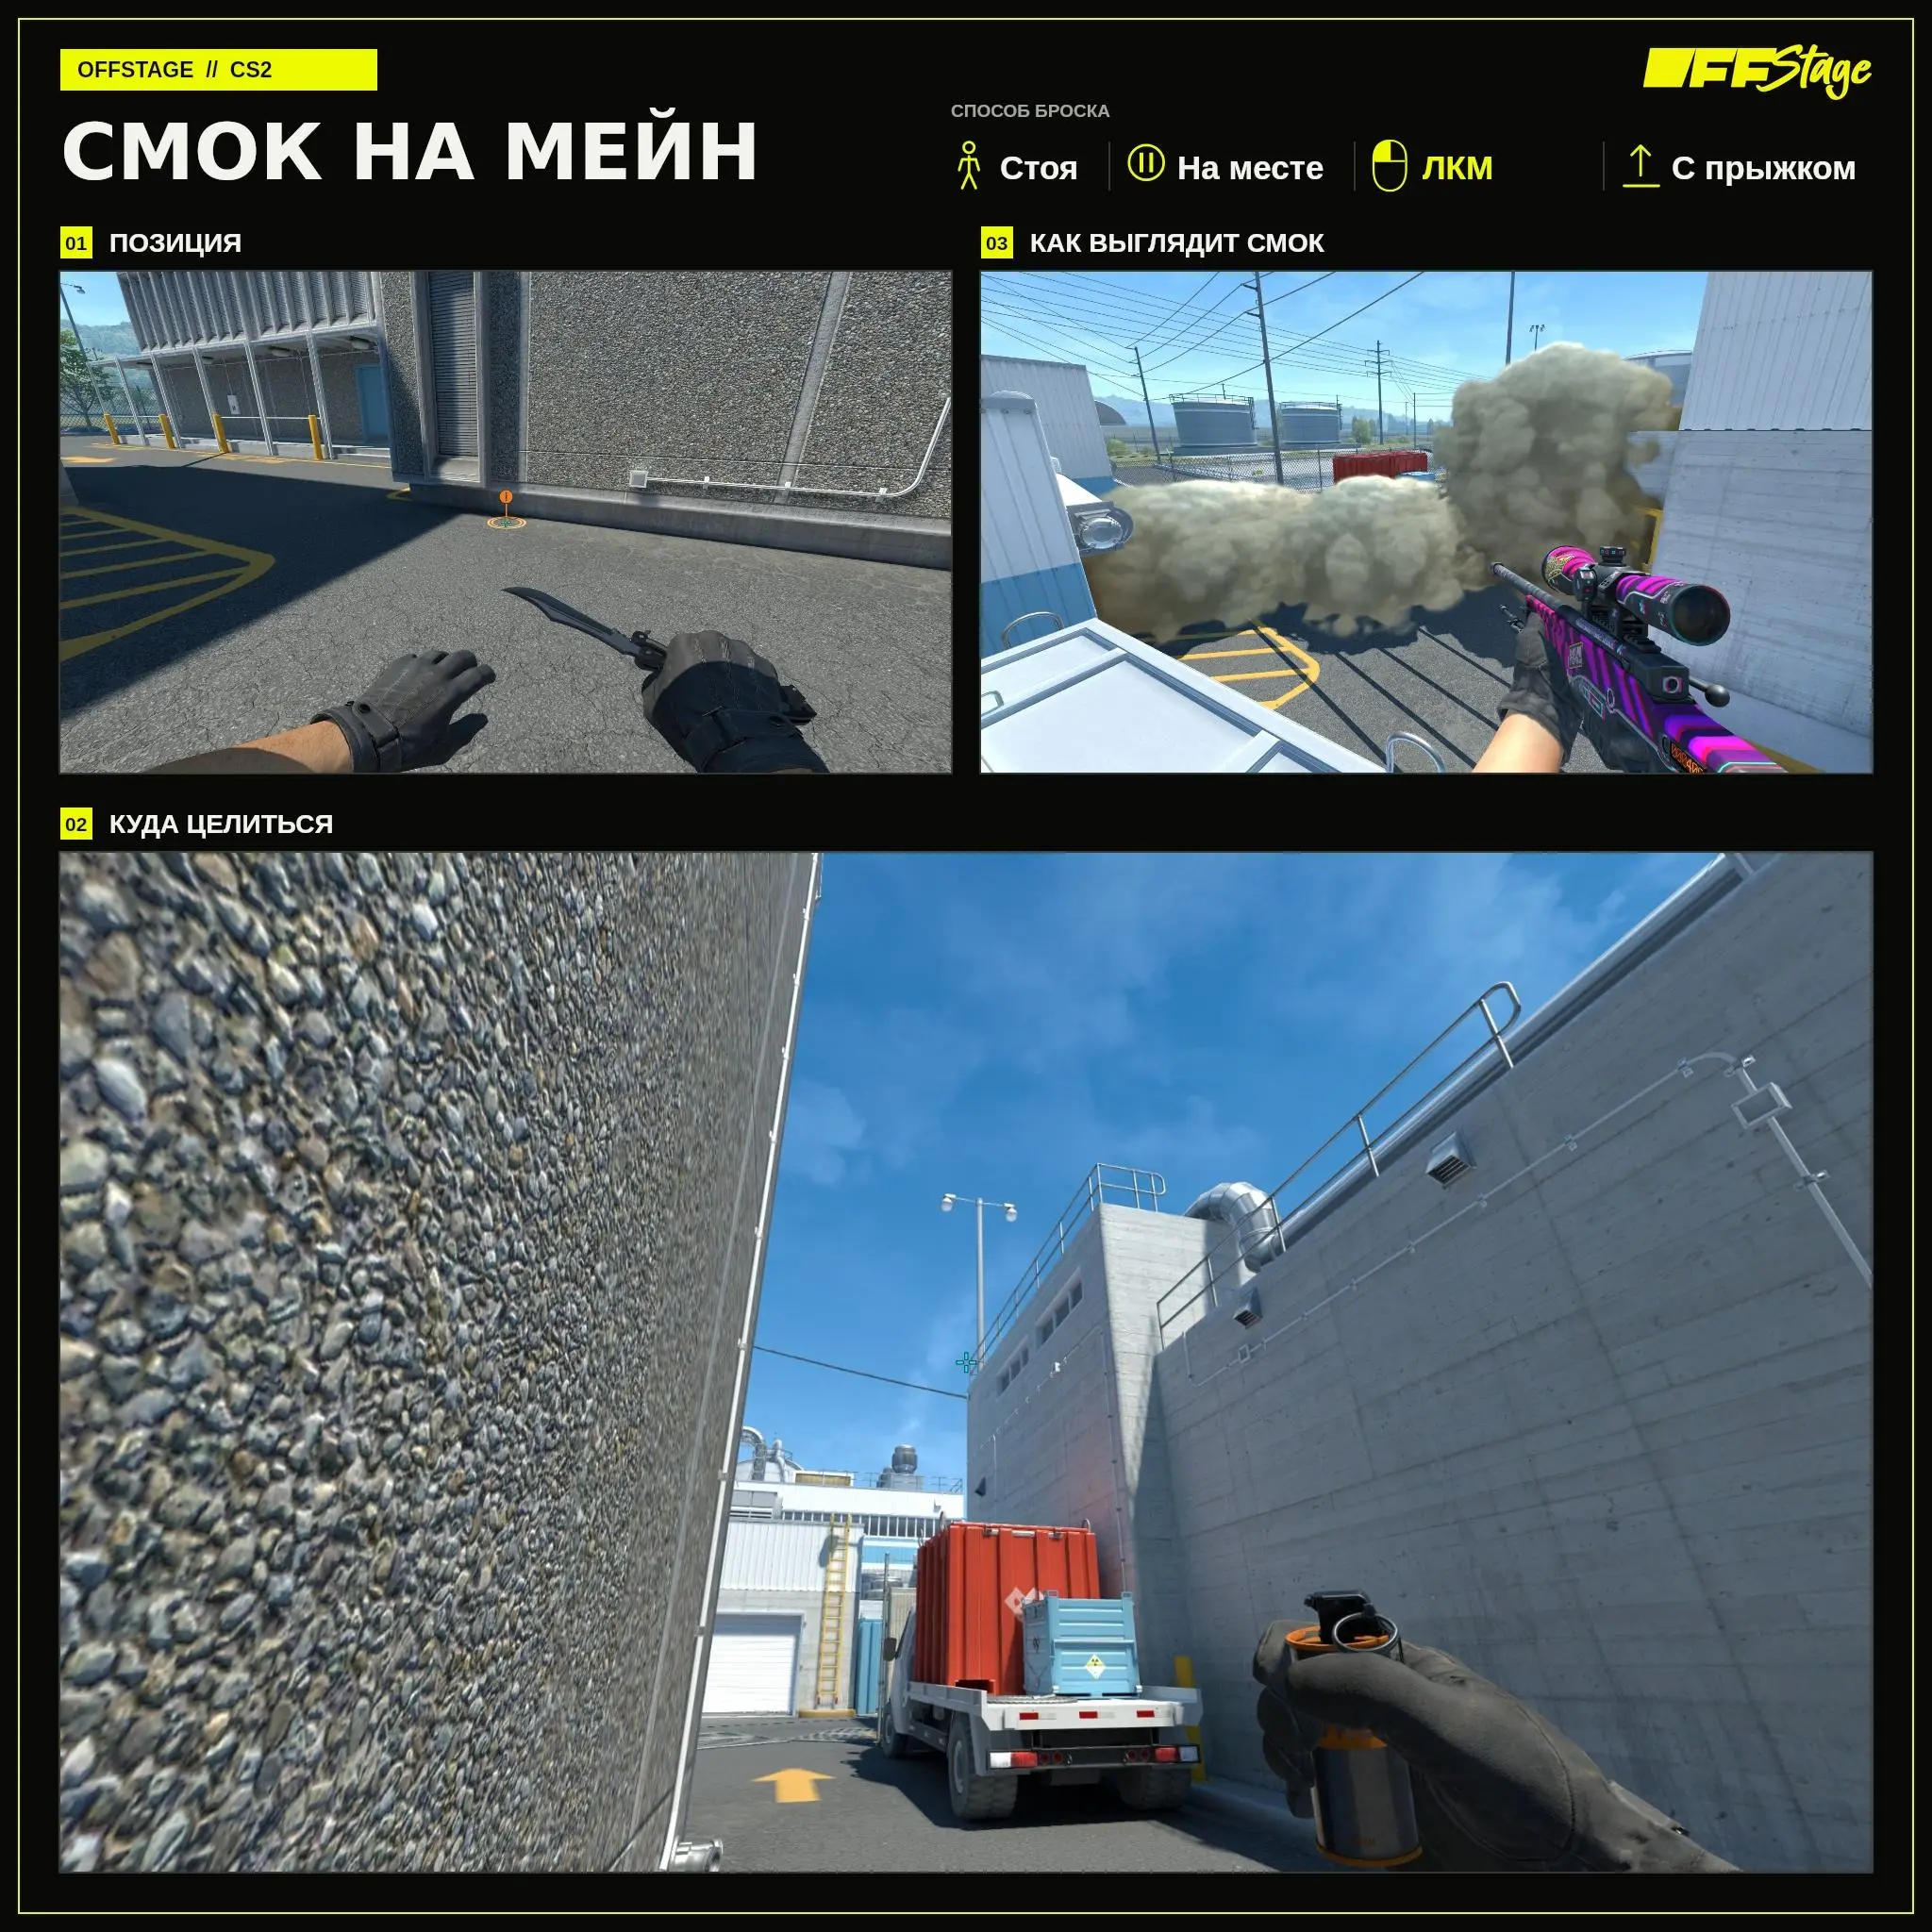
Smoke on the main from the T-side
A smoke on the main from the Nuke side blocks the passage between the street and Site A. It helps secure the street without getting distracted by the player on the main, or supports the exit from the lobby. Discuss the throw with your team: if a teammate is planning to enter A via the main, the smoke will block their path as well.
Stand by the wall with the ventilation panels on the T-side. Find a landmark at the edge of the roof near the streetlight, as shown in the large screenshot. Throw while standing still—left-click while jumping, without moving. In the result screenshot, the main is blocked along with two NAVI smoke grenades—the entire combo requires three grenades.
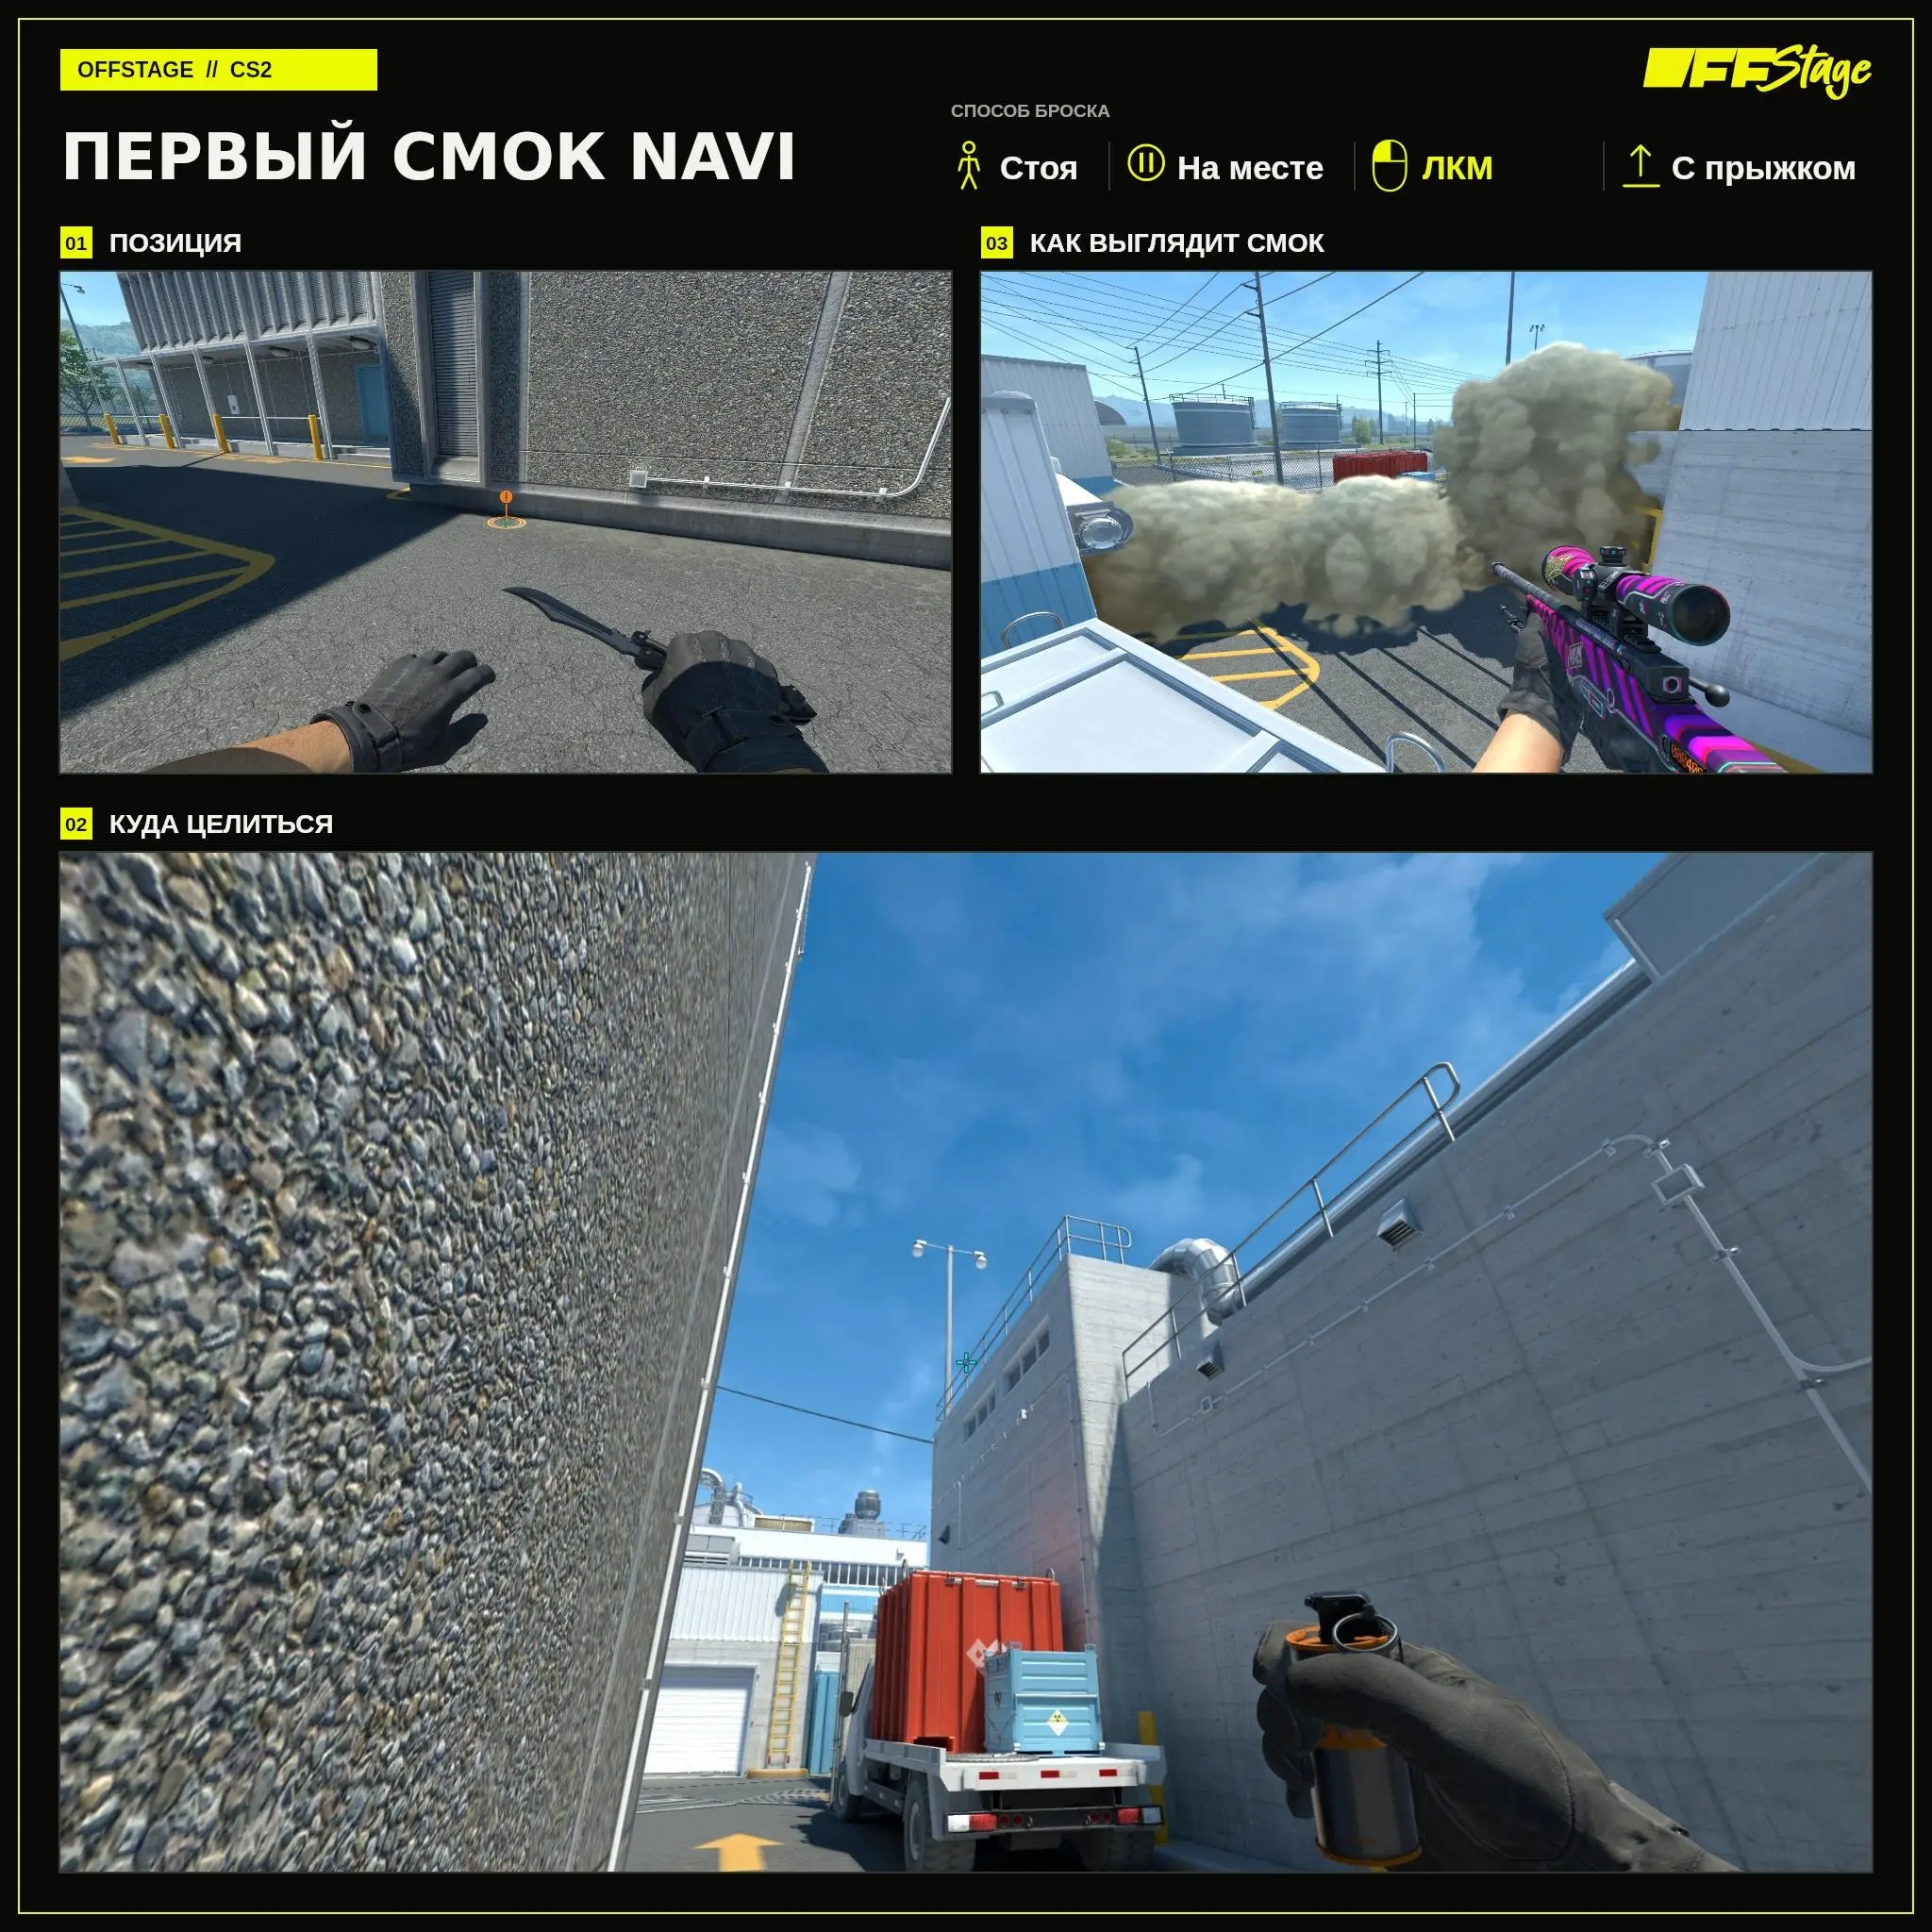
First NAVI smoke grenade
The first NAVI smoke is part of the street spread, along with the second NAVI smoke and the main. The street smokes cover the passageway, while the main smoke blocks the exit from the building. This setup is useful when a team wants to move behind the wall. You still need to check the nearby corners: CTs might have taken them before the smokes appeared.
Take the same position by the T-spawn wall as you would for the Main. The aim point for the first NAVI is on the roof railing next to the streetlight; the exact location is shown on the diagram. Left-click while jumping from a standing position. When practicing, compare the two crosshairs: they’re close together but correspond to different grenades.
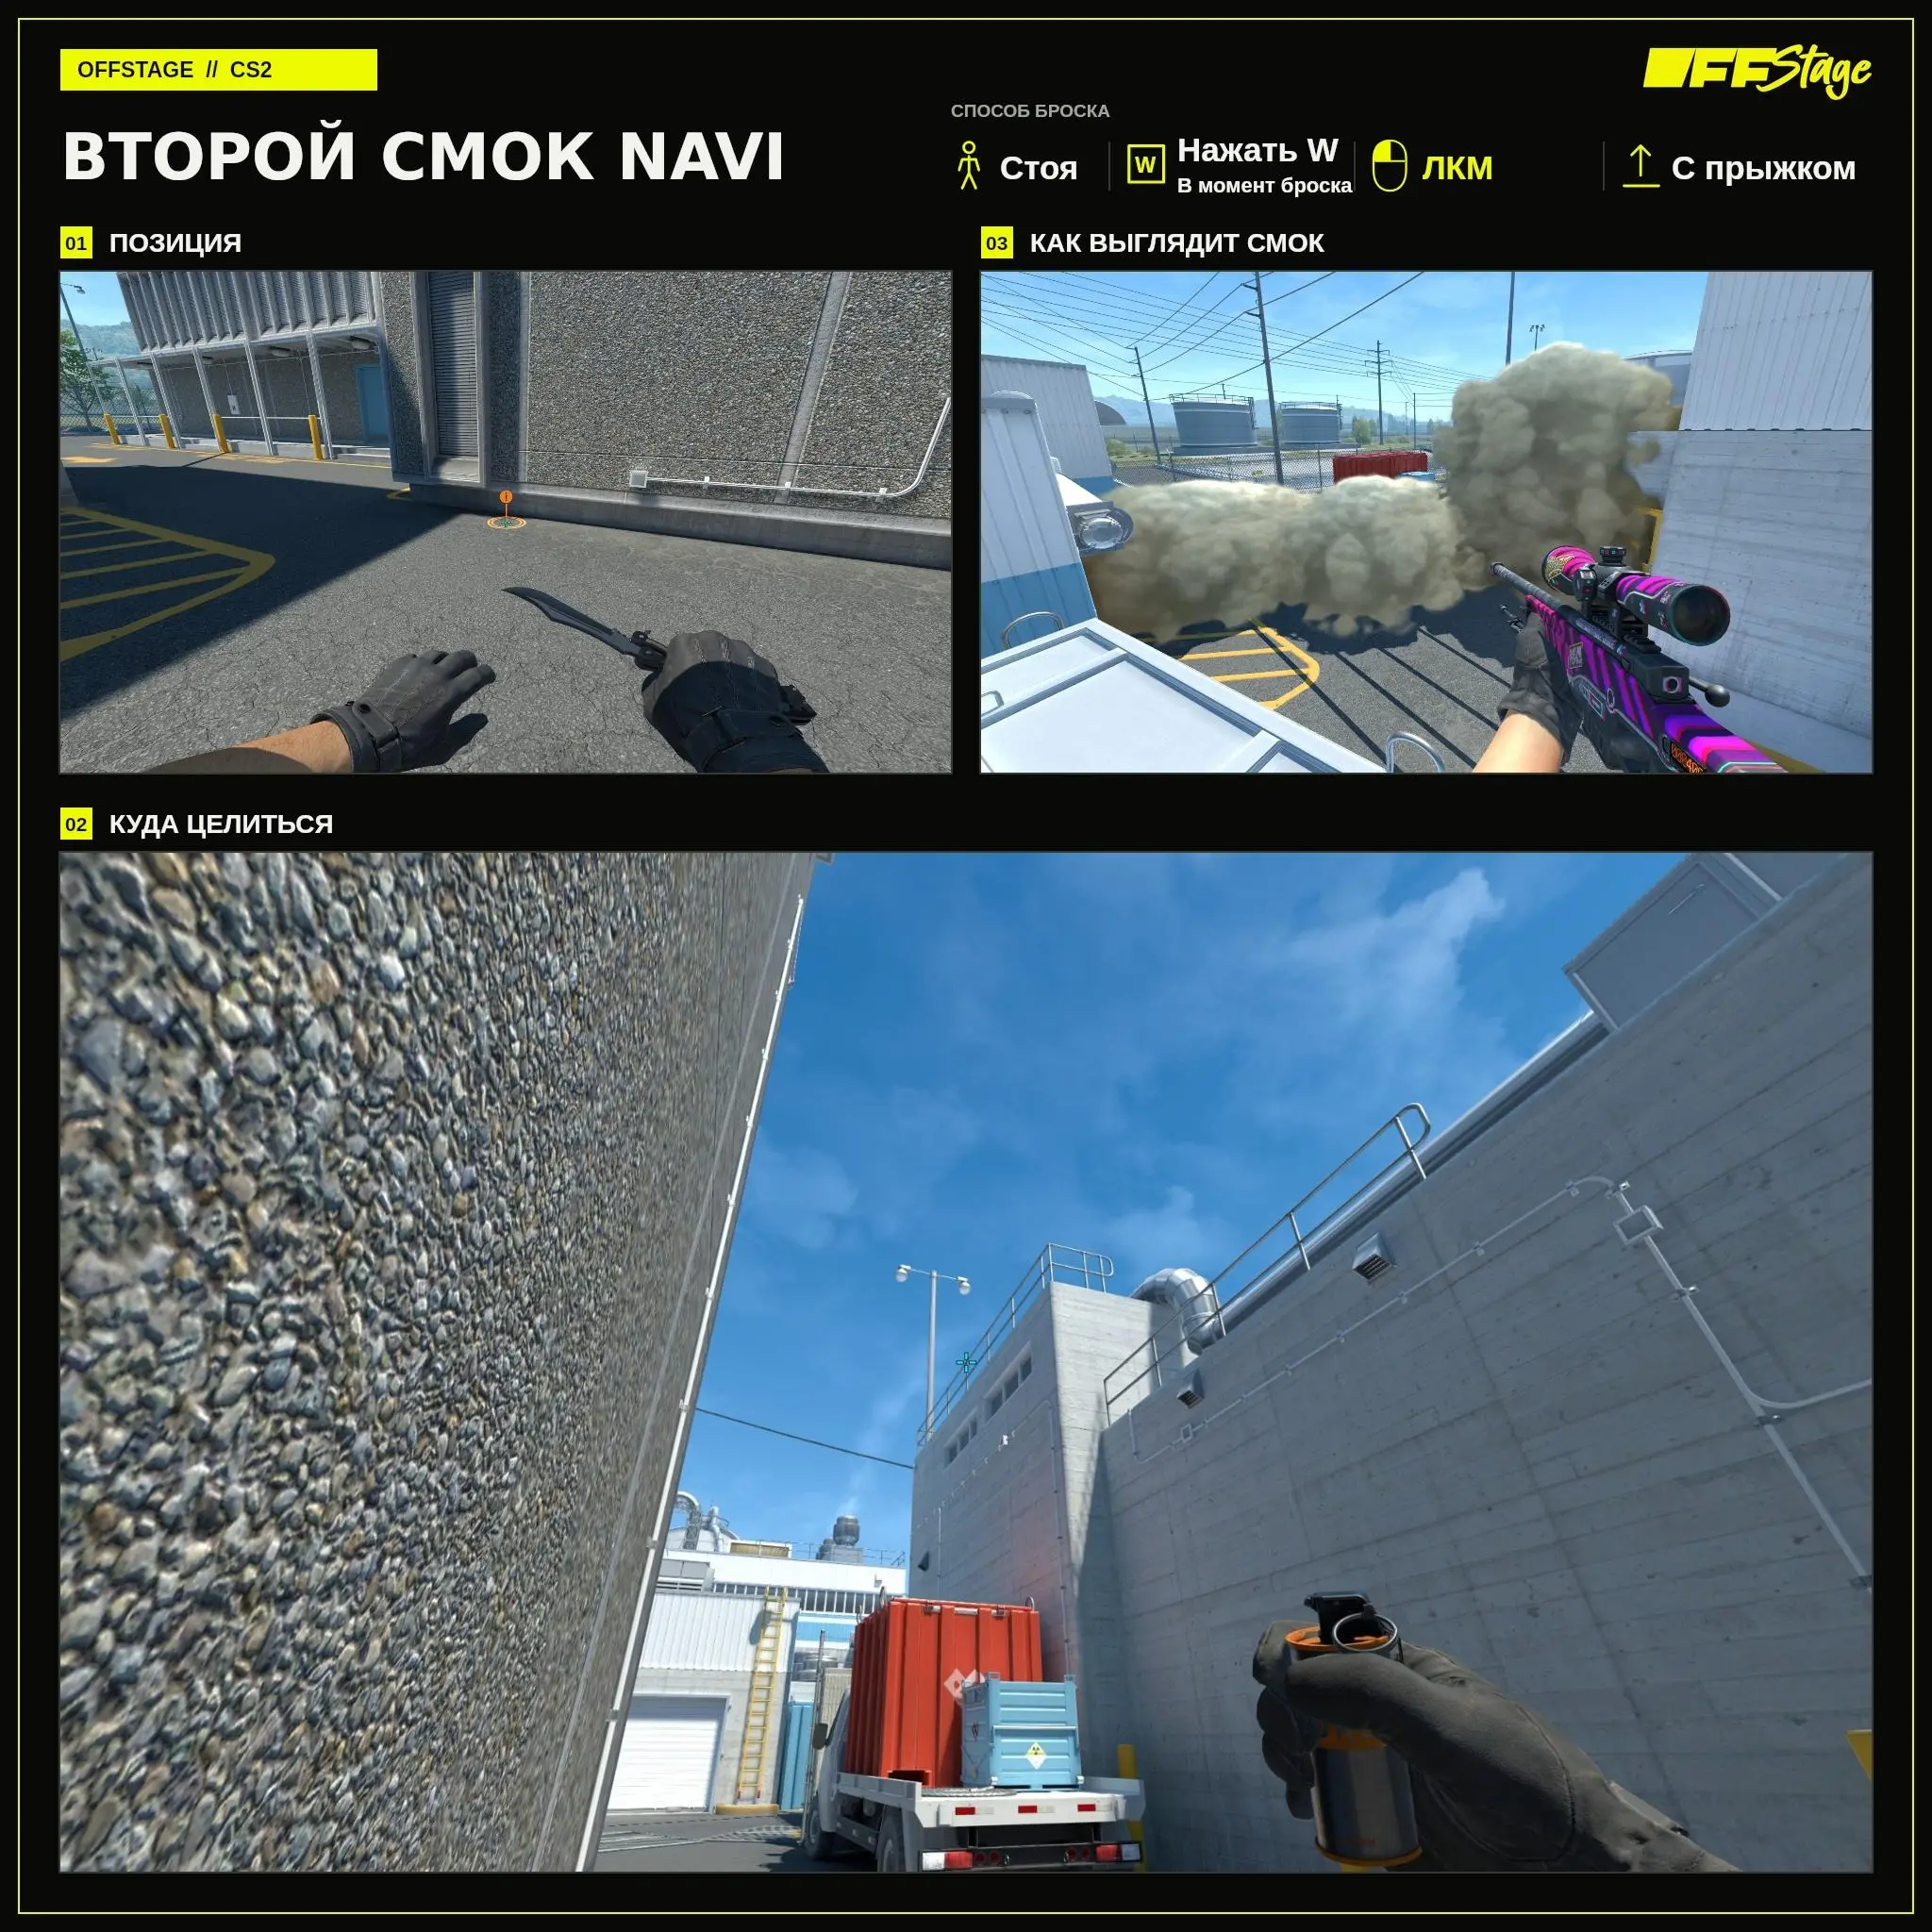
NAVI’s second smoke grenade
The second NAVI player covers the remaining part of the wall. Before heading out, agree on who will throw each smoke and when the team starts moving. Even if both grenades land exactly where intended, a smoke grenade that lands too late can expose the first player to a sniper. Wait until the smoke has fully cleared.
Stand by the same wall and aim at the roof using this pattern. The moment you throw, press W, jump, and release the left mouse button. There’s no need to start running ahead of time: here, you need to briefly press forward at the same time as you throw. Then practice throwing the smoke grenade in combination with the first NAVI and the main.
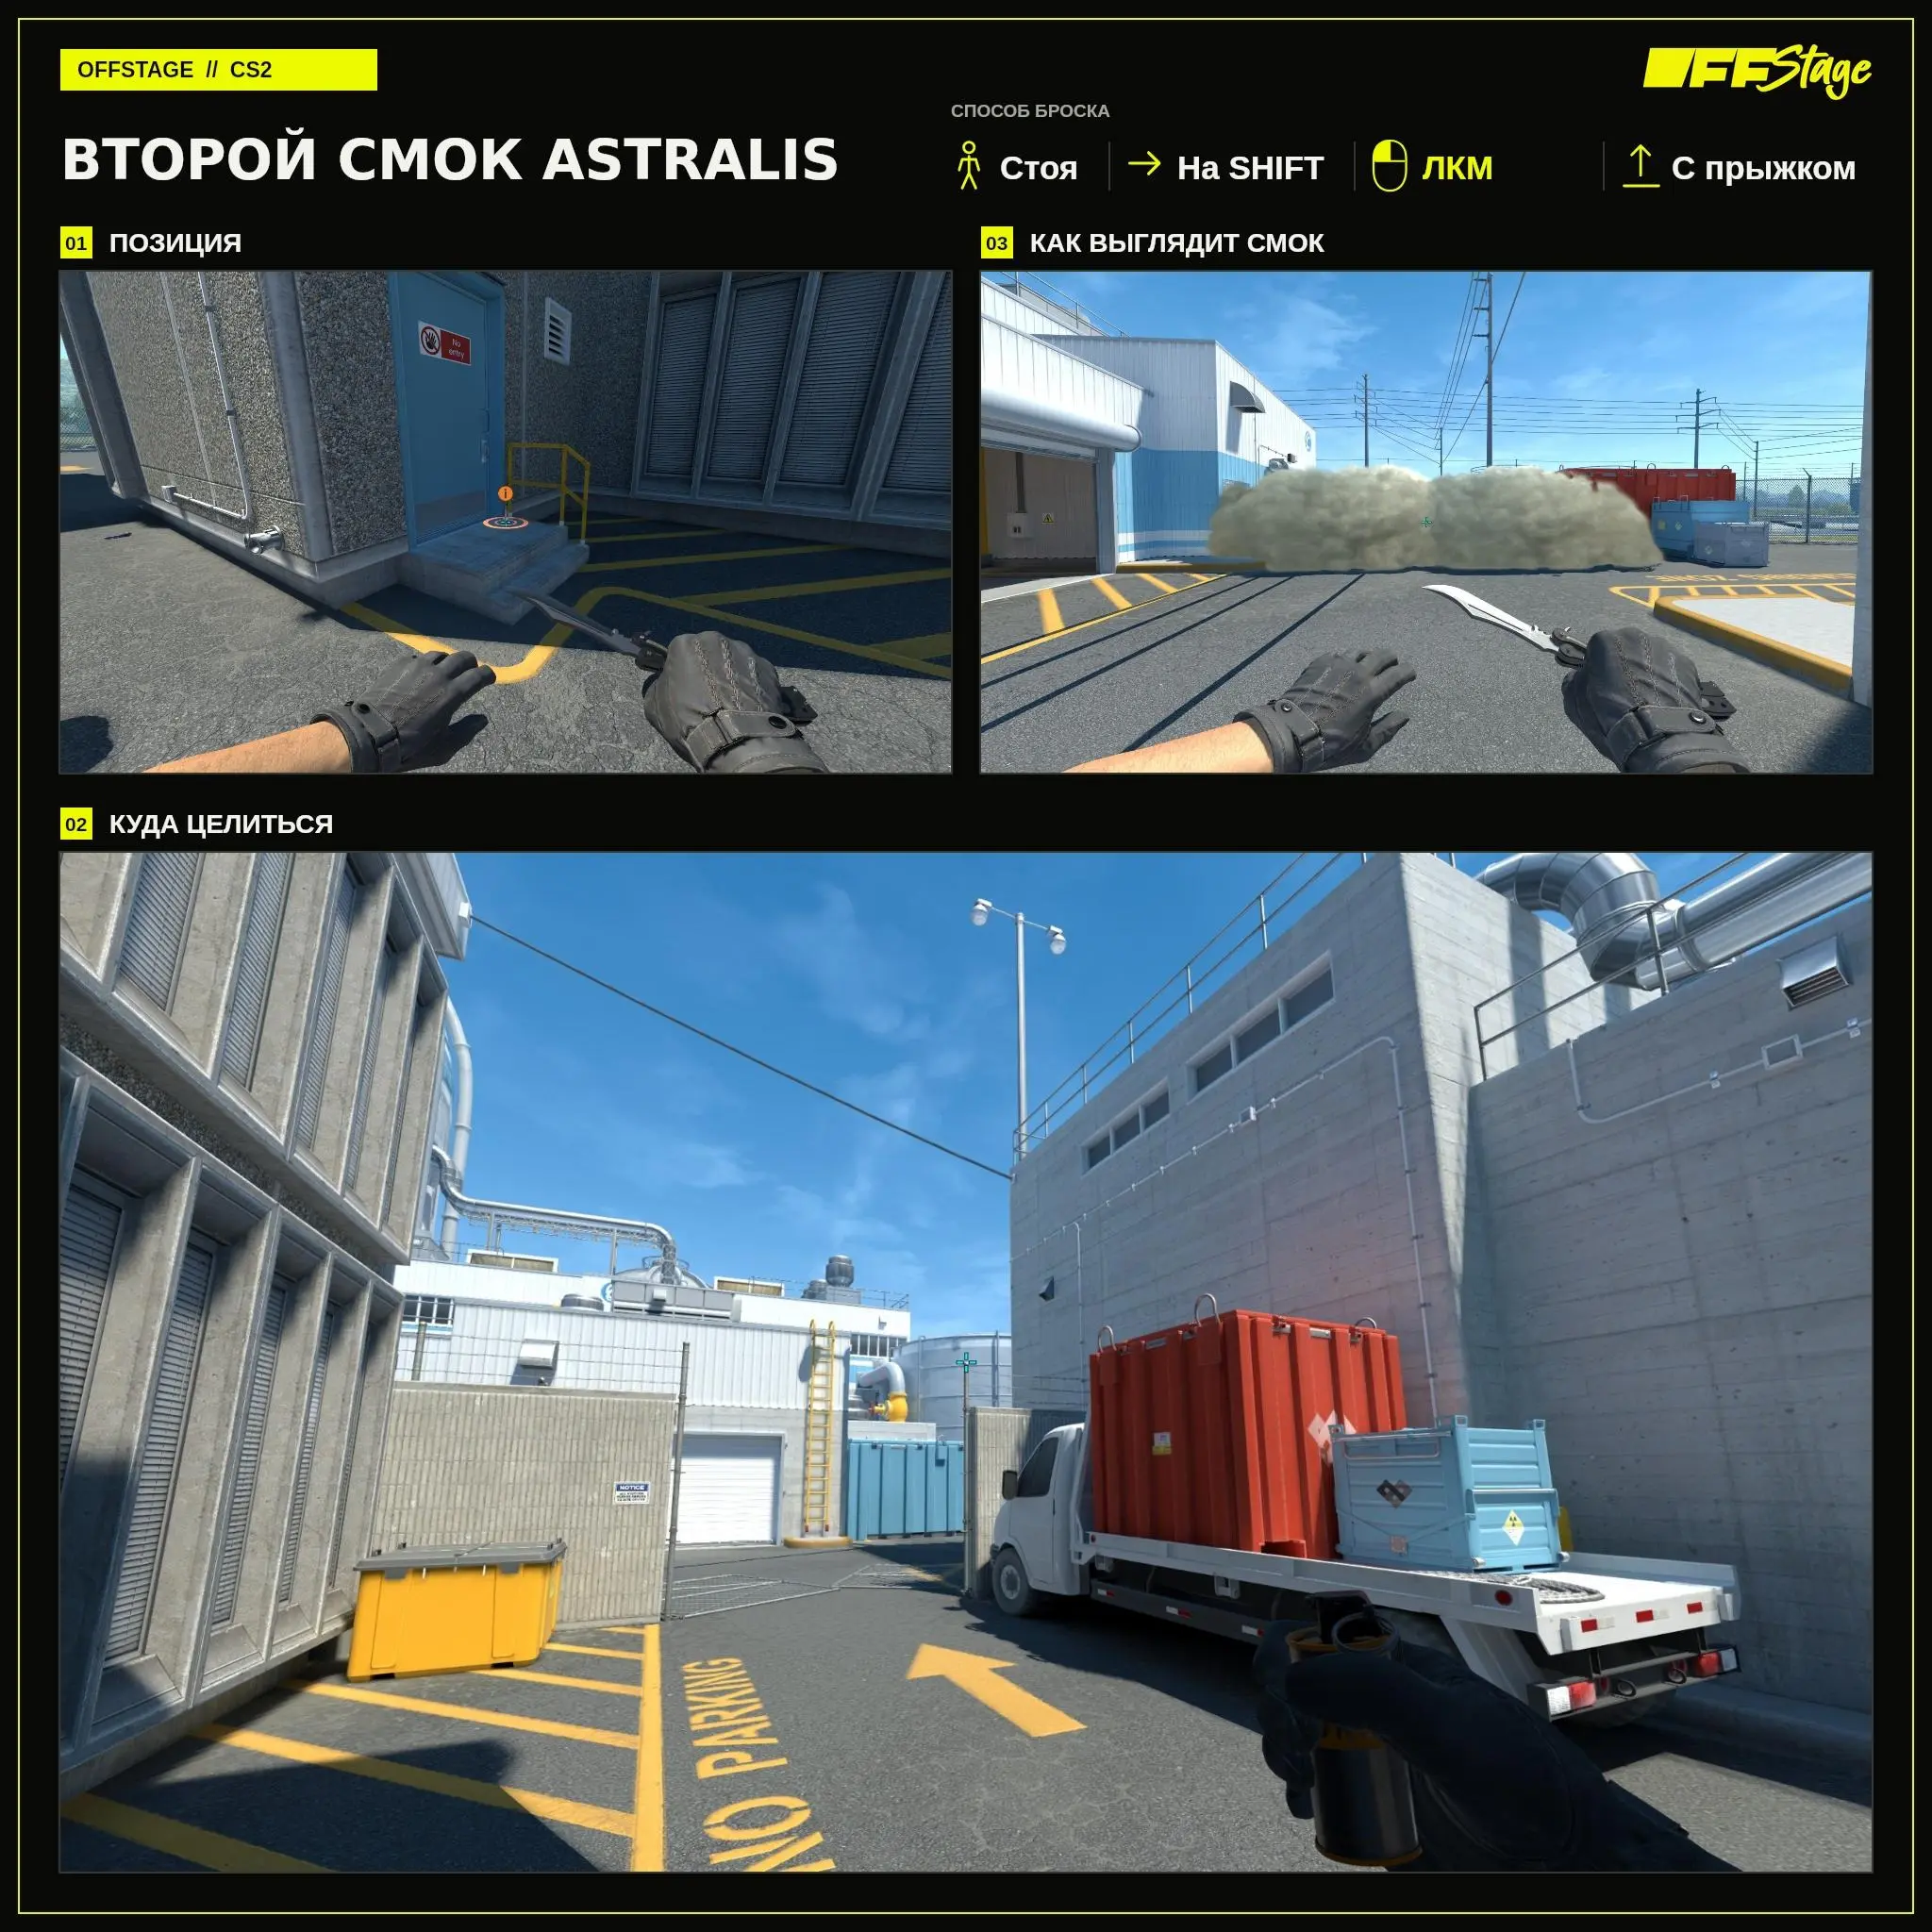
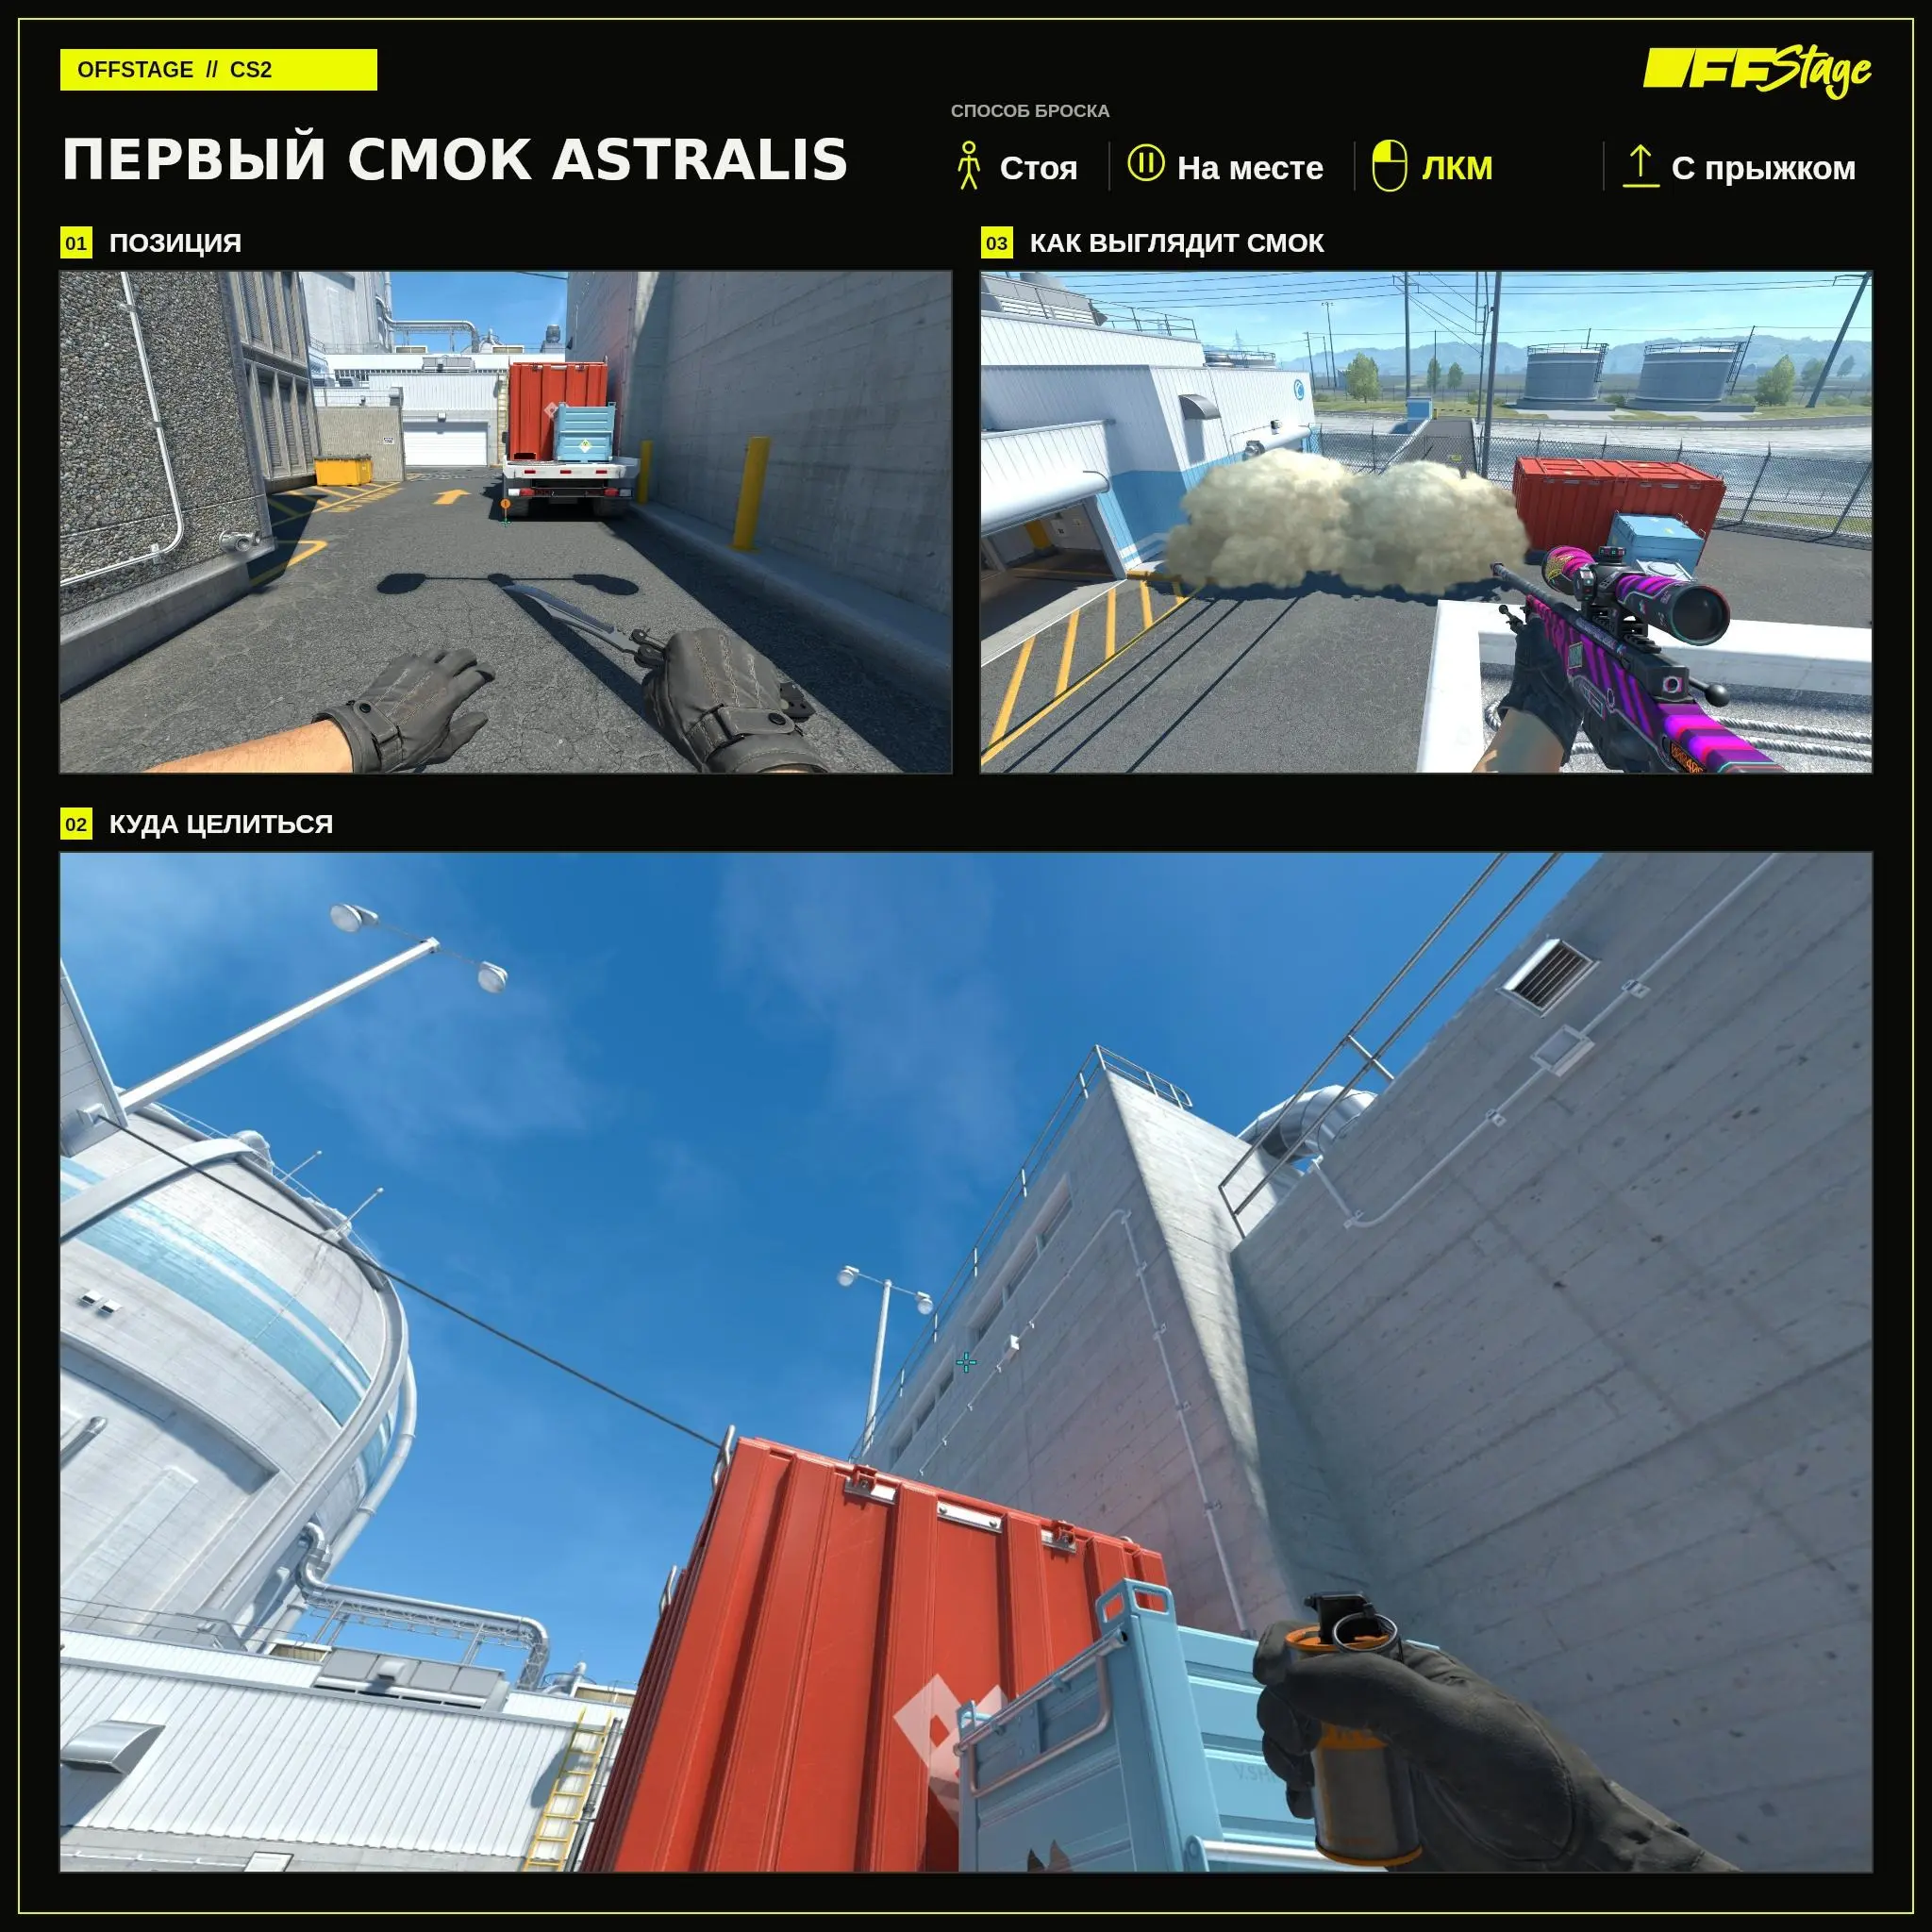
First Astralis smoke from the truck
You can also throw the Astralis wall smoke from the truck with the red container. The goal is the same—to cover the passage along the street leading to the secret spot. This option is convenient because both smoke grenades are thrown from a standing position. Choose one of the two Astralis pairs and practice both throws so you have a set spread ready for the exit.
Approach the marked spot behind the truck. Aim at the wall above the red container as shown in the large screenshot and left-click to throw while jumping from a standing position. Make sure to take your position precisely first: if you start aiming while still approaching, it’s easy to end up in the wrong spot.
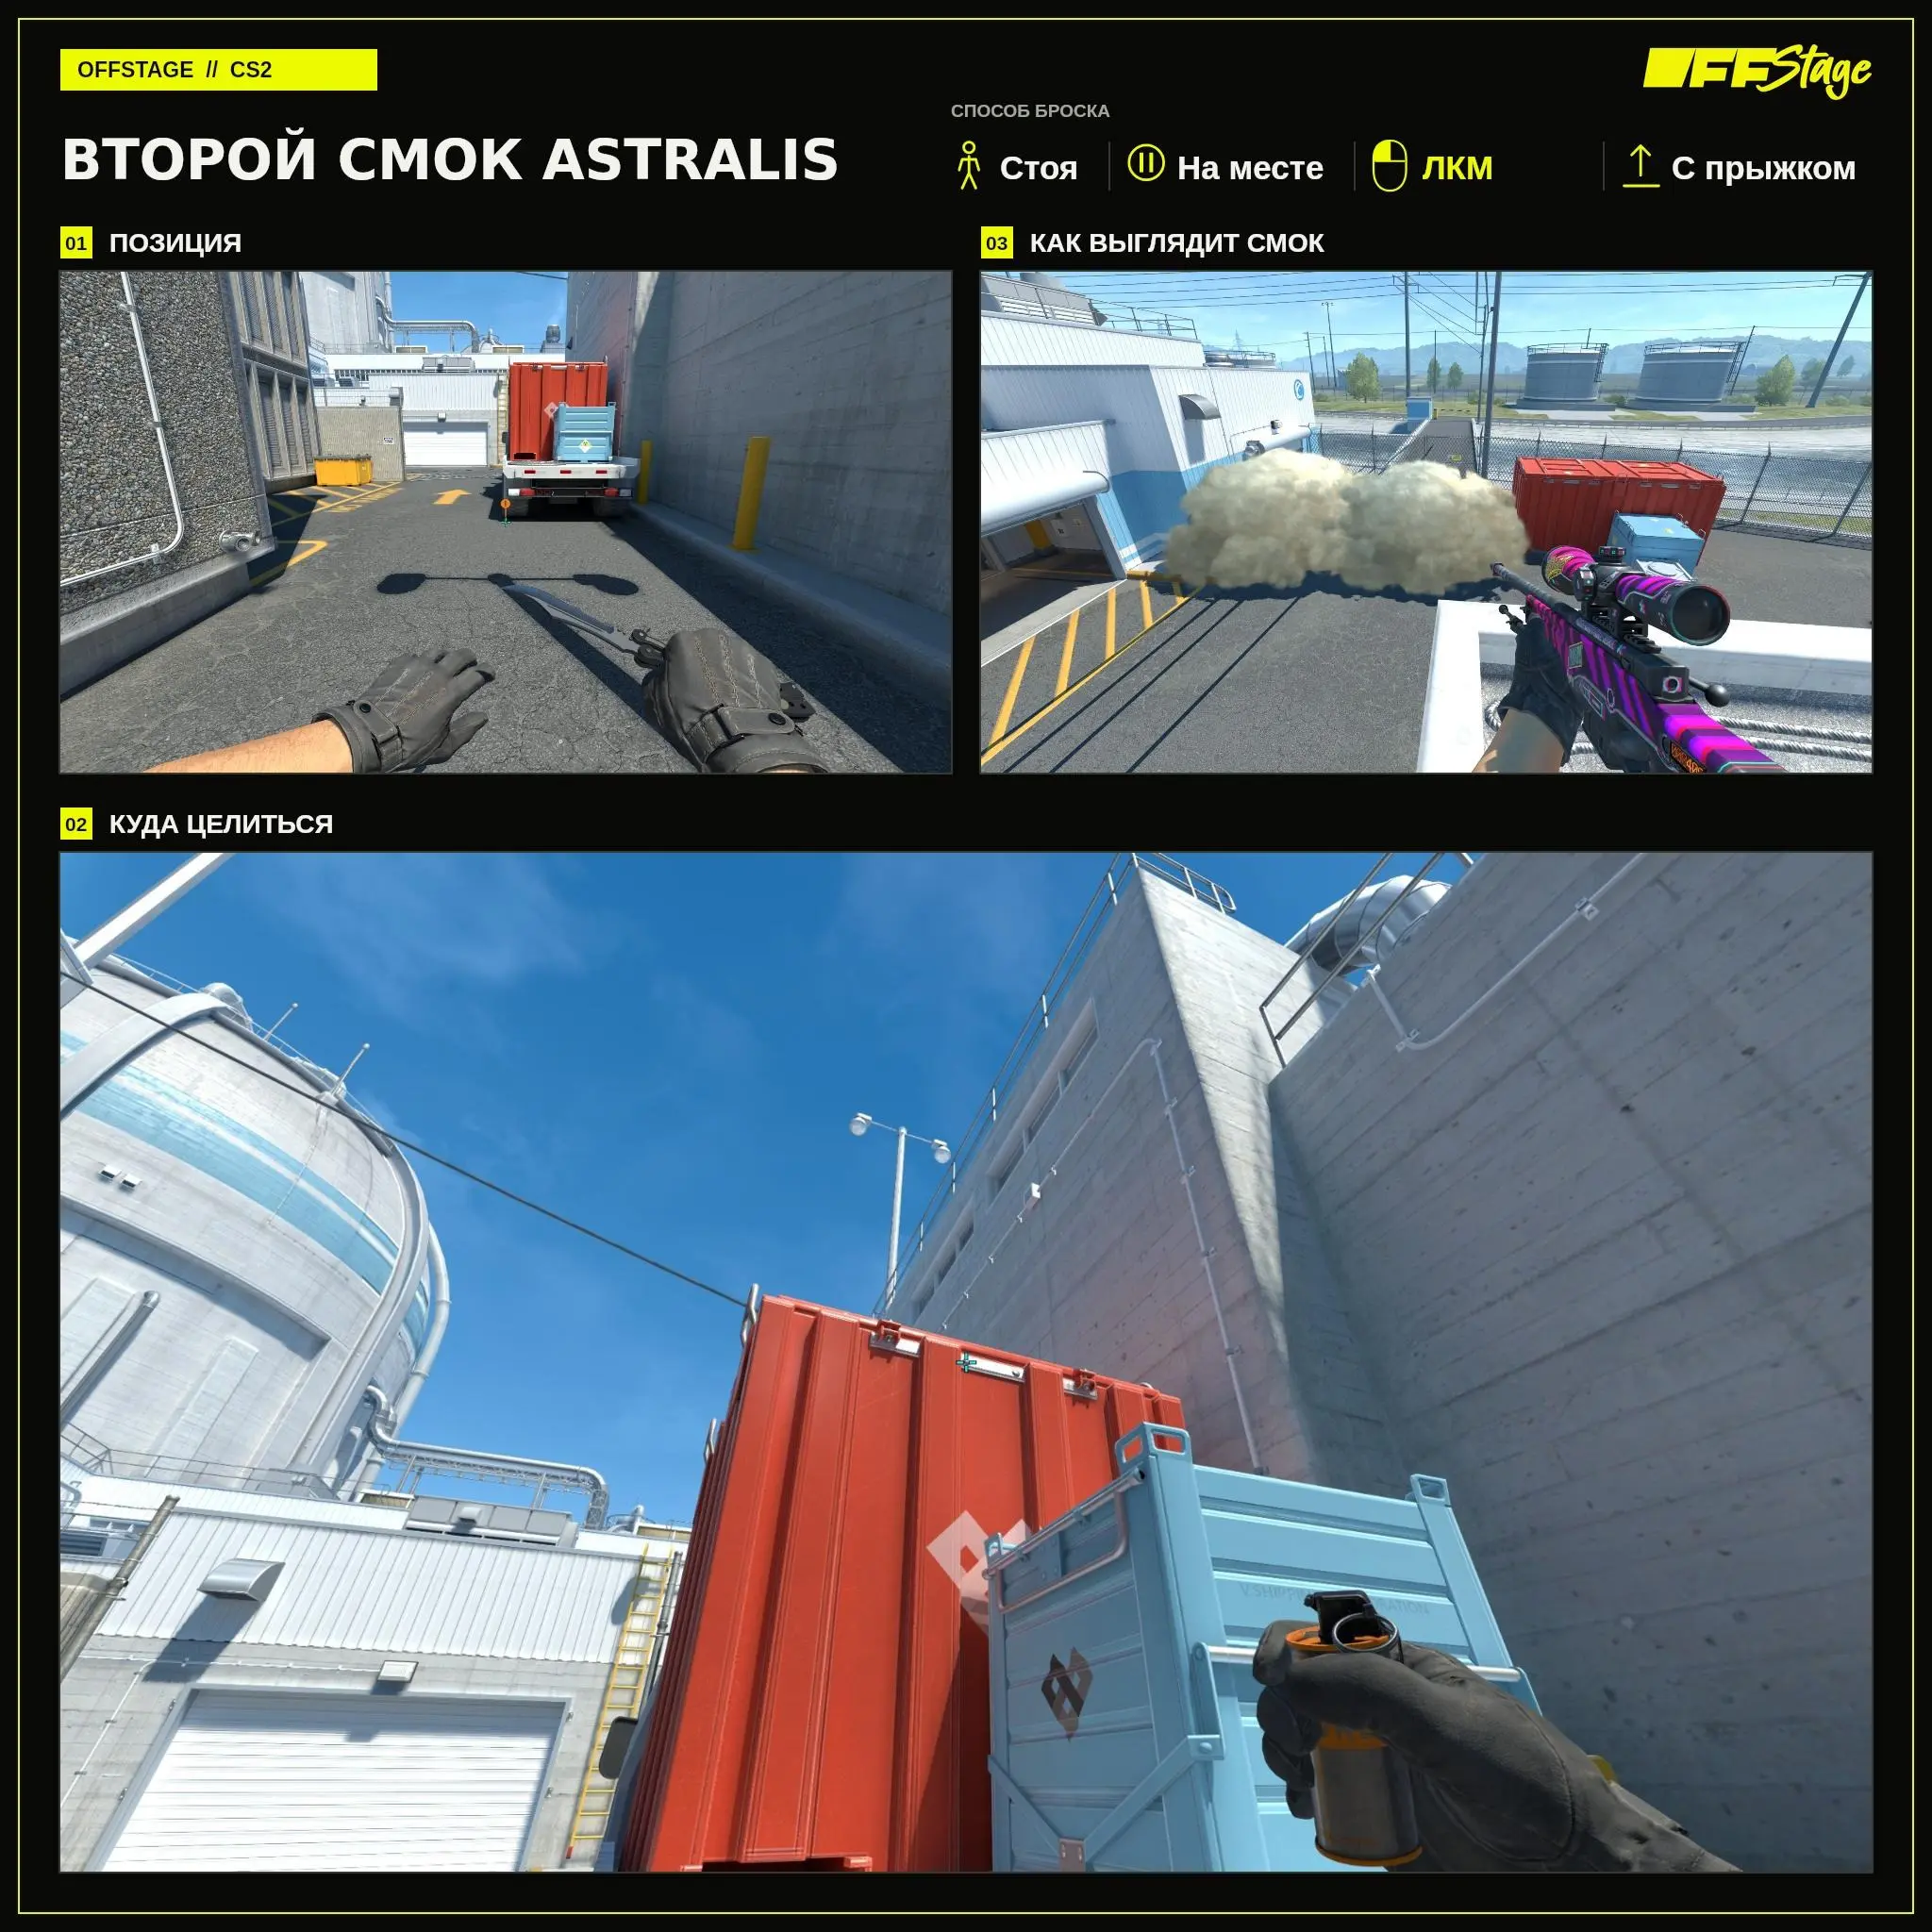
Astralis’s second smoke from the truck
The second smoke from the truck completes this Astralis pair. Behind the wall, you can send players into the secret or leave one lurker behind while the rest prepare to exit through the lobby. You don’t have to go behind the smoke screens every round: sometimes it’s useful to use your usual spread and play in another part of the map.
Stay at the same spot behind the truck and aim at the light-colored detail at the top of the red container. Left-click to jump from a standing position. You don’t need to press Shift here—this movement applies to the route from the blue door. After jumping, check to see if there’s a gap between the two smoke grenades.
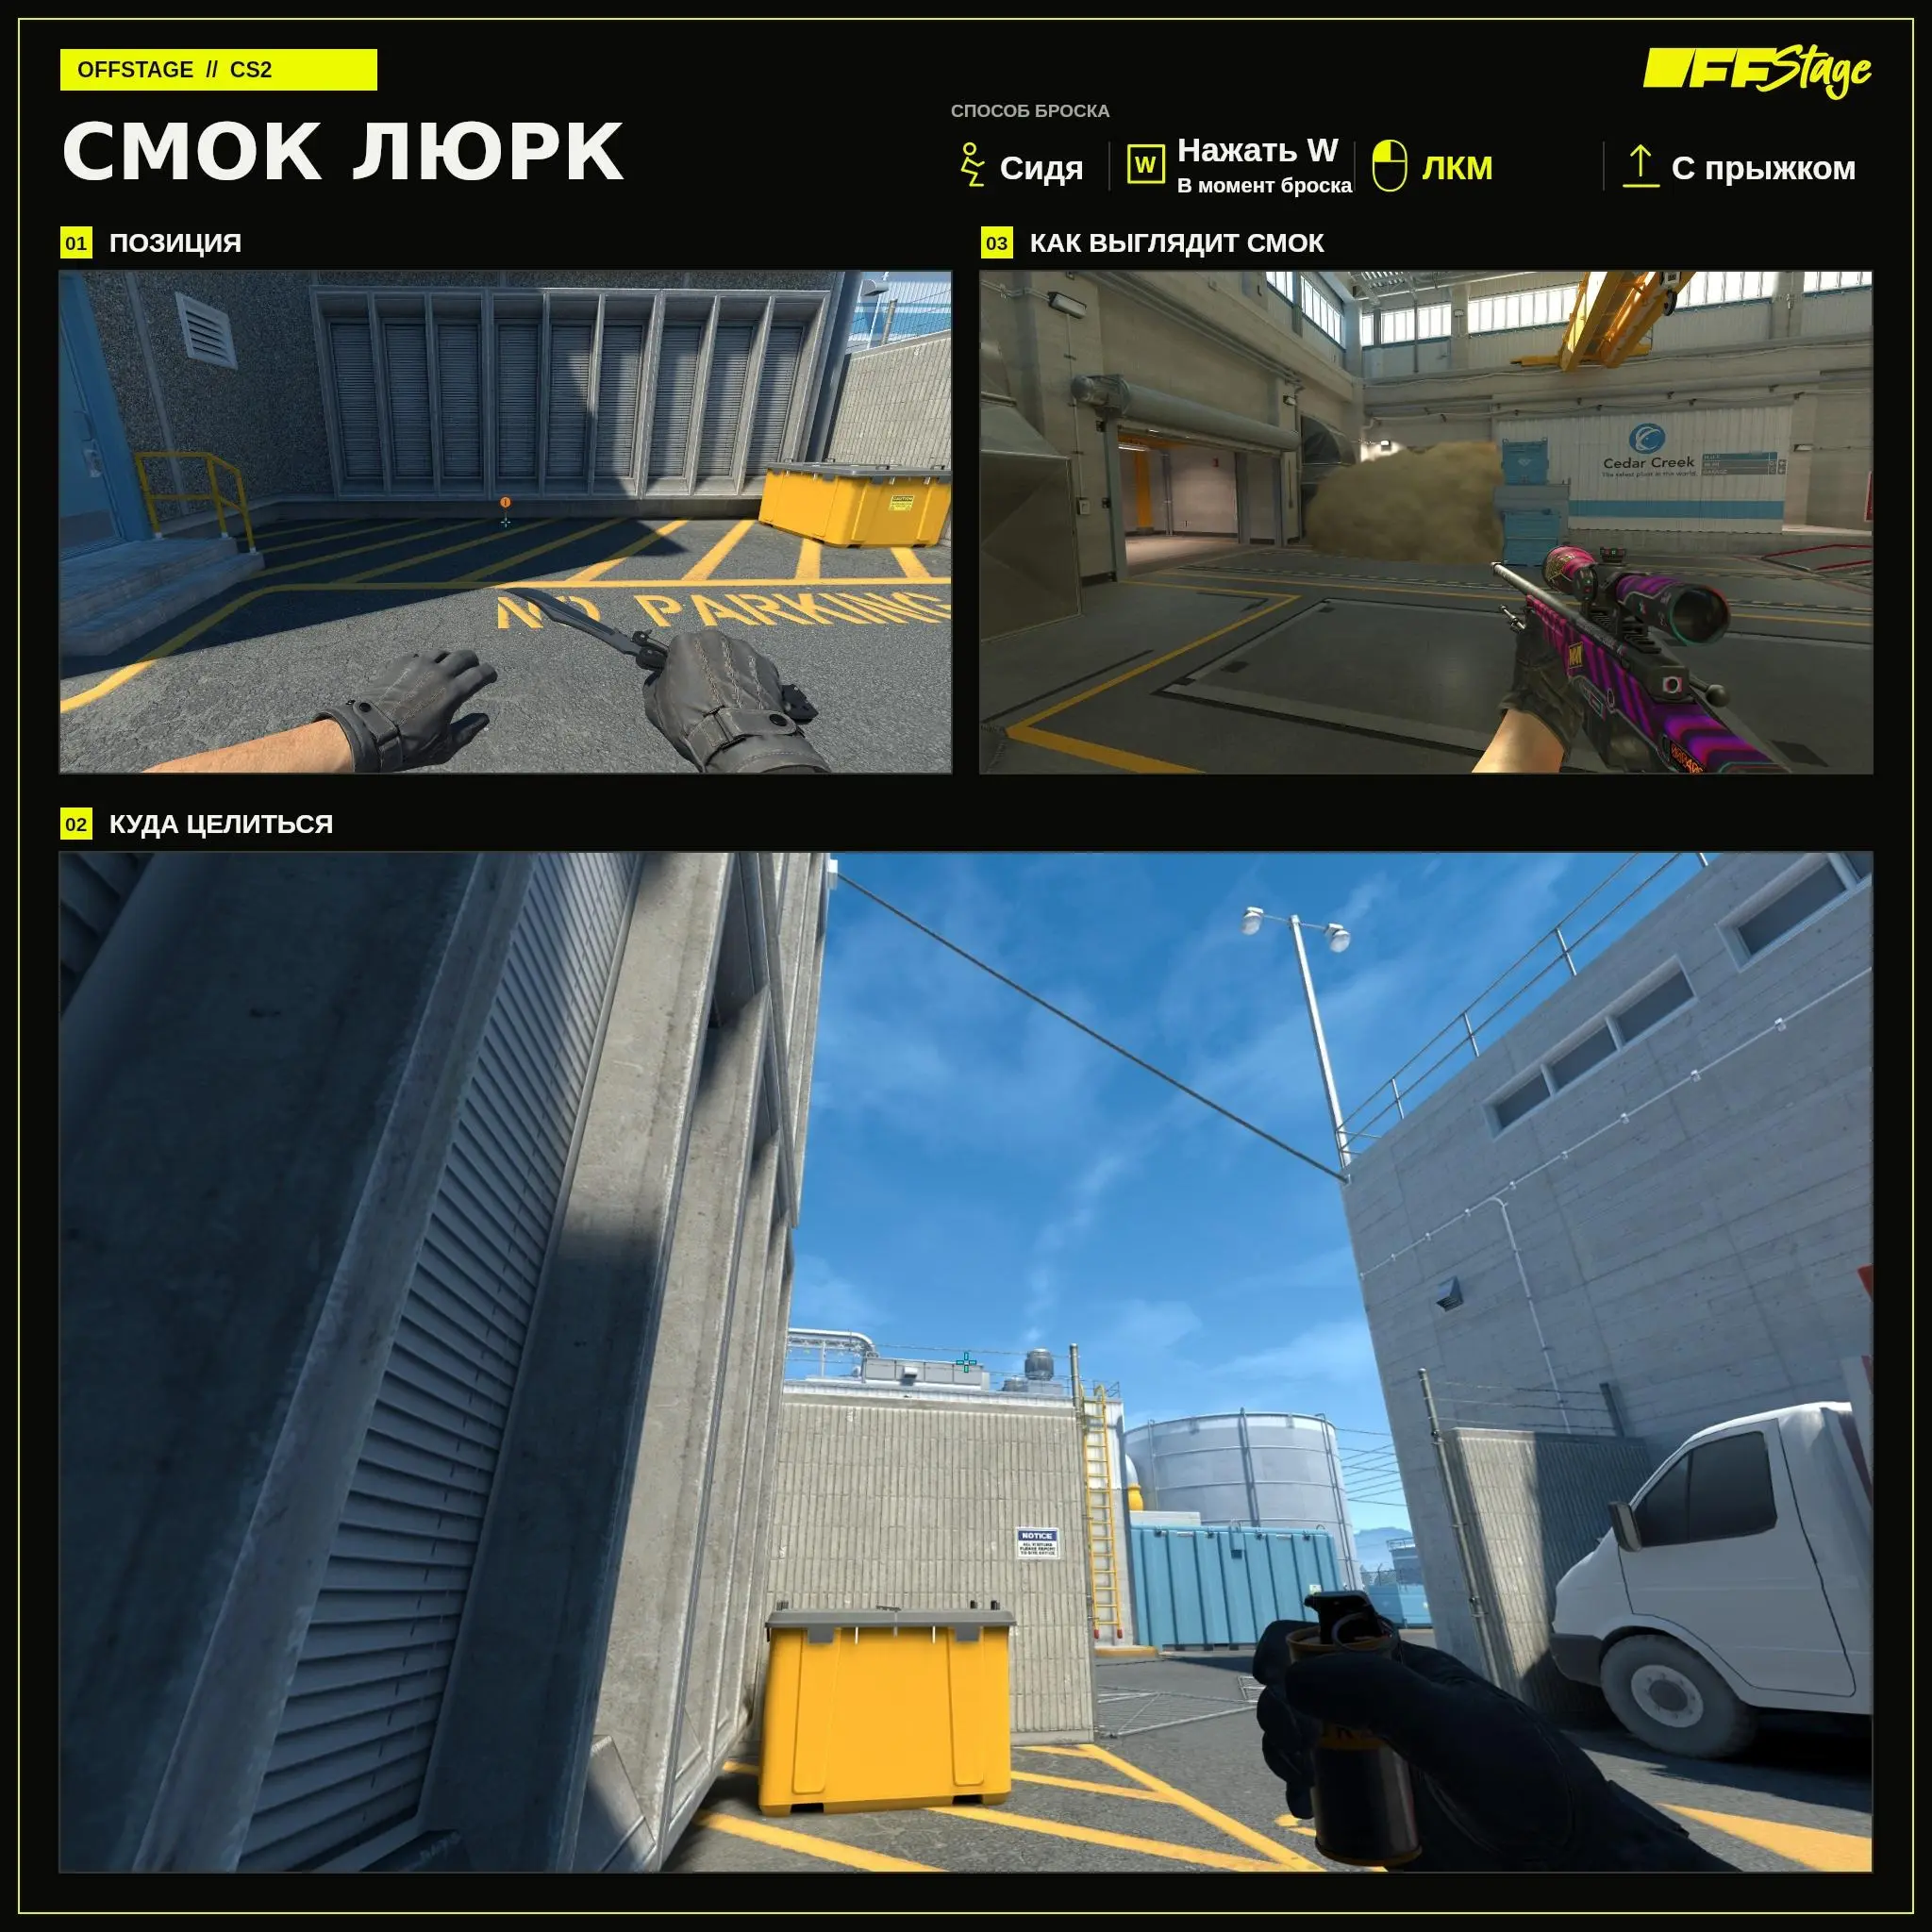
Smoke Lurk from the T-spawn
The T-spawn lurk-smoke is placed by the door and the vent on A. It helps a player from the lobby get to the vents while the team distracts the defenders. But if you jump down immediately every time, your opponent will quickly figure it out. Sometimes leave a smoke without an exit or wait behind it to avoid playing the same round over and over.
Crouch by the vent panels between the blue door and the yellow container at the T-spawn. Aim at the roof opposite you as shown in the diagram. The moment you throw, press W and left-click while jumping from a crouch. There’s no need to start standing or move forward in advance—that will already alter the throw.
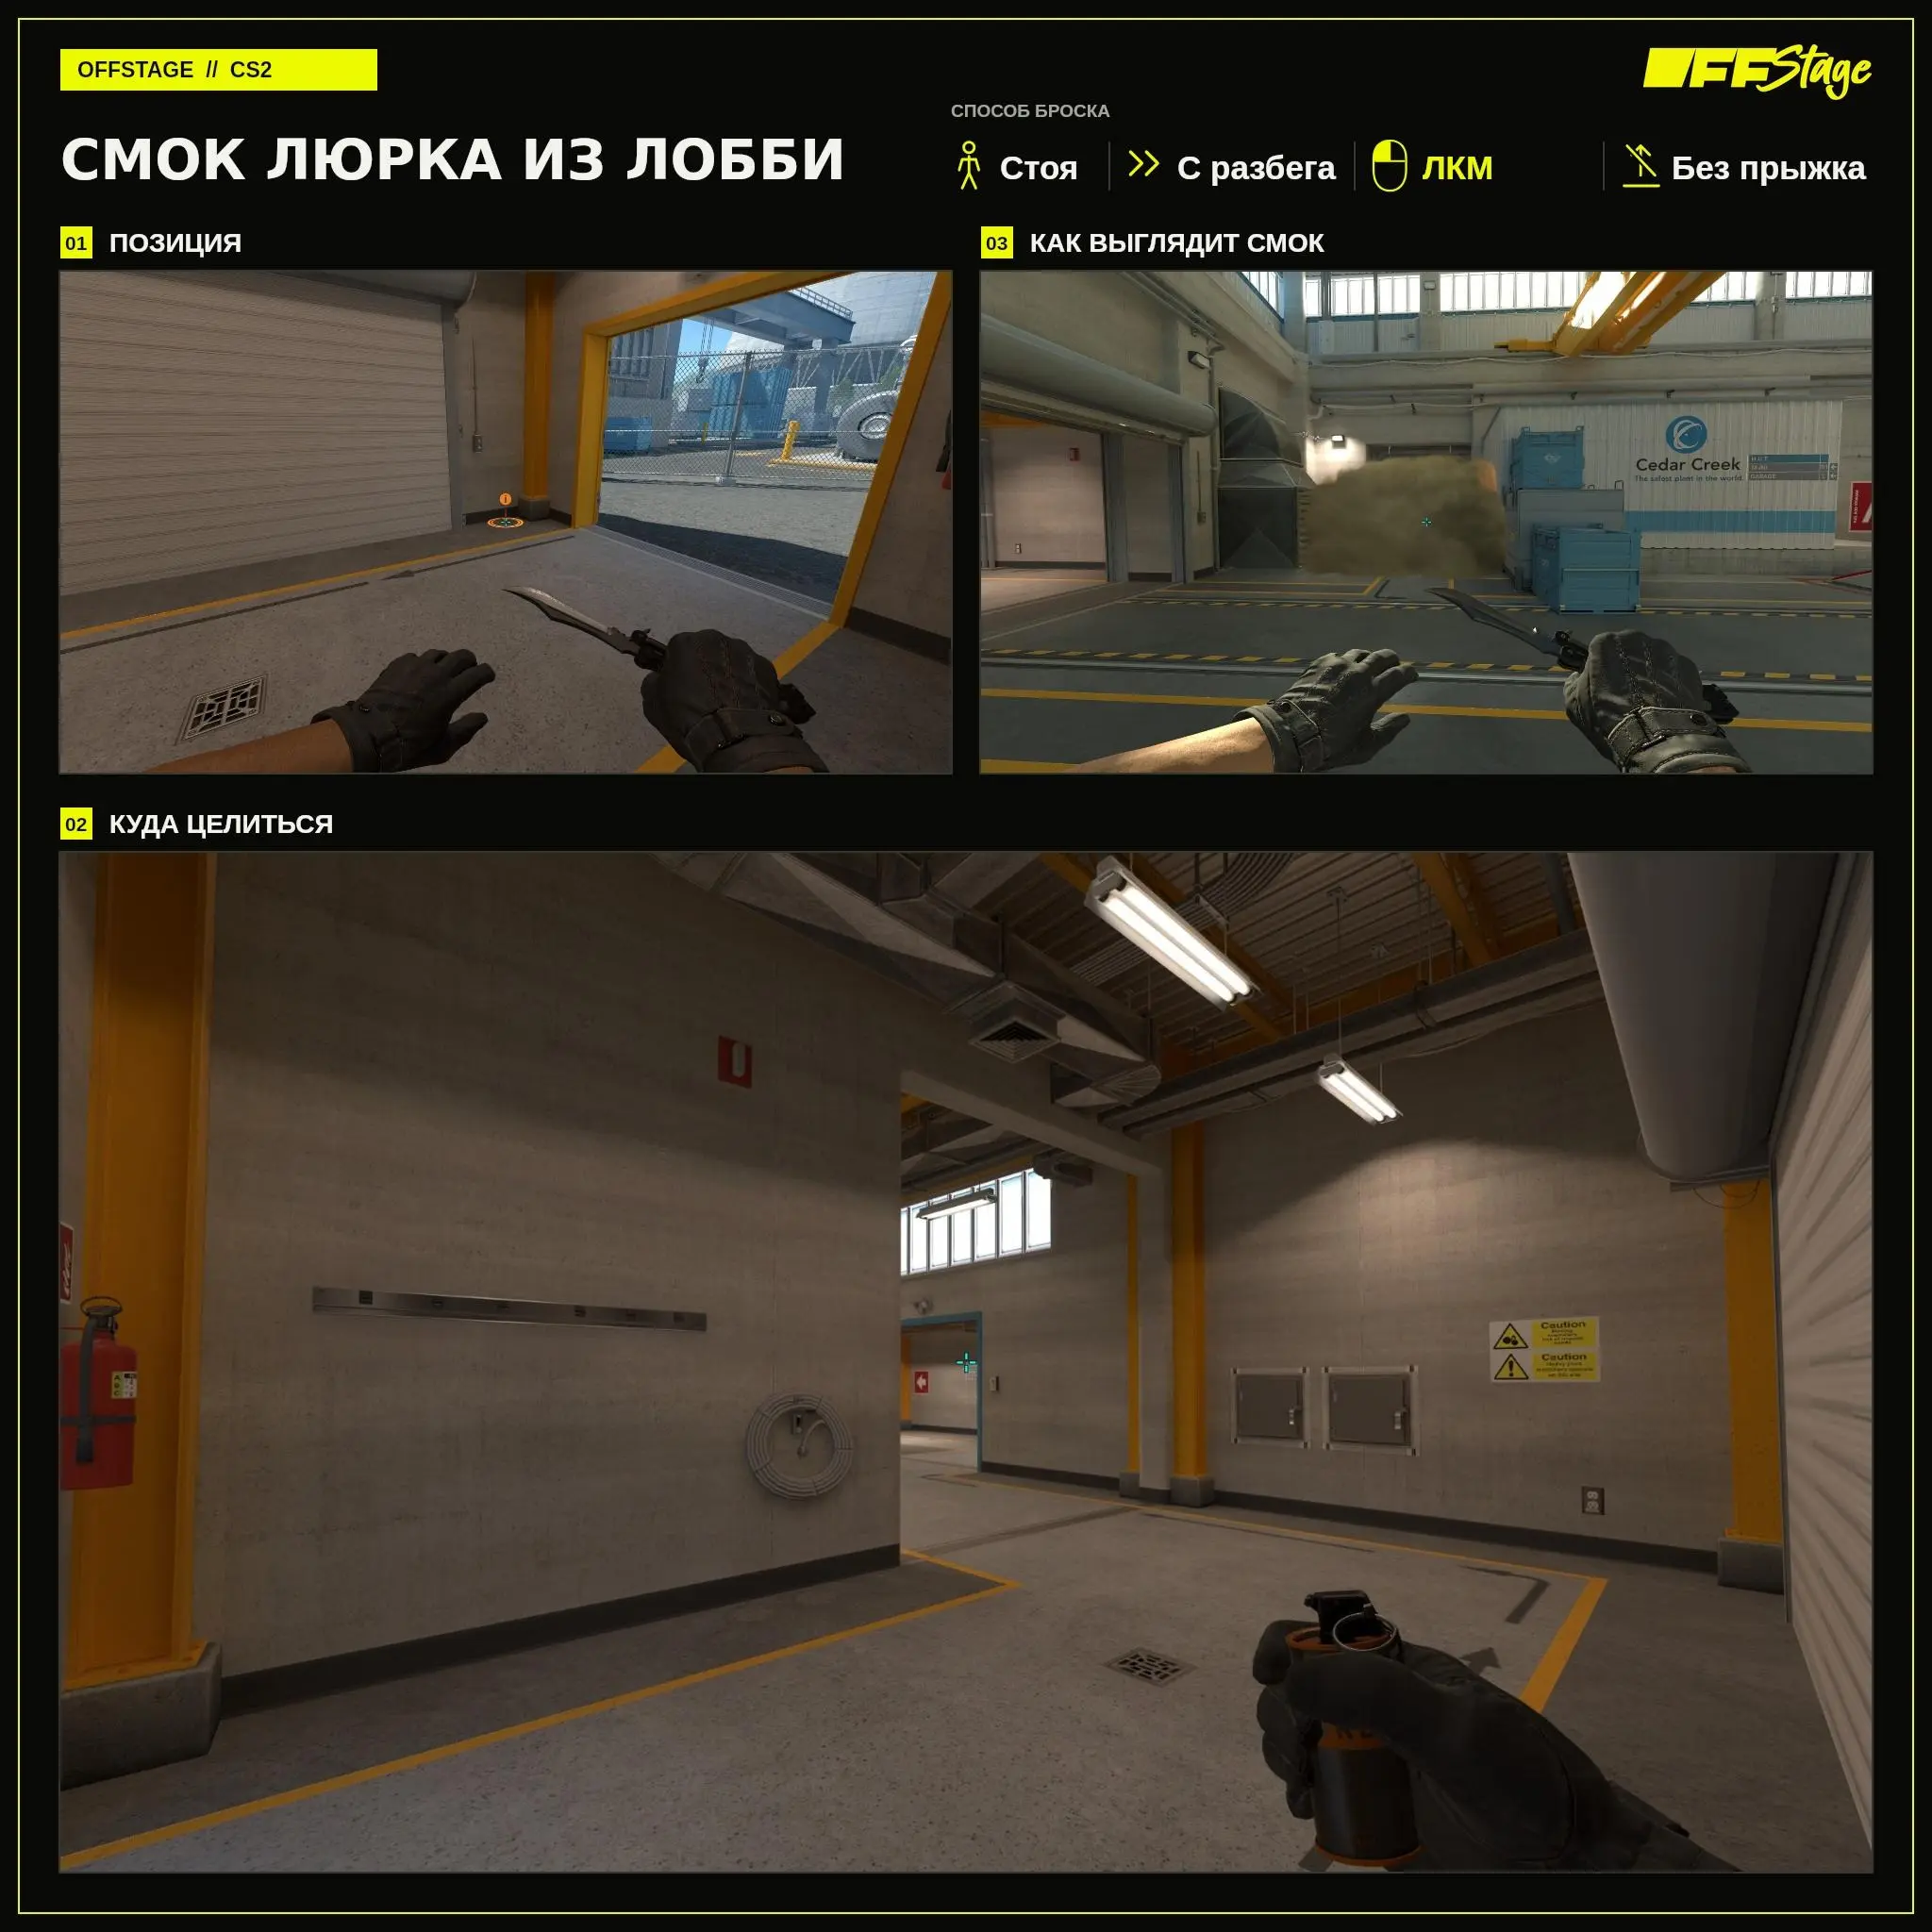
Lurk-Smoke from the Lobby
This Lurk-Smoke can be deployed from the lobby while the team is already preparing to push to A. It lands near the door and vents, helping you get closer. Before moving through, agree on who will provide cover: the A-side support can position themselves right by the smoke, even if nothing is visible behind it.
Start at the edge of the wide opening with the yellow frame, as shown in the first screenshot. Aim at the top of the doorway deep inside the lobby, as shown in the diagram. Throw with the left mouse button while running up to it, without jumping. Practice timing your throw so you don’t release the grenade too early or too late.
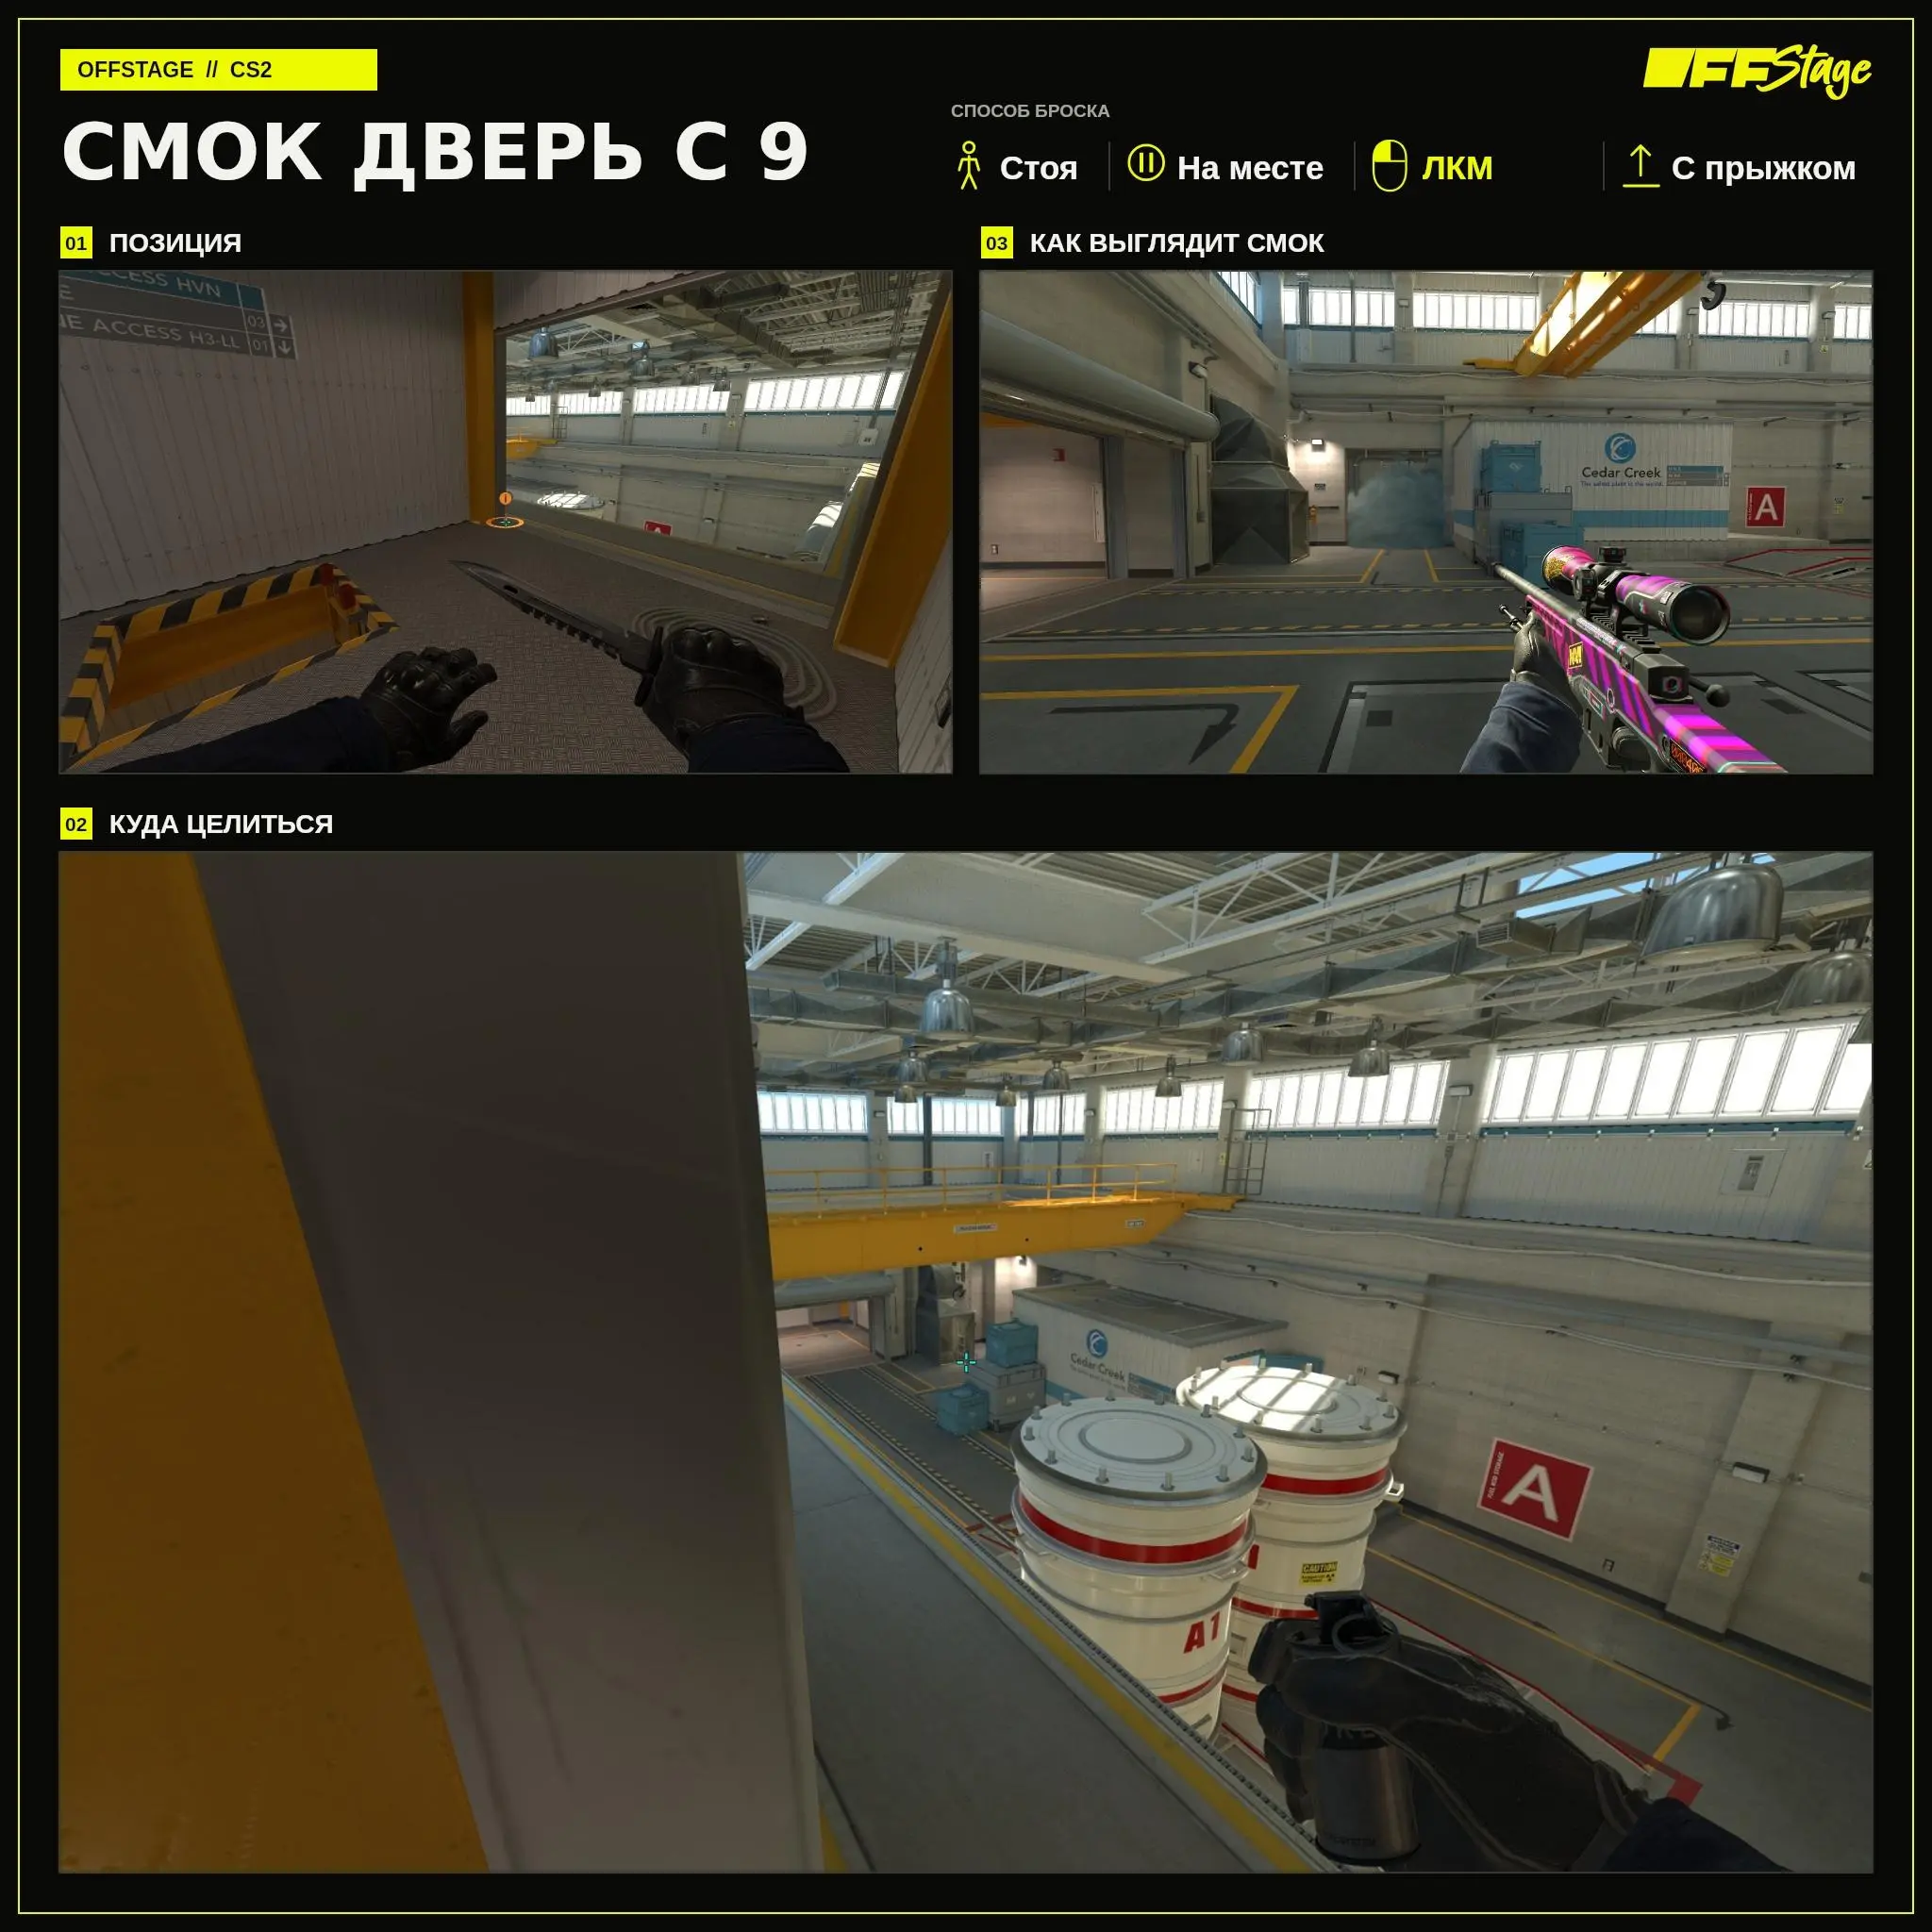
Smoke grenade into the door from the 9
A smoke grenade thrown through the door from the “9” position helps the A-side defenders hold the lobby exit. It’s convenient to throw this if your partner on the “plent” is busy with the guard post and you can already hear footsteps approaching the door. You don’t need to come down from the “9” to throw it. The smoke will give you time to prepare for the exit, but it’s best to keep your weapon at the ready.
Stand at the left edge of the Room 9 doorway. Aim down, near the blue crates by the door, referring to the map. Left-click while jumping from a standing position. After the throw, keep watching A: the door is blocked by smoke, but opponents can still come out through the booth.
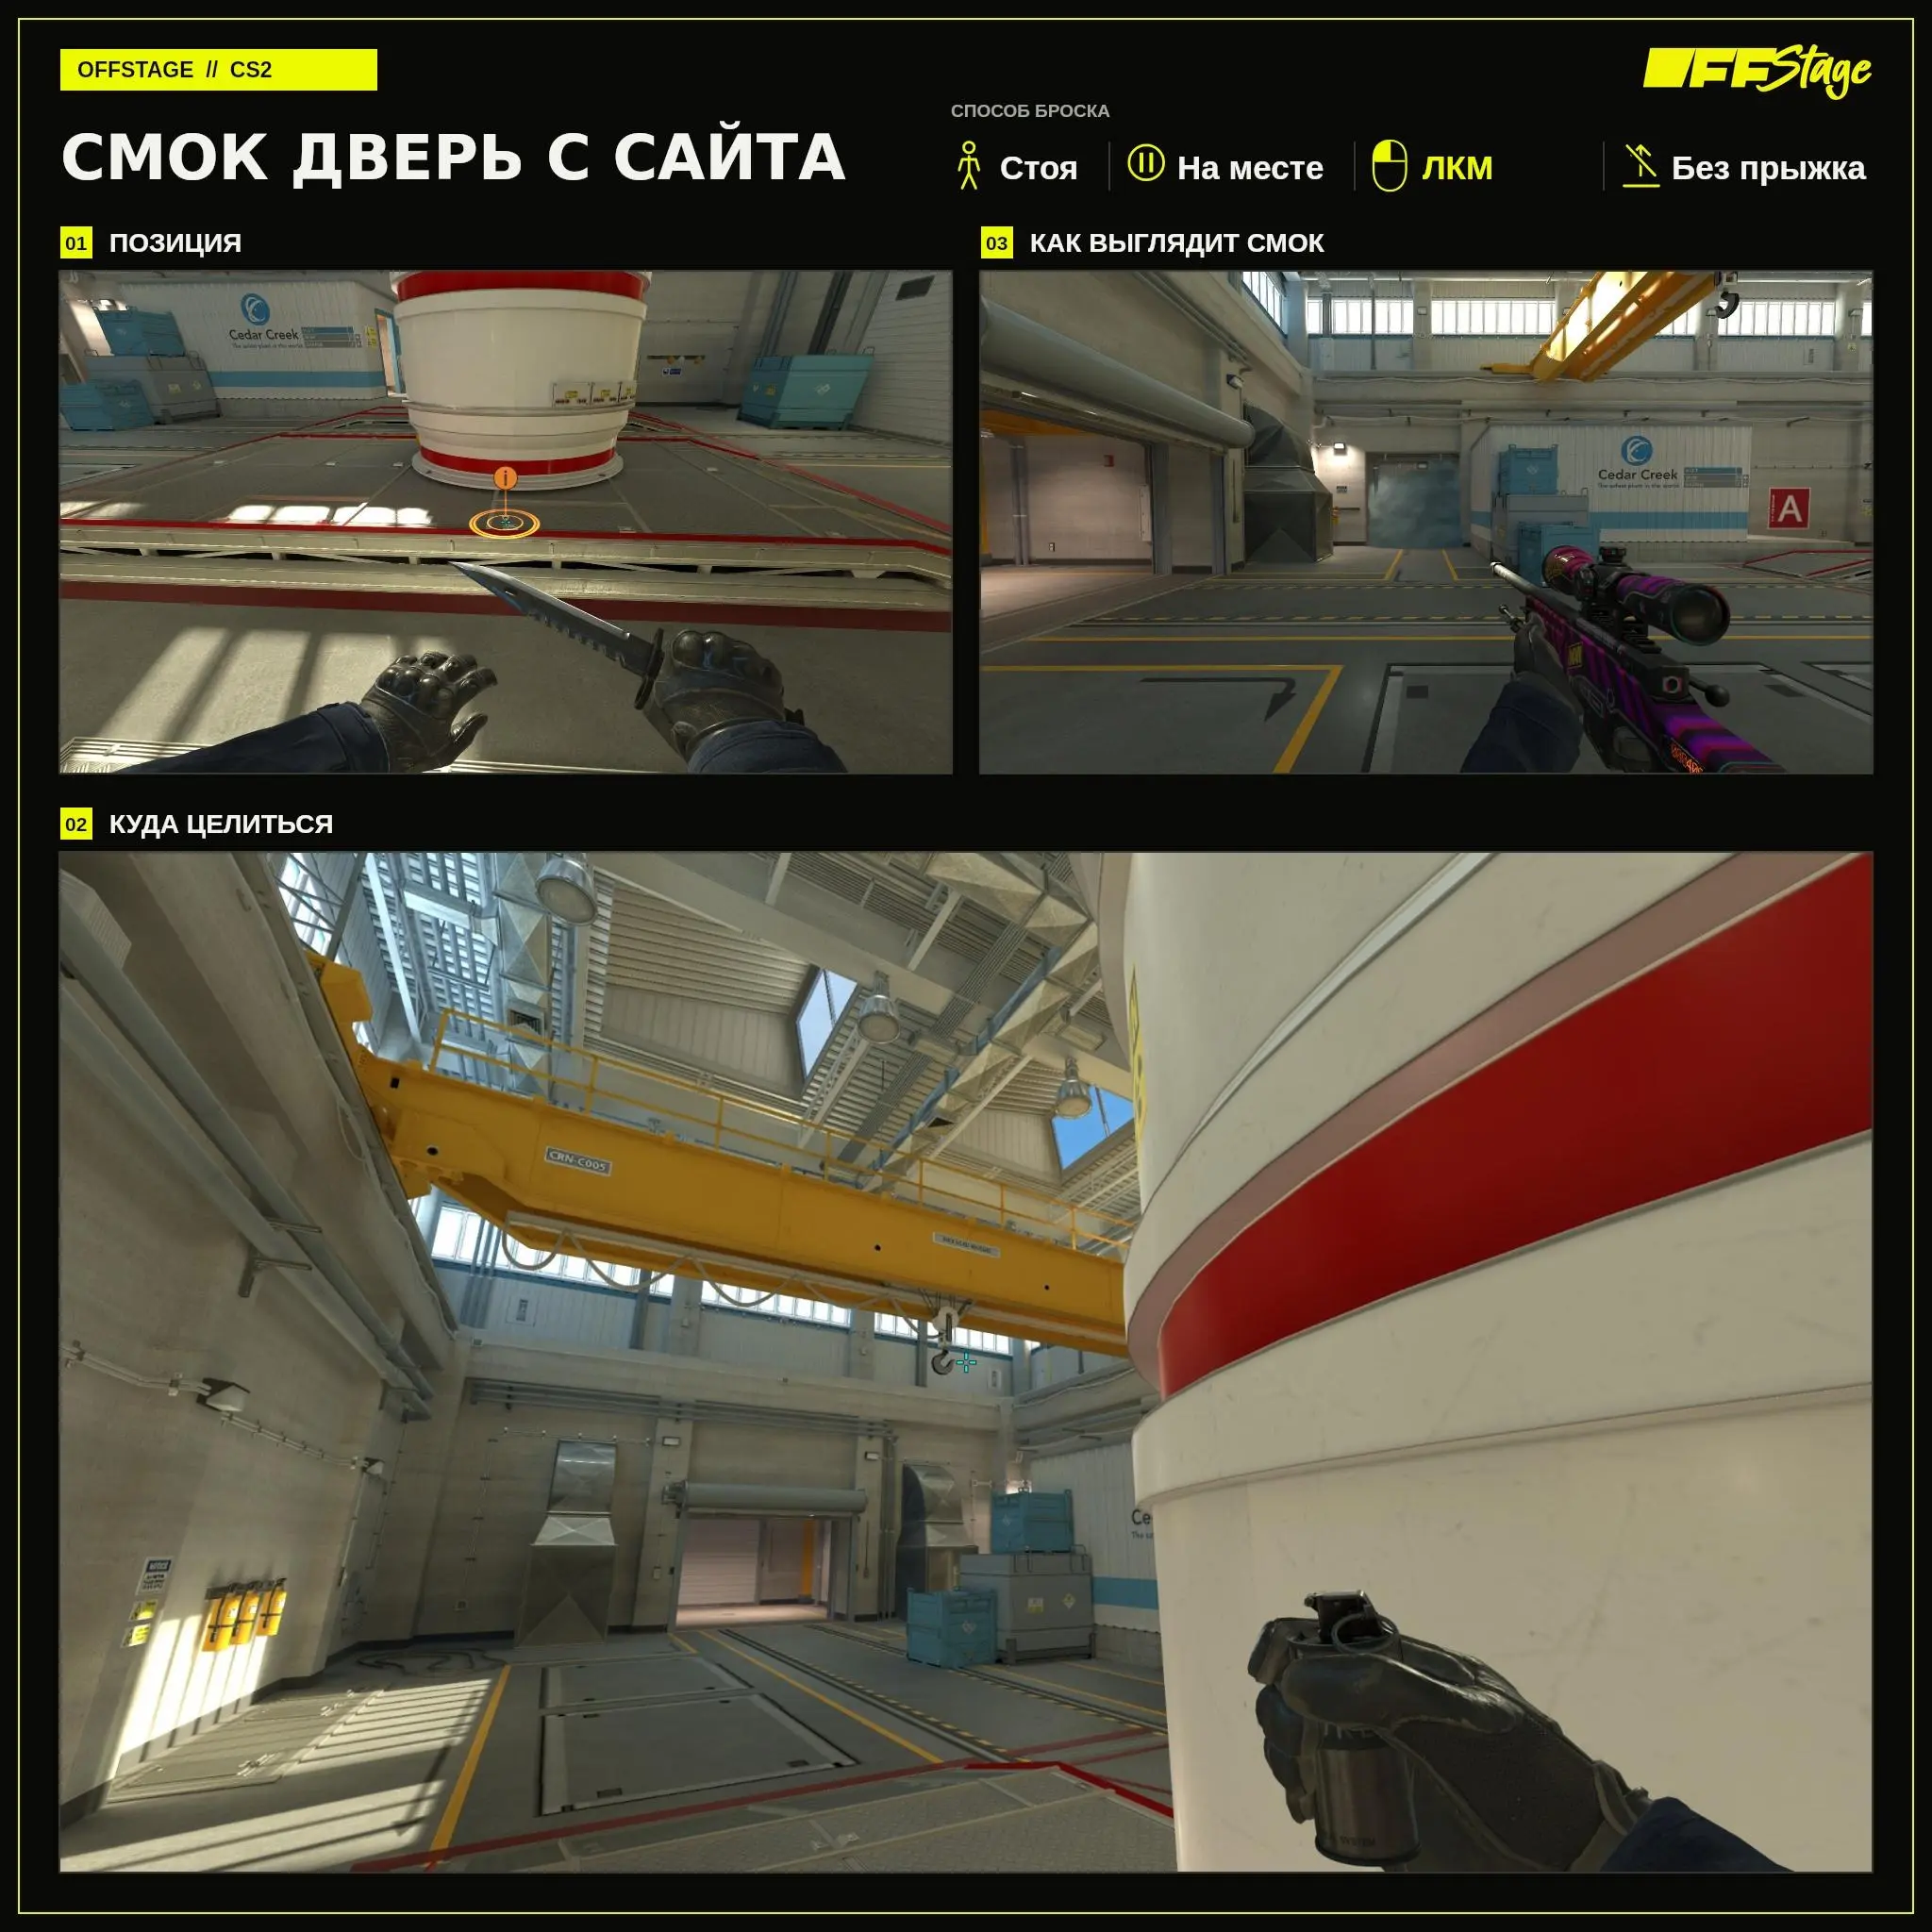
Smoke bomb into the door from the site
Support A can smoke the door directly from the barrel. This is useful if your partner on the 9 doesn’t have a smoke left or is busy with another route. You can use the same throw to refresh smoke that’s about to run out. Just warn your team so that two players don’t waste their grenades at the same time.
Take up the marked position in front of the barrel at A, at the edge of the area. Position yourself under the yellow crane, next to the hook, as shown in the diagram. Throw with the left mouse button from a standing position, without jumping. After throwing, keep an eye on the edge of the smoke: the attack team might come out through it toward the flashlight.
Frequently Asked Questions (FAQ)
За Т начните со стартового дыма, одной пары уличных смоков и мейна. Затем добавьте люрк-смок для прохода из лобби. Опорнику А пригодится дым в дверь — с плента или с девятки, в зависимости от того, где вы обычно играете.
Для перехода по улице используйте стенку. В подборке есть две пары Astralis и комбинация NAVI с мейном. Дождитесь раскрытия дымов, а у спуска будьте готовы встретить КТ: соперник мог занять секрет заранее.
Отдельного броска в гараж в этой подборке нет. Если проходите за стенкой, важно проверить, видит ли вас игрок из гаража. Попросите напарника посмотреть оттуда на ваш переход: дым может лежать далеко от проёма и при этом закрывать нужный обзор.
Проверьте позицию, прицел и движение. Второй Astralis от синей двери даётся на Shift, второй NAVI — с нажатием W в момент броска. Оба Astralis от грузовика бросаются с места. Если готовый дым исчез лишь на мгновение, причиной могла быть HE: её взрыв ненадолго рассеивает смок.
Разучивайте броски на тренировочной Nuke, каждый раз заново подходя к позиции. Затем дайте всю стенку и пройдите за ней вместе с напарником. Пусть он посмотрит на переход со стороны КТ и скажет, где вас видно. После обновлений карты стоит повторить знакомые смоки перед матчем.