Top 10 Most Important Smoke Placements on Mirage in CS2

A smoke through the window helps secure mid, a CT smoke helps push to A, and a smoke spread near B cuts off support for the defenders. We’ve compiled 12 smoke placement strategies for Mirage in CS2: from basic smoke under the exit to grenades that can help a teammate or set up a CT push.
Smoke through the window on Mirage
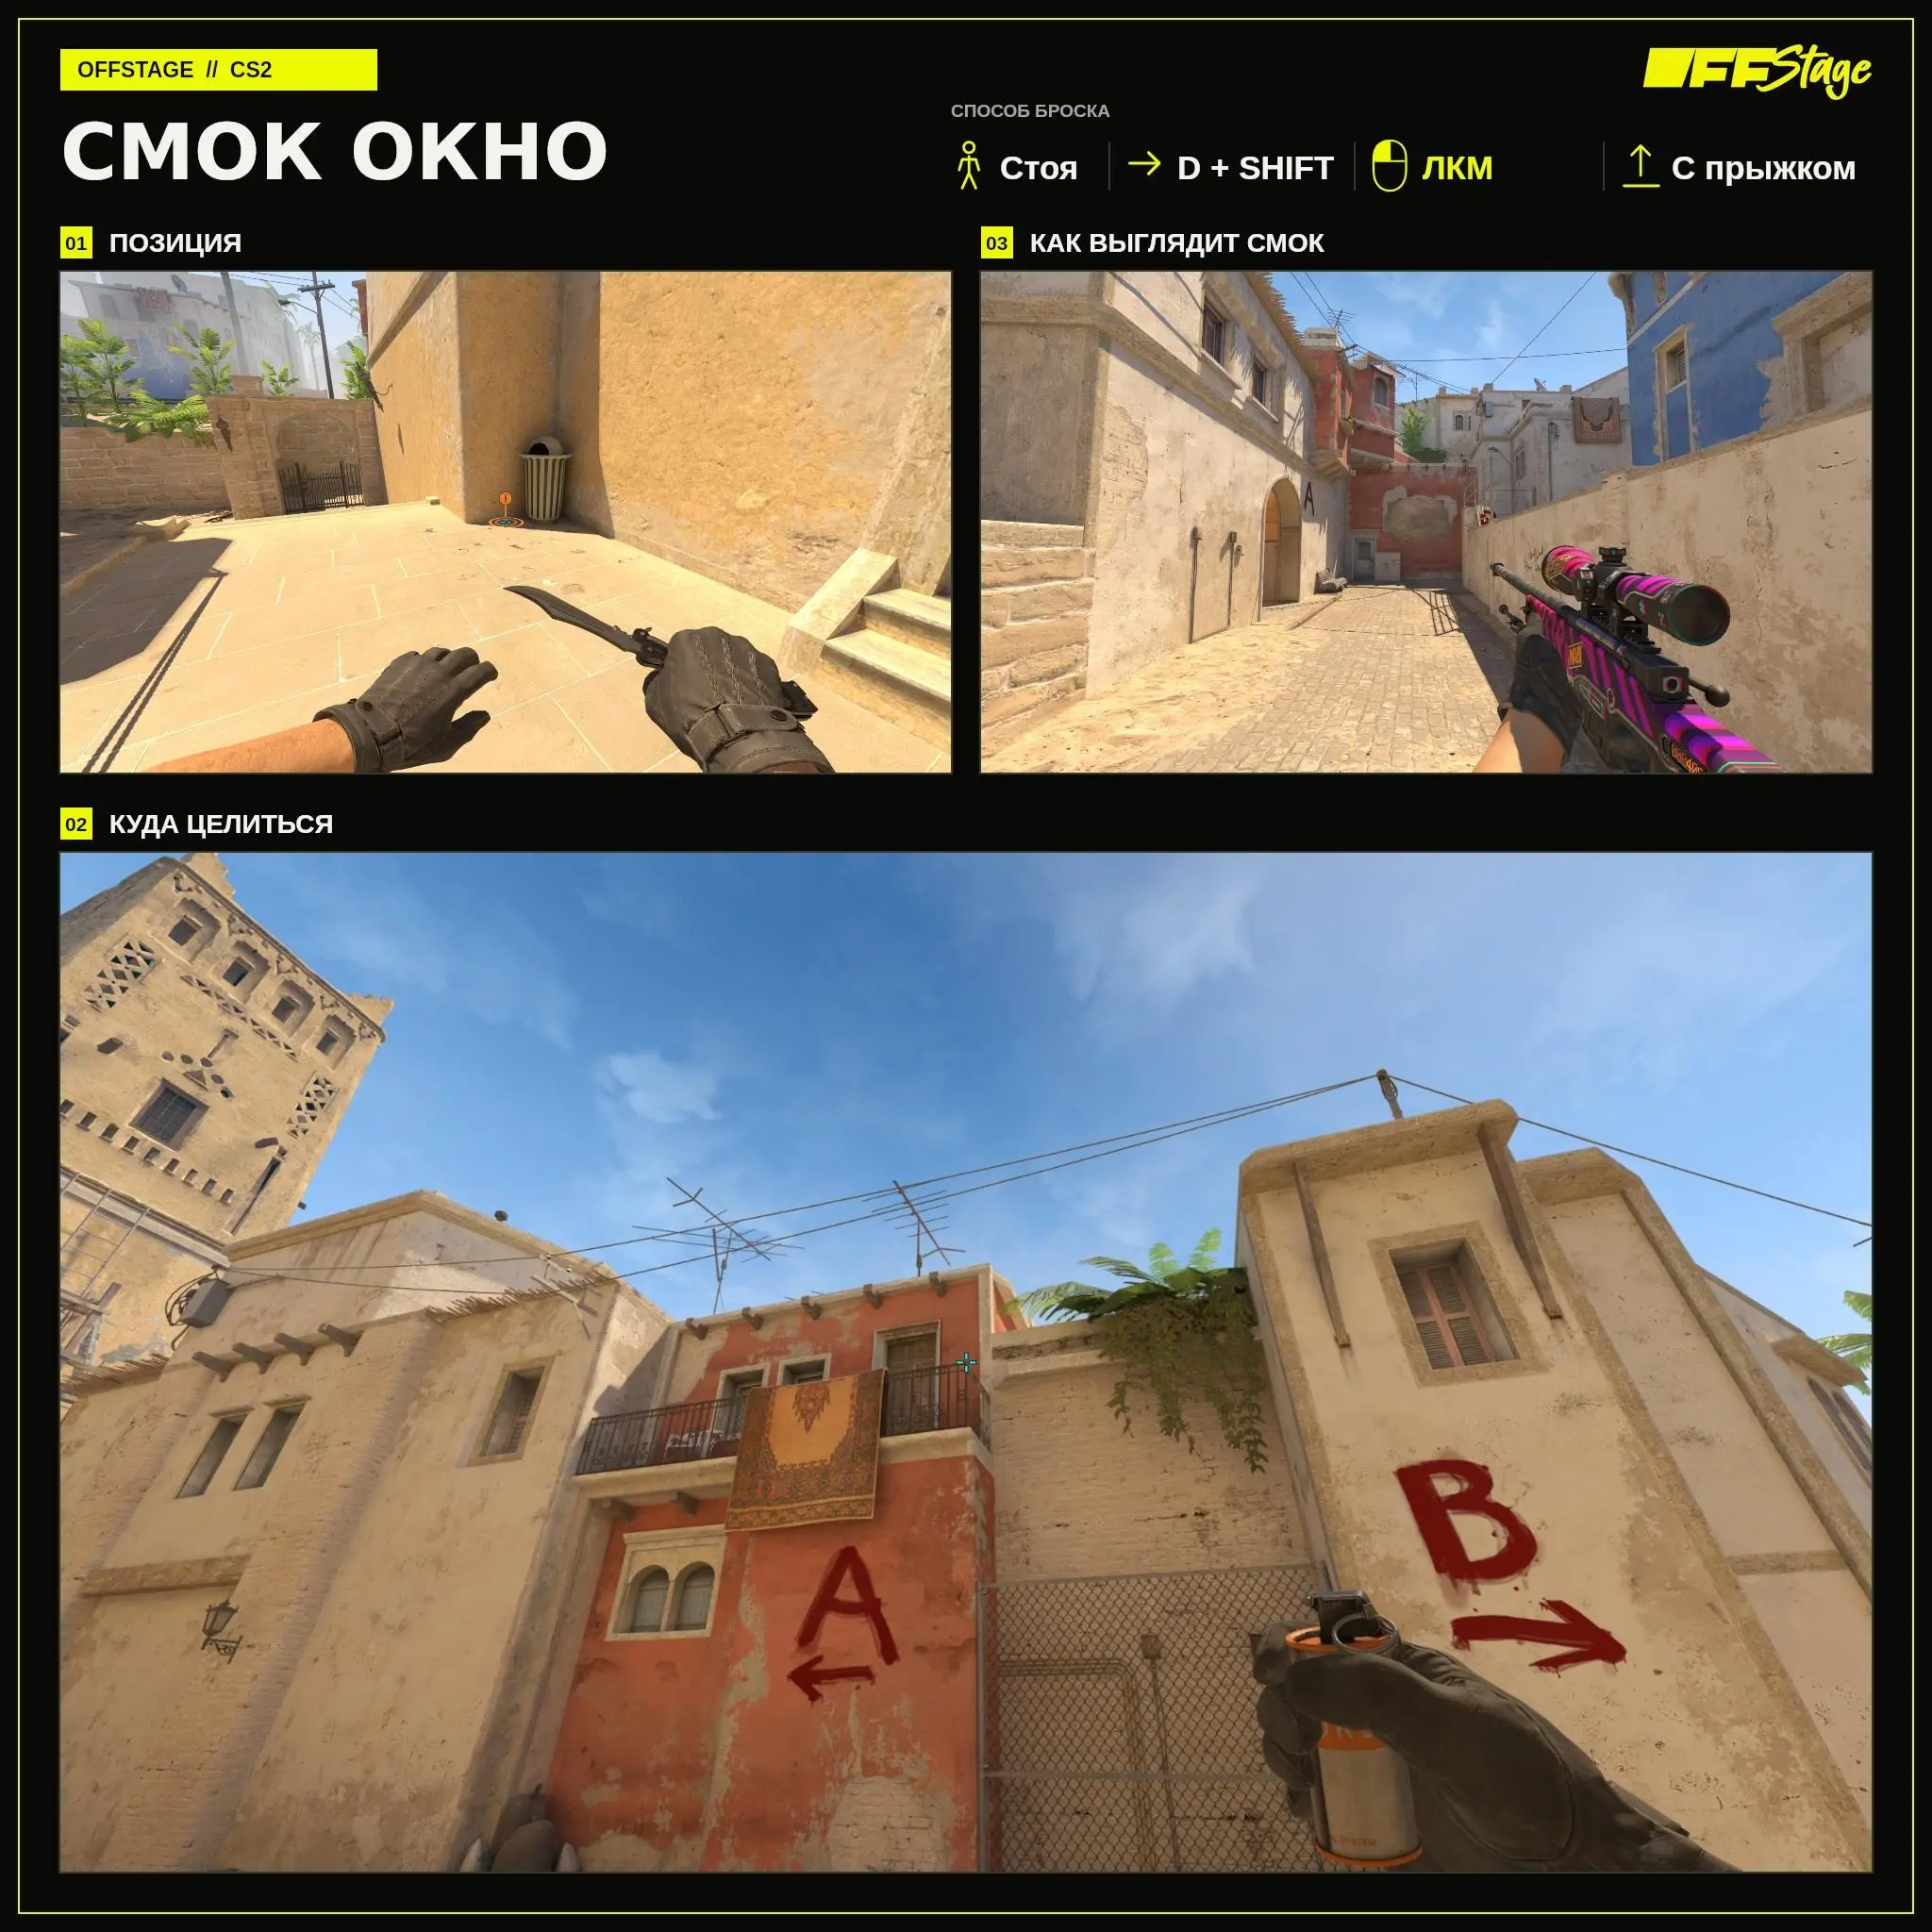
Pushing mid through an open window is risky: a sniper could take you out before you even reach the crates. A smoke through the window on Mirage blocks the sniper’s line of sight and helps your team secure the center. From there, it all depends on the round’s plan: smoke in the lower corner is useful for pushing to the short side, and smoke on the short side is useful for pushing into the corner.
Stand to the left of the trash can at the T-spawn and aim according to the diagram—at the balcony railing of the red building. Hold down the left mouse button, start moving right with D and Shift, then throw the grenade while jumping. The timing of the throw is crucial here: you must jump while already moving, with Shift held down.
Smoke at the mid spawn
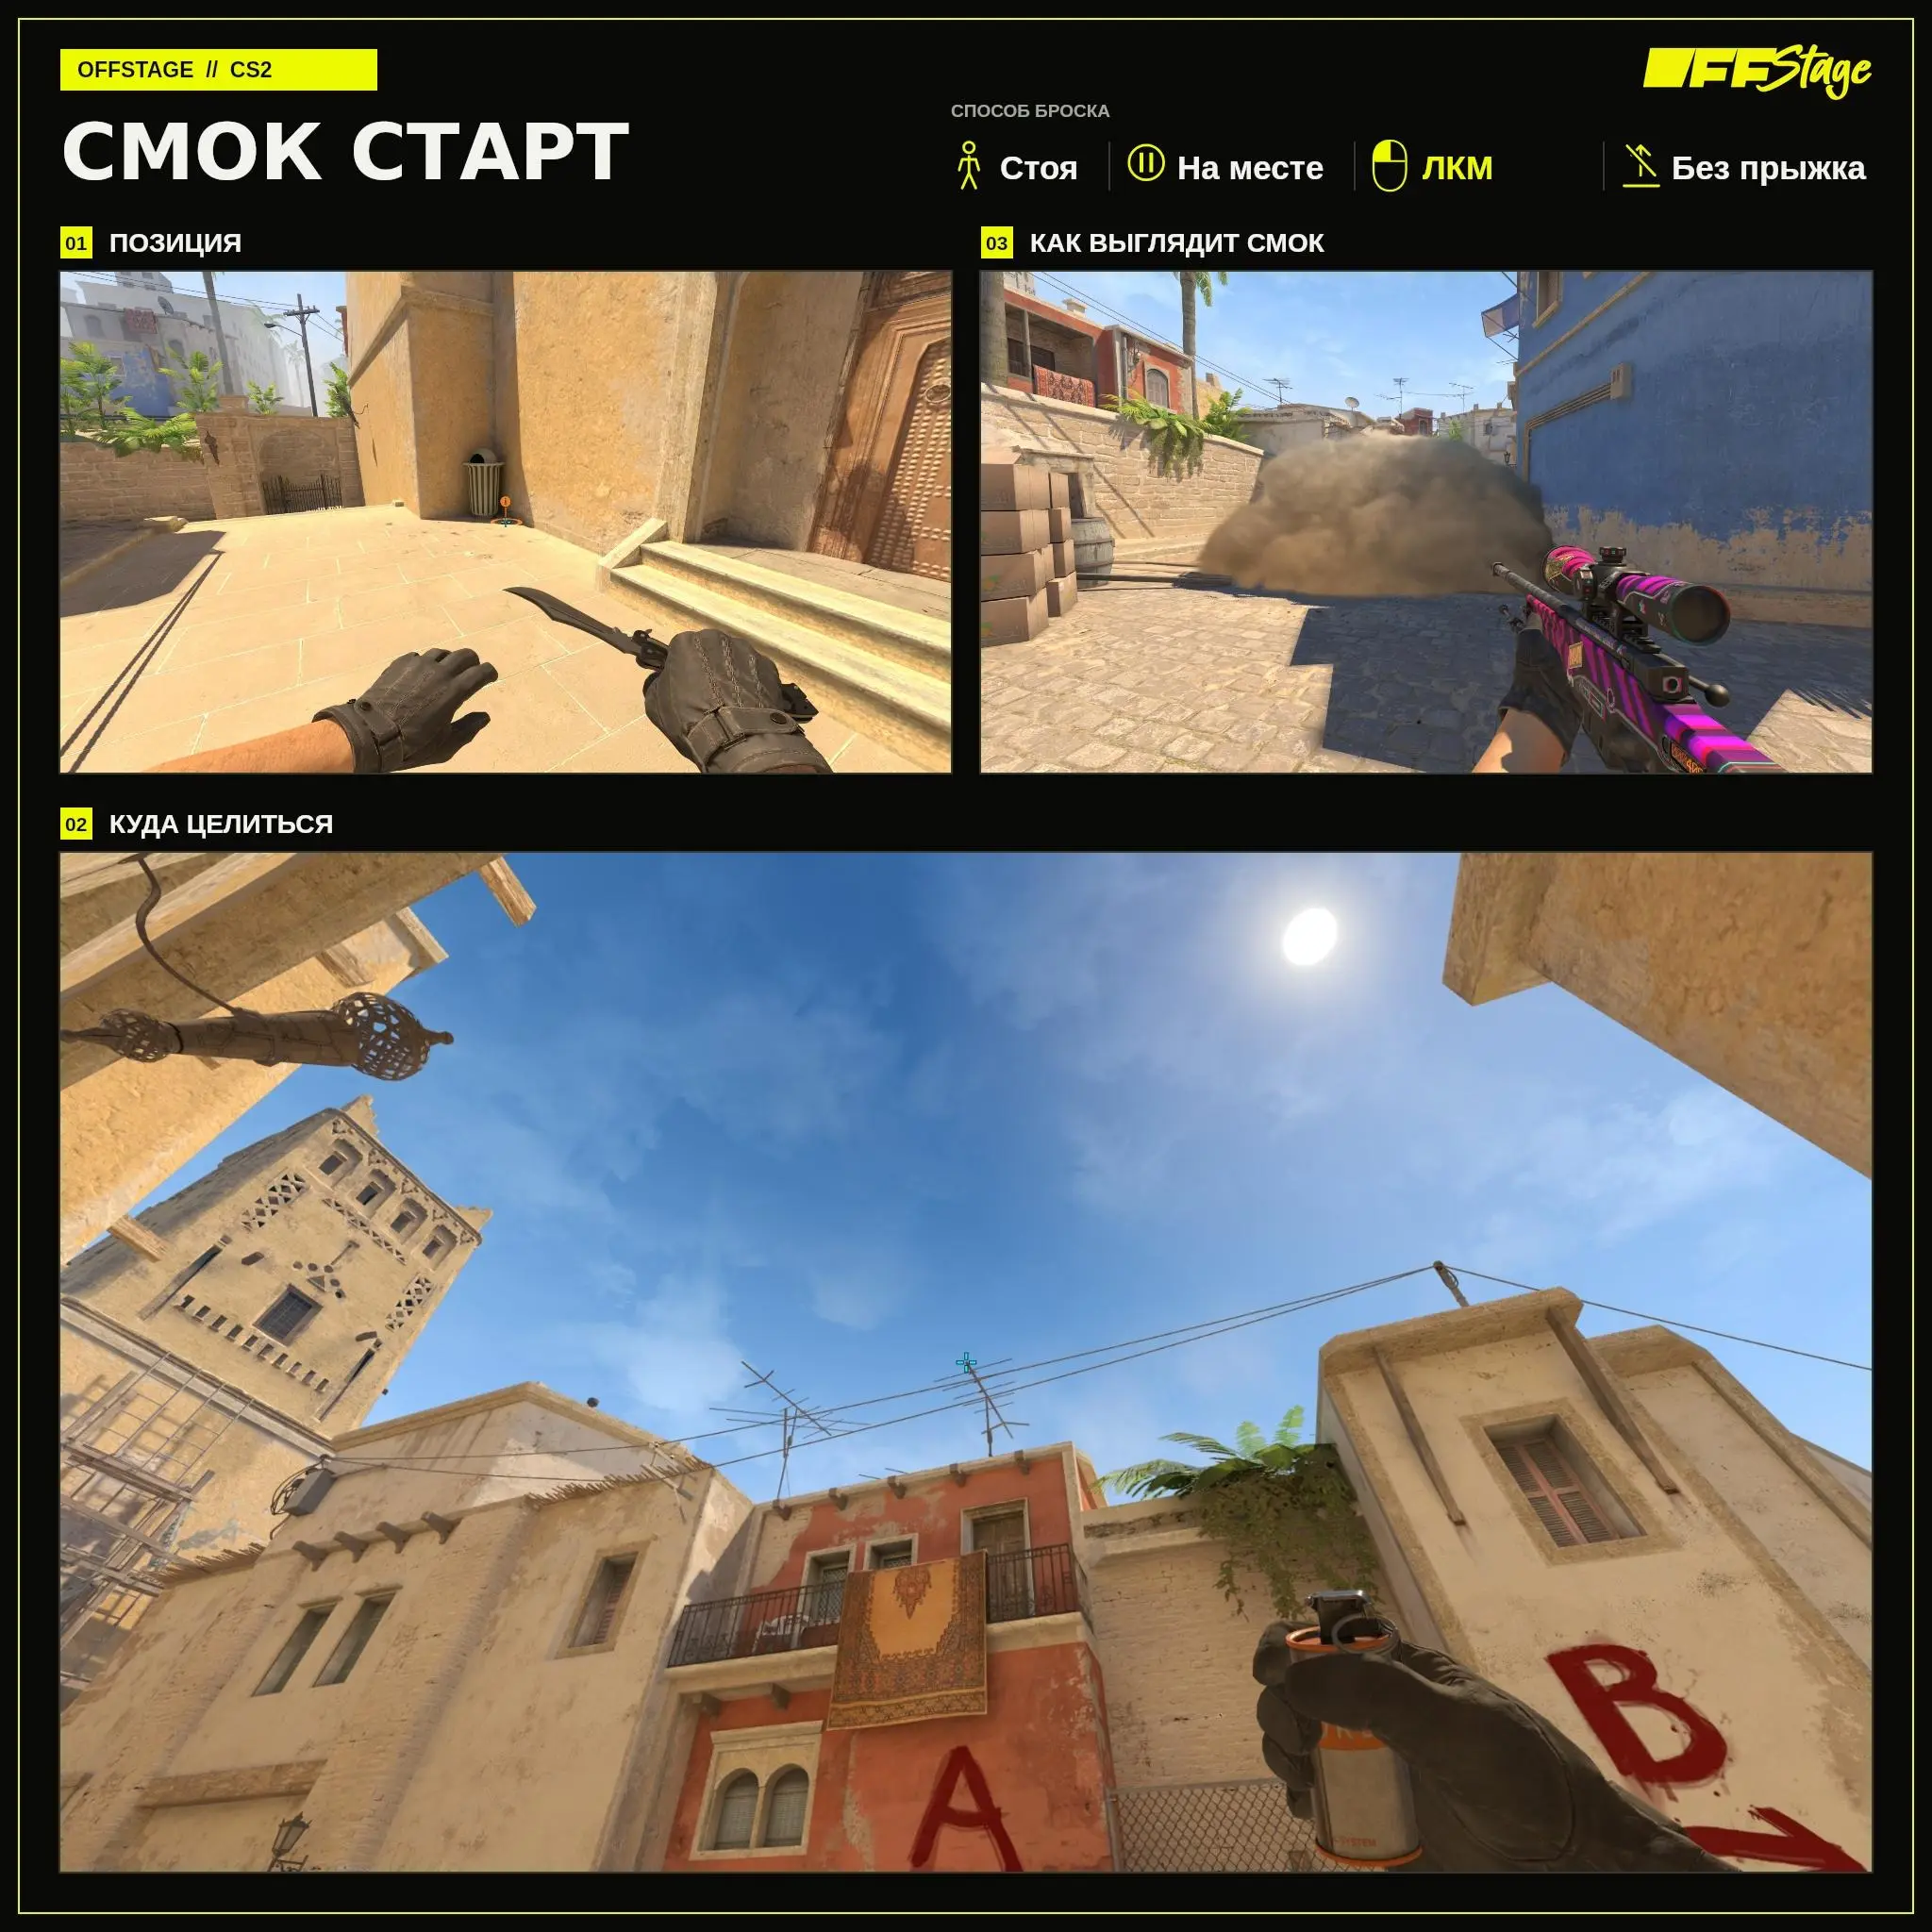
This smoke on Mirage’s mid covers the path to the crates on top mid. It’s useful if you want to secure the center first, wait for the command, and then throw your next grenades from there. It’s best to combine the smoke with the window: this makes it easier to reach the crates and set up a path to the corner or the short.
Stand to the right of the trash can at the T-spawn, near the steps. Aim at the top of the right antenna above the red building and throw with a left-click from your spot, without jumping. If your teammate is providing a window at that moment, leave him space to the left of the trash can—these two grenades have different throw points.
Smoke into the connector from the T-spawn
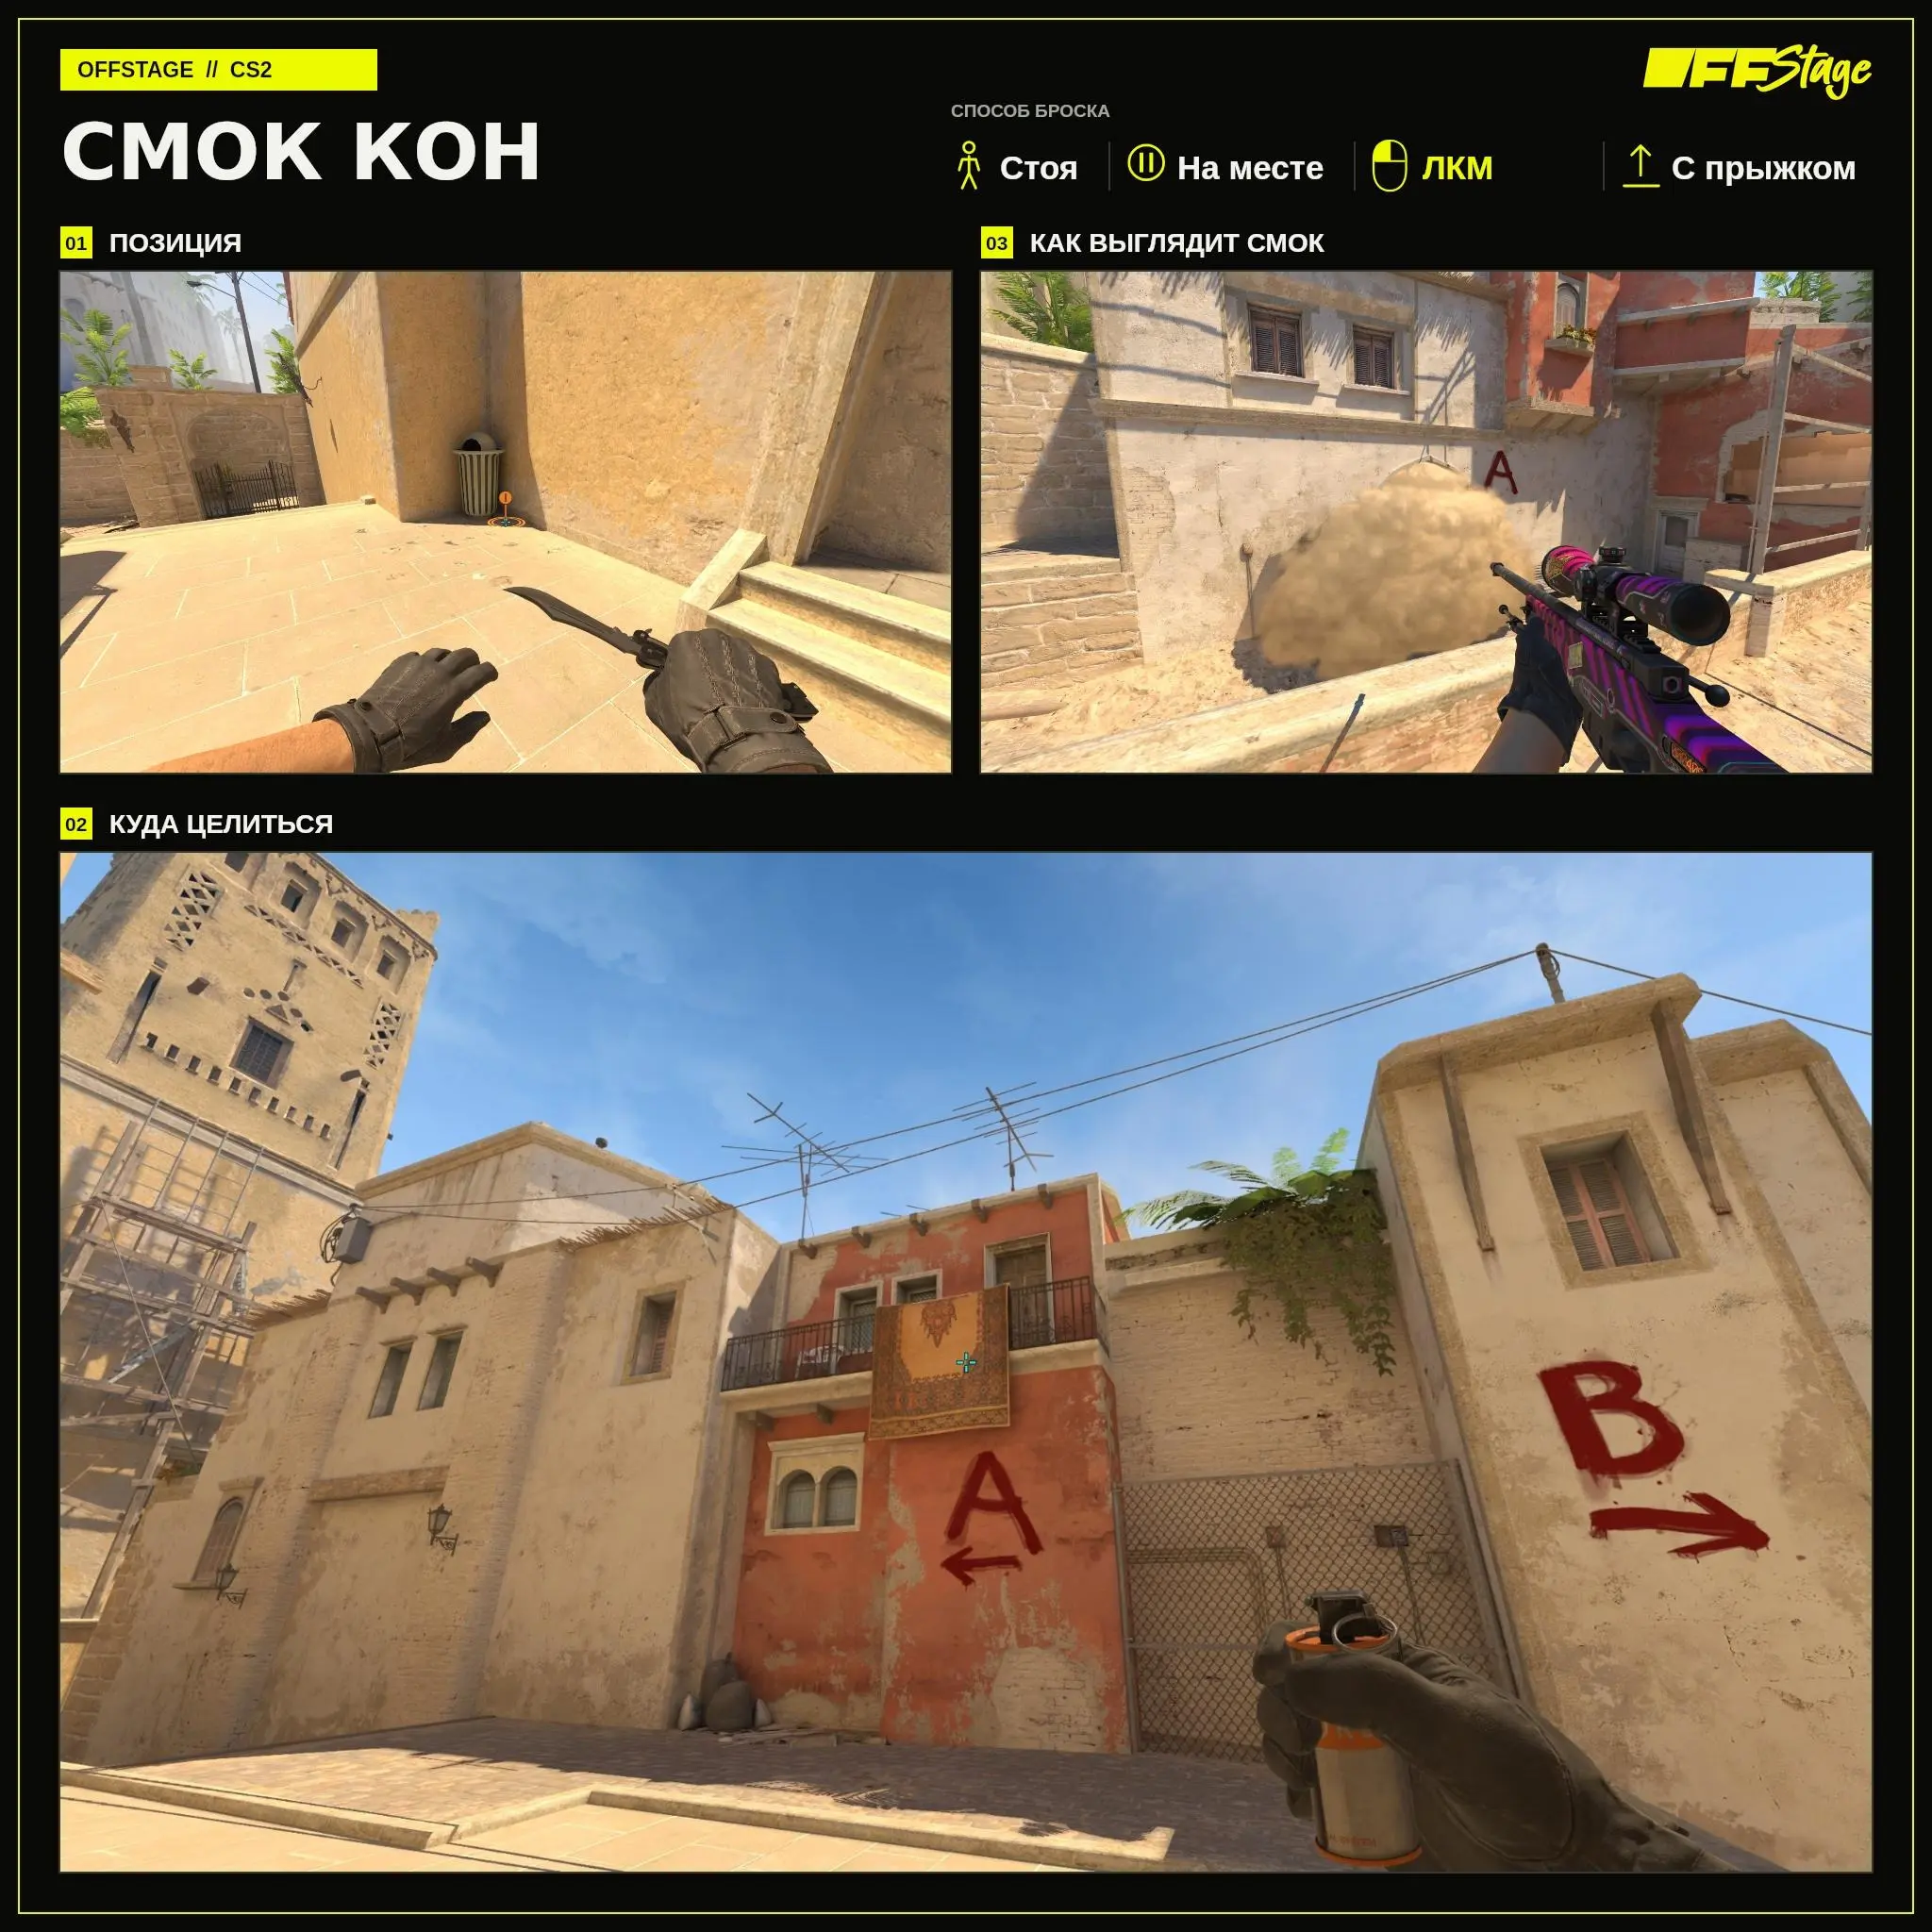
Smoke into the connector helps you move from mid to short or under the window. It blocks the entrance to the connector, preventing CTs from shooting players in the back as they head toward B. It’s best to throw the smoke grenade in advance from the T-spawn. This option is less convenient for moving to A via the connector: the smoke will be right in your way.
Take up a position to the right of the trash can. The landmark is on the rug hanging from the balcony of the red building; the exact spot to aim for is shown in the screenshot. Throw while standing still—left-click while jumping, without moving.
Smoke into the top of the connector
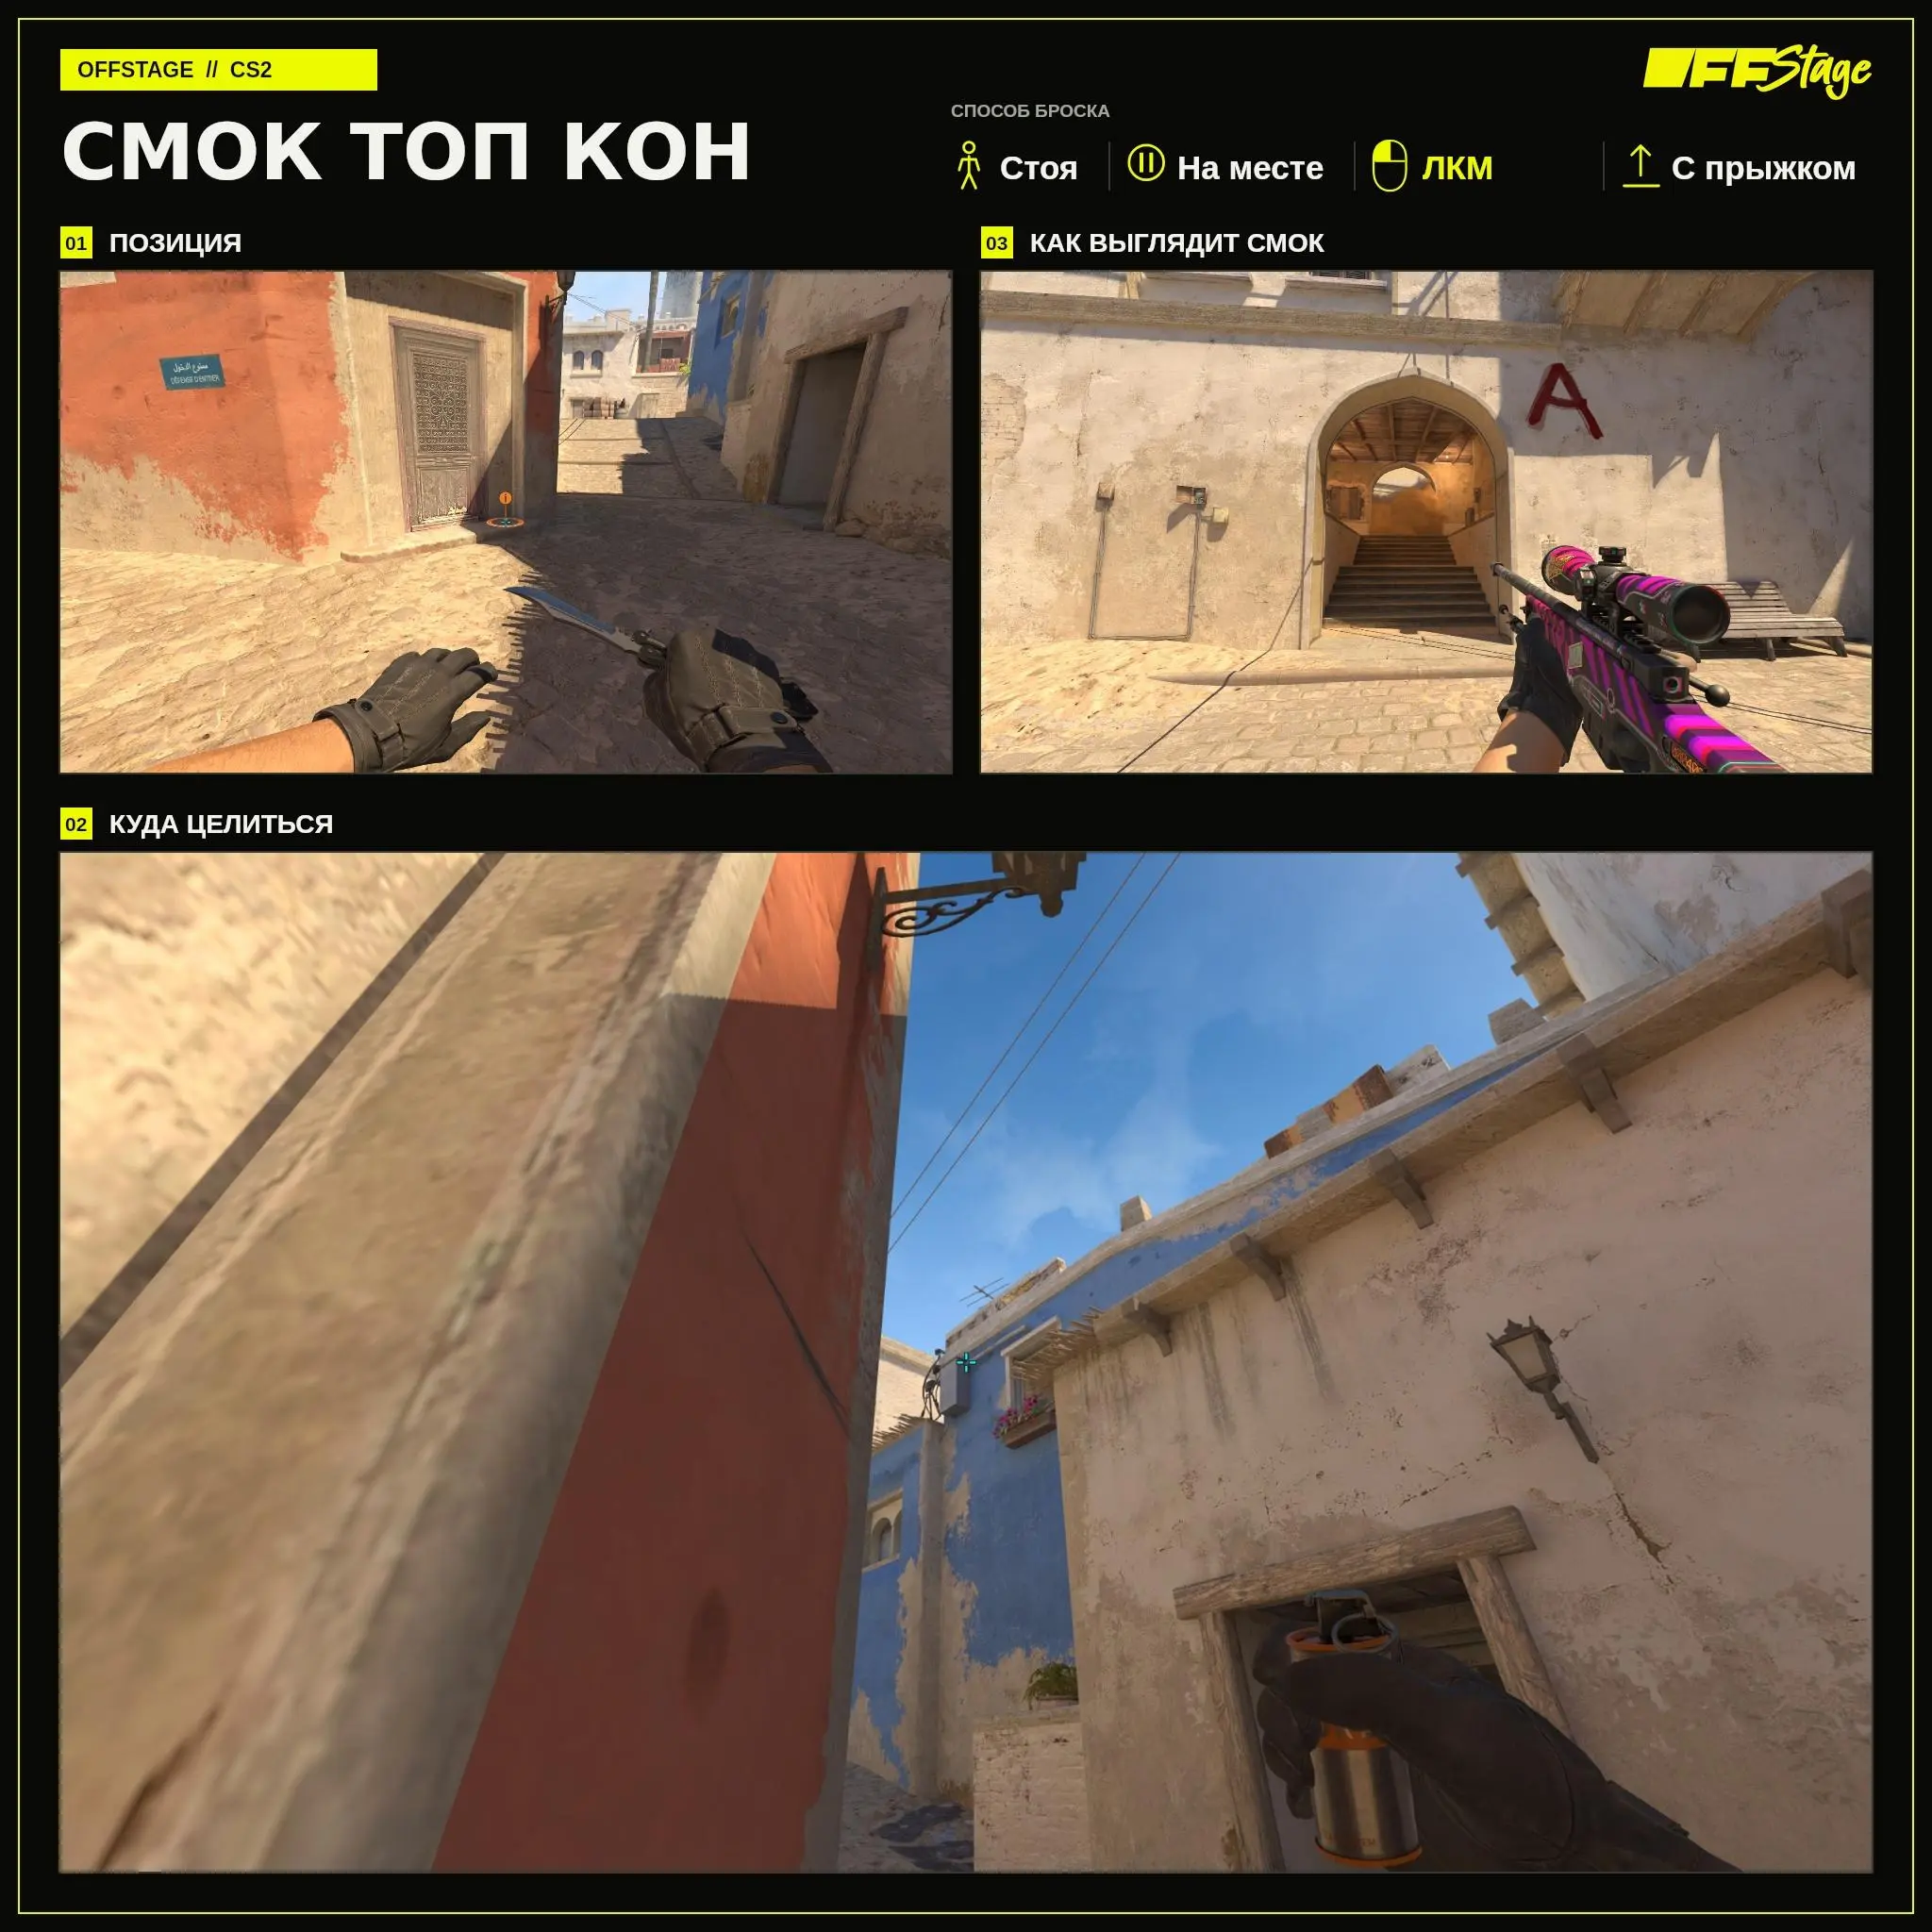
A smoke in the top of the connector blocks the passage closer to A. With it, you can enter the lower part of the connector and climb the stairs. This is useful when exiting from the ramp at the same time: A defenders will have to watch two directions. Just check the corners before smoking—the CT might have gone down into the cone beforehand.
The throw is made from top-mid. Stand in the marked corner by the door on the red wall and turn toward the blue building. Use the gray box next to the window and the flowers as a reference point; the crosshair position is shown on the diagram. Left-click to jump from a standing position when your teammates are ready to move into the corner.
Smoke on the short from mid
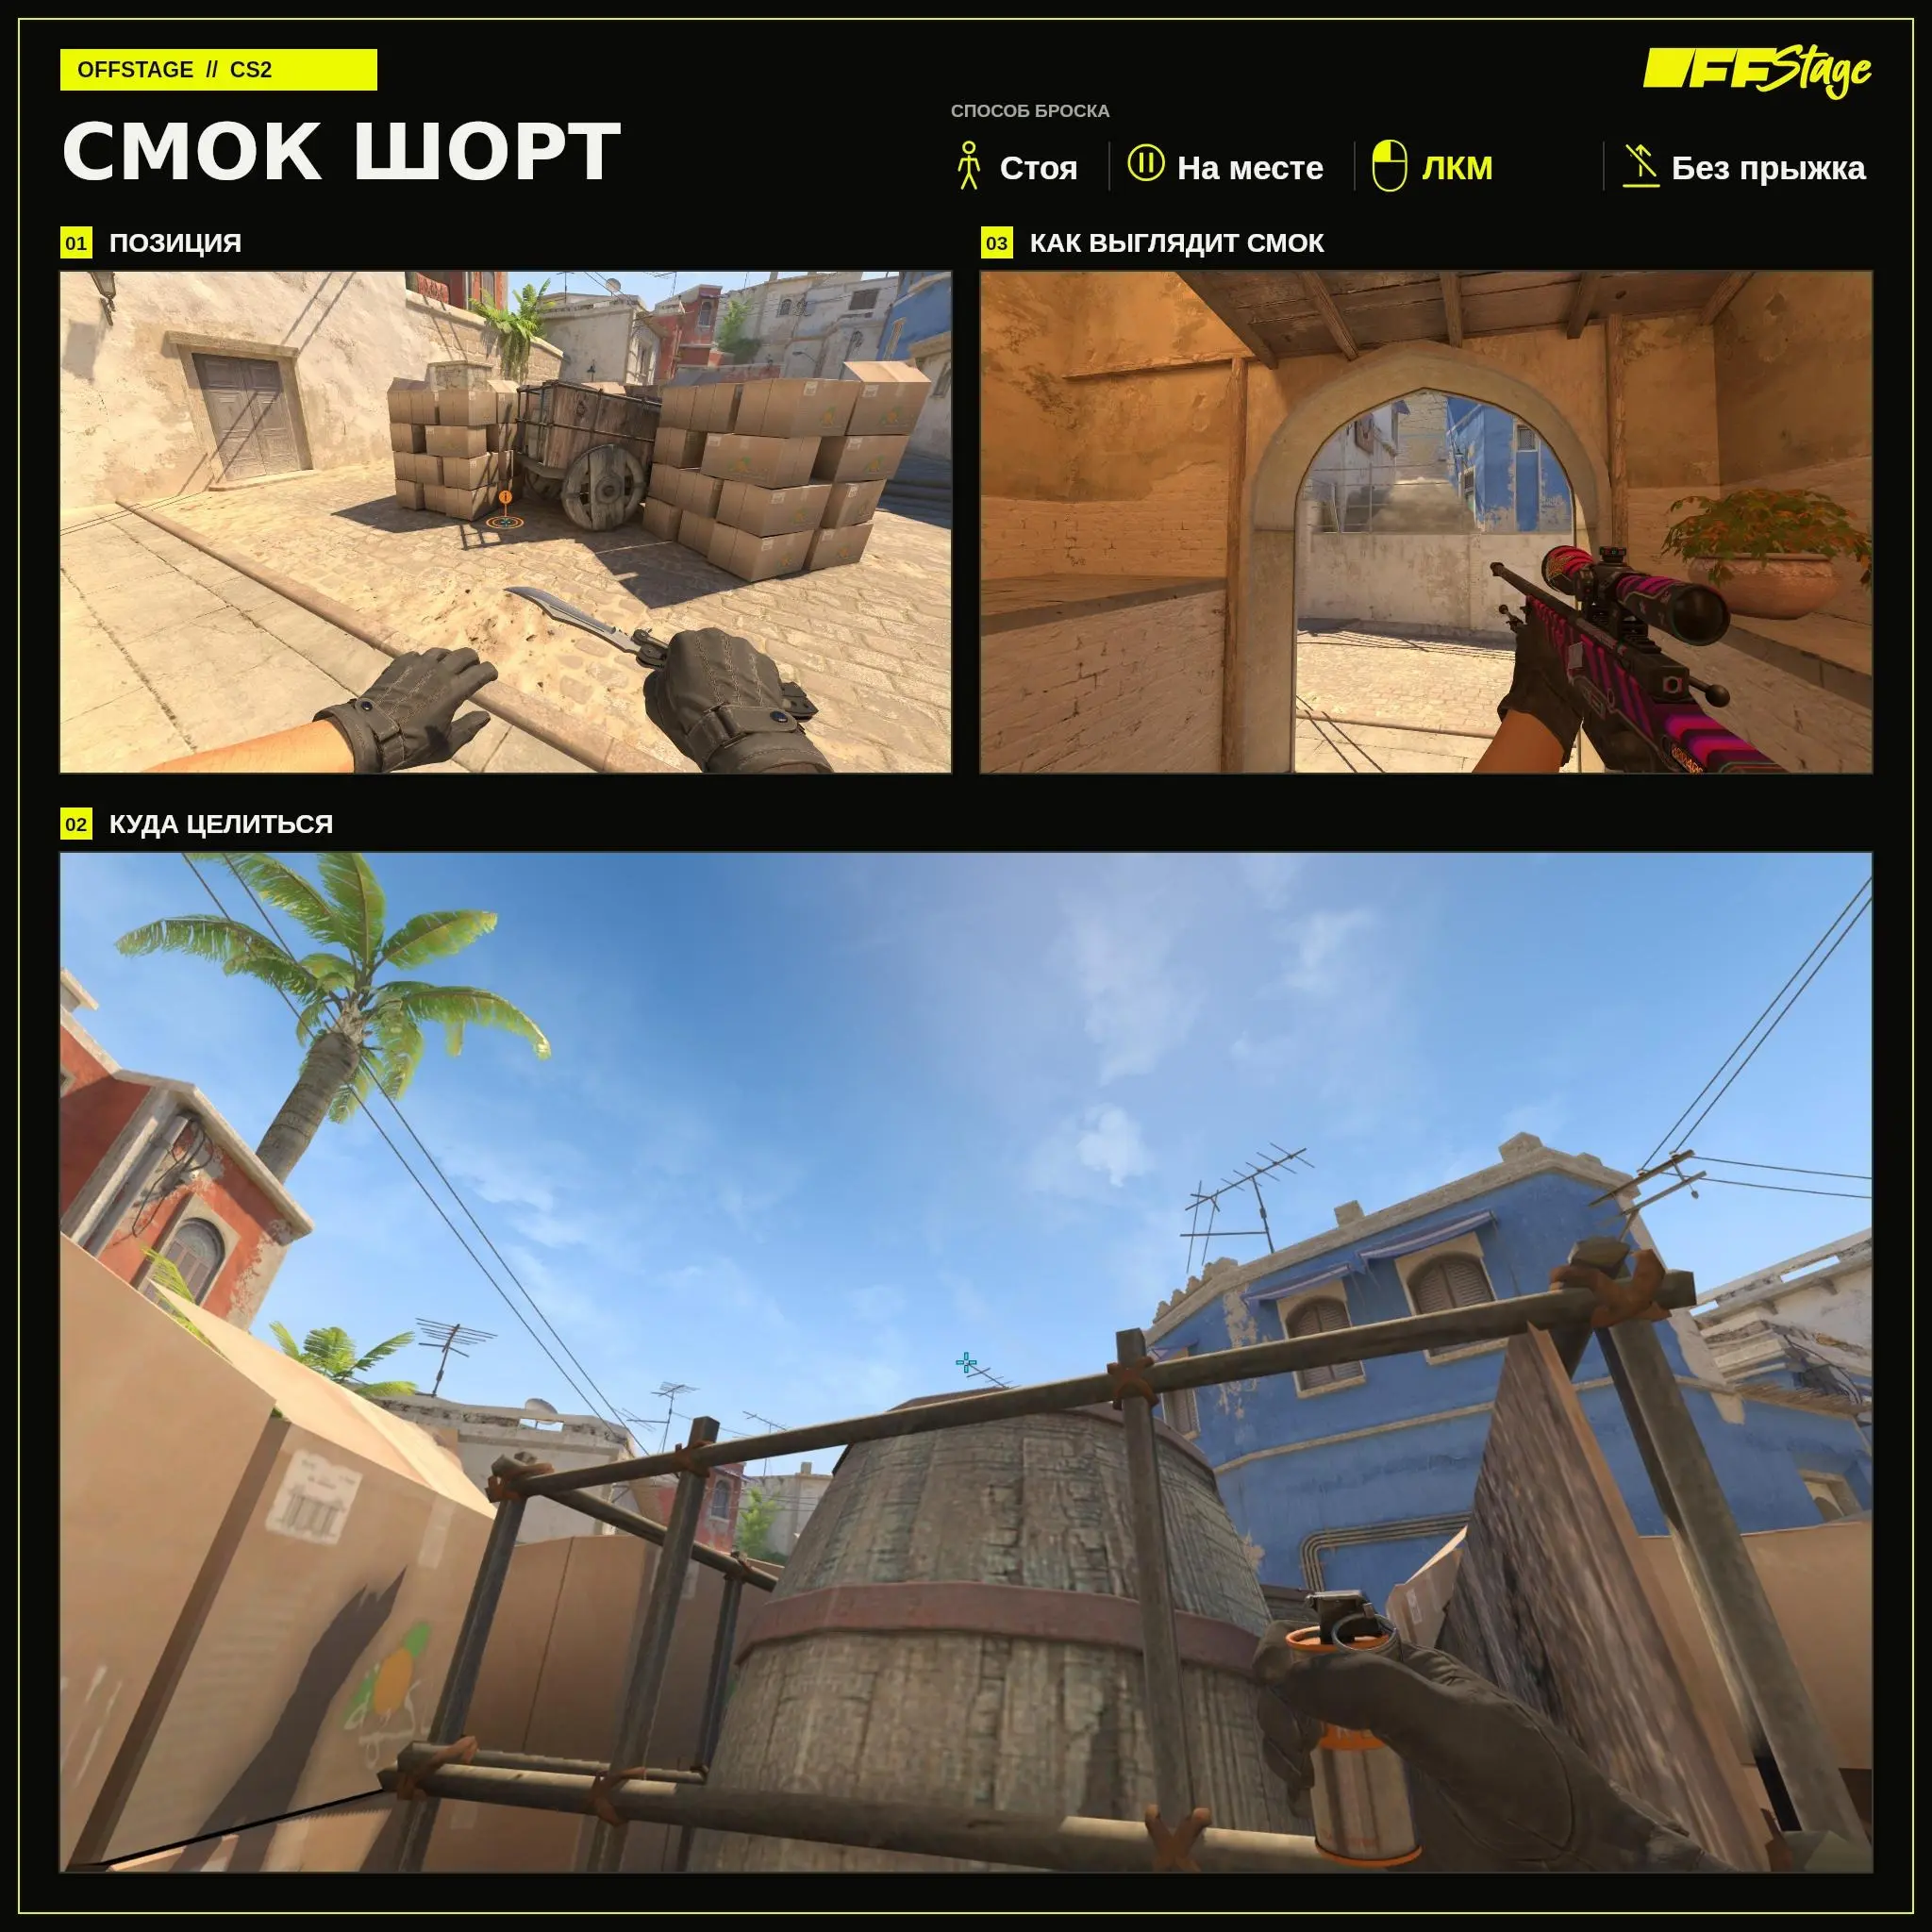
If the team is moving from mid to the connector, the player on the short side can intercept them from the flank. This smoke helps clear that angle and focus on the connector. It’s best to deploy it after securing the crates. Ask your teammate to cover you while you hold the grenade: mid may still be under CT control.
Approach the cart with barrels between the crates. Find the thin antenna above the far roof, to the left of the blue building, and aim according to the diagram. Throw the grenade with a left-click from a standing position, without jumping. Wait for the smoke to clear, then start the run with your team.
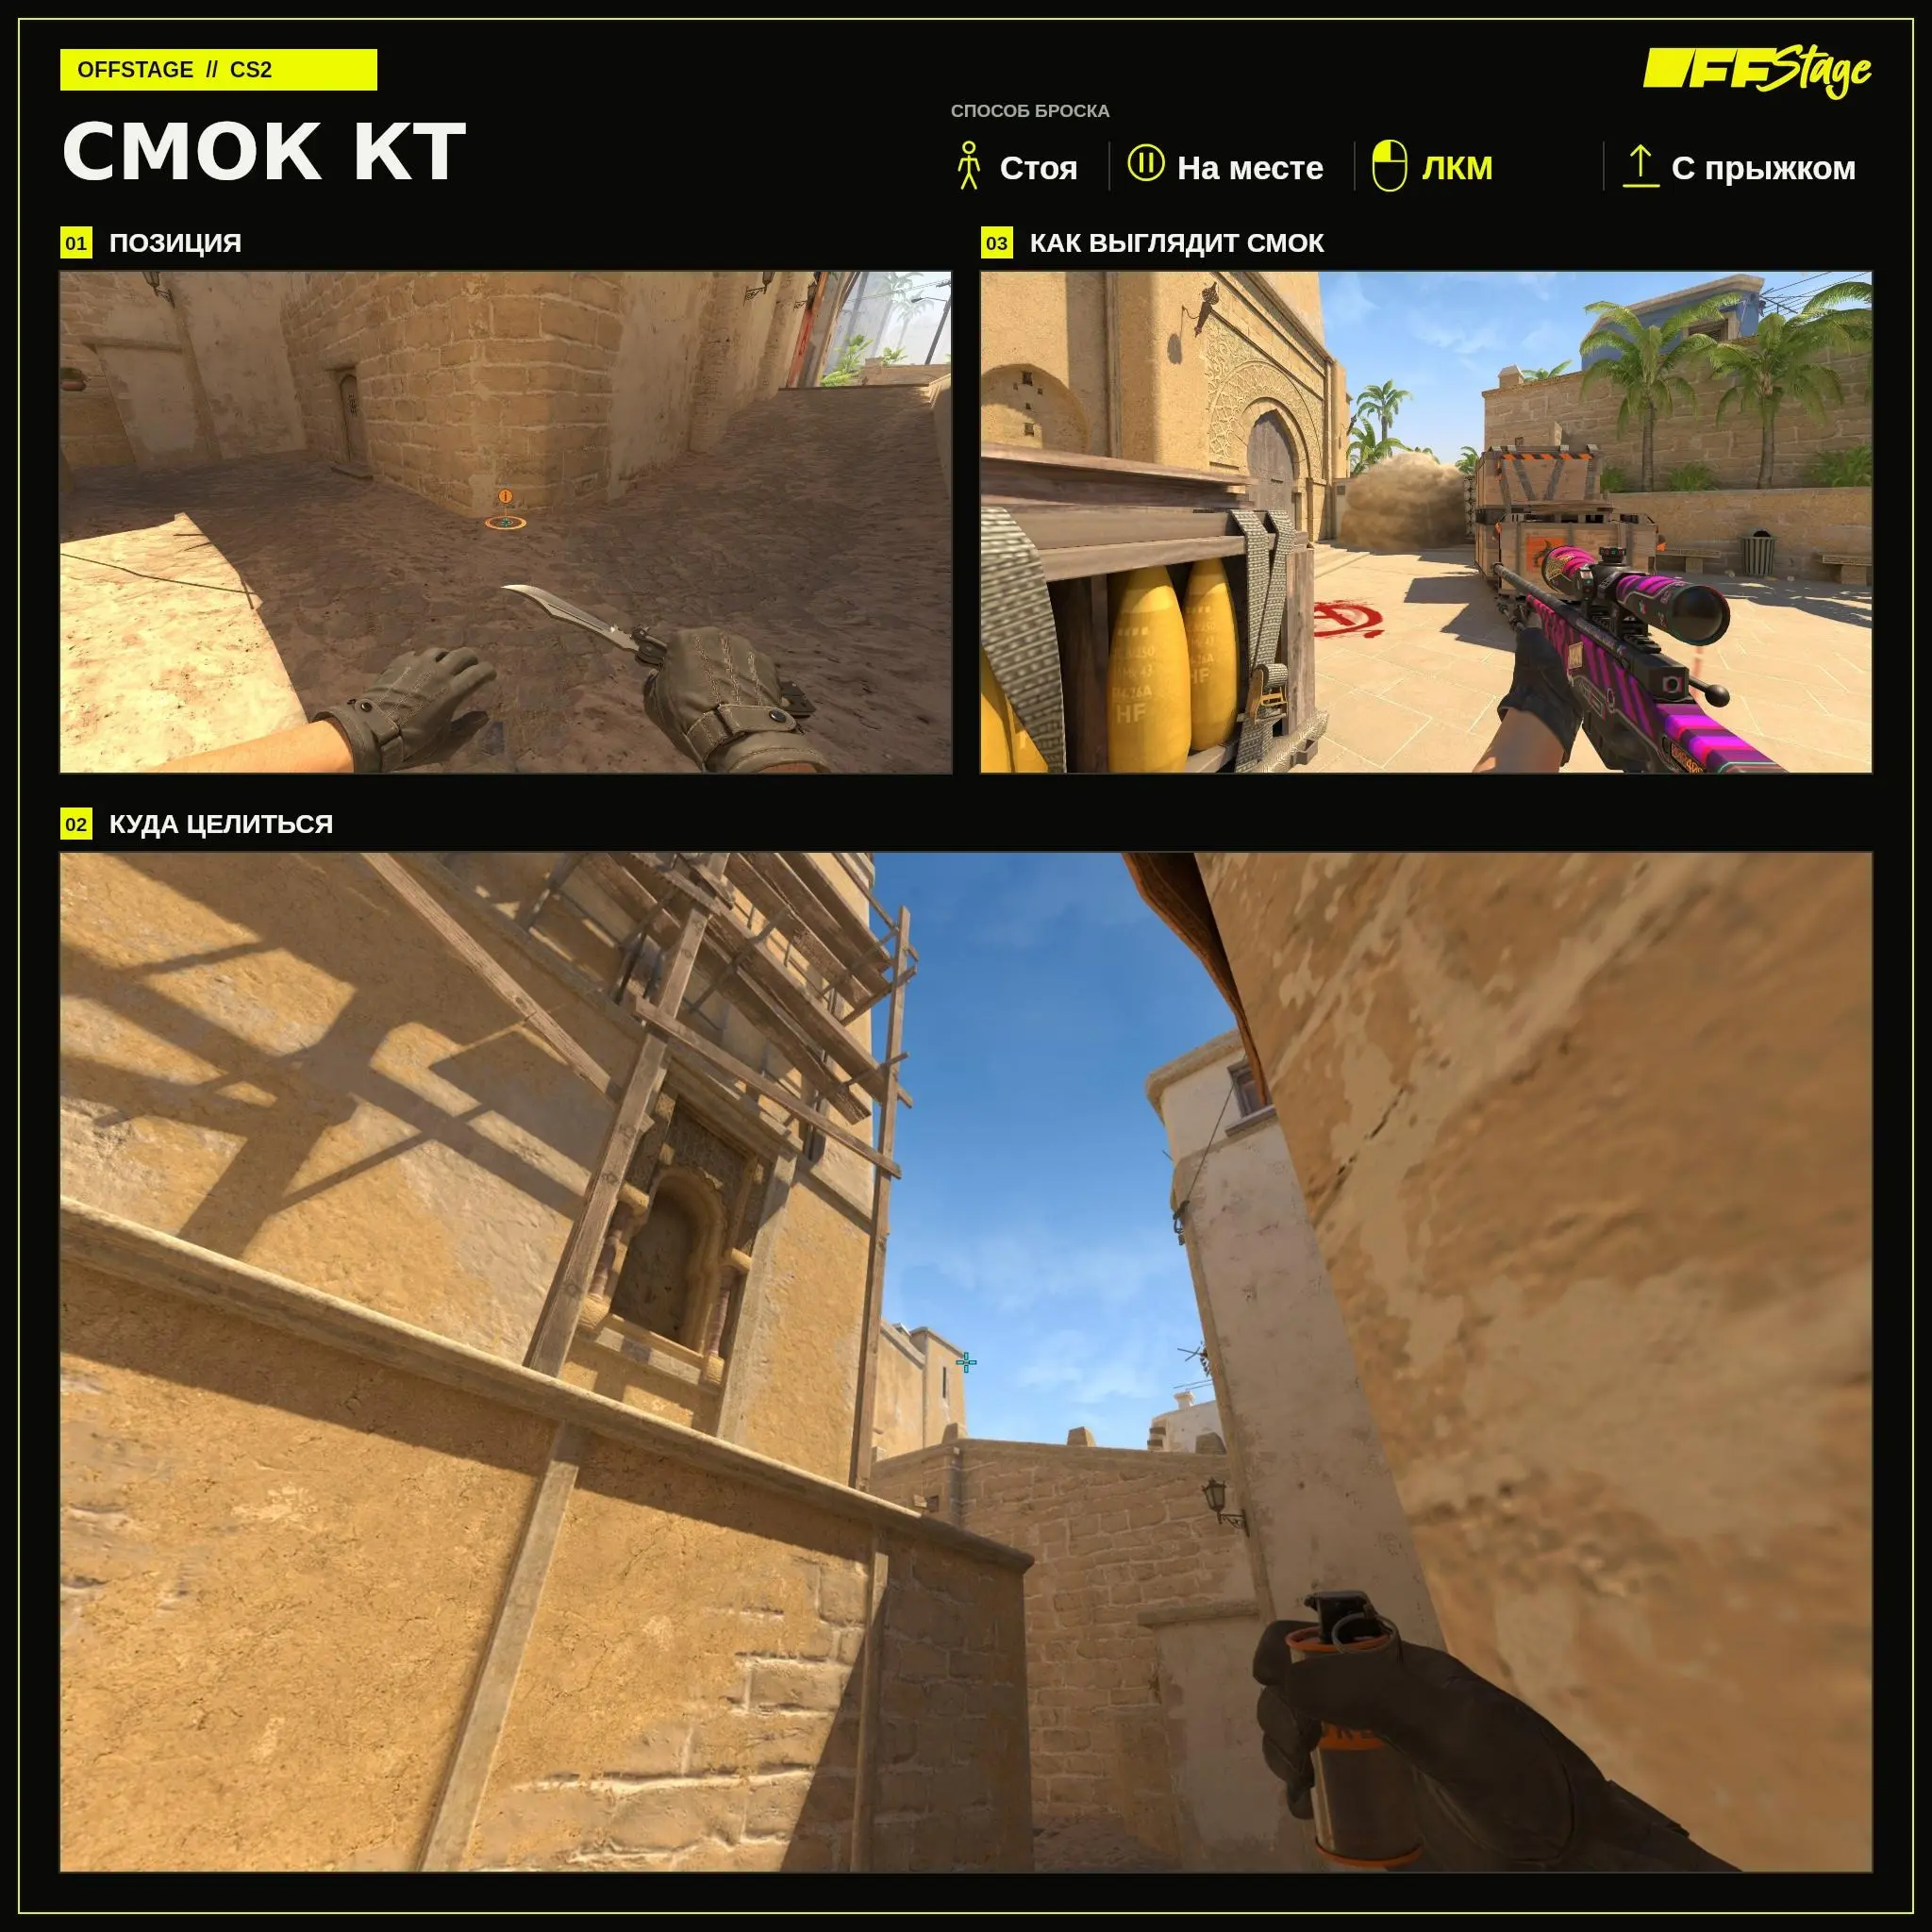
CT Smok to reach A
The CT smoke blocks the view from the ticket side and helps secure A. The first players can take out the defenders on the platform, while the bomb carrier moves to the planting site. Smokes are usually placed on the stairs and underneath them near the exit. It’s important for the team to start moving out after the grenades have been thrown.
Stand in the marked corner by the stone wall, as shown in the first screenshot. The aiming point is on the distant, light-colored building with a narrow window—refer to the large screenshot. Throw while standing, left-click while jumping, without taking a step or a running start. First take your position, then aim.
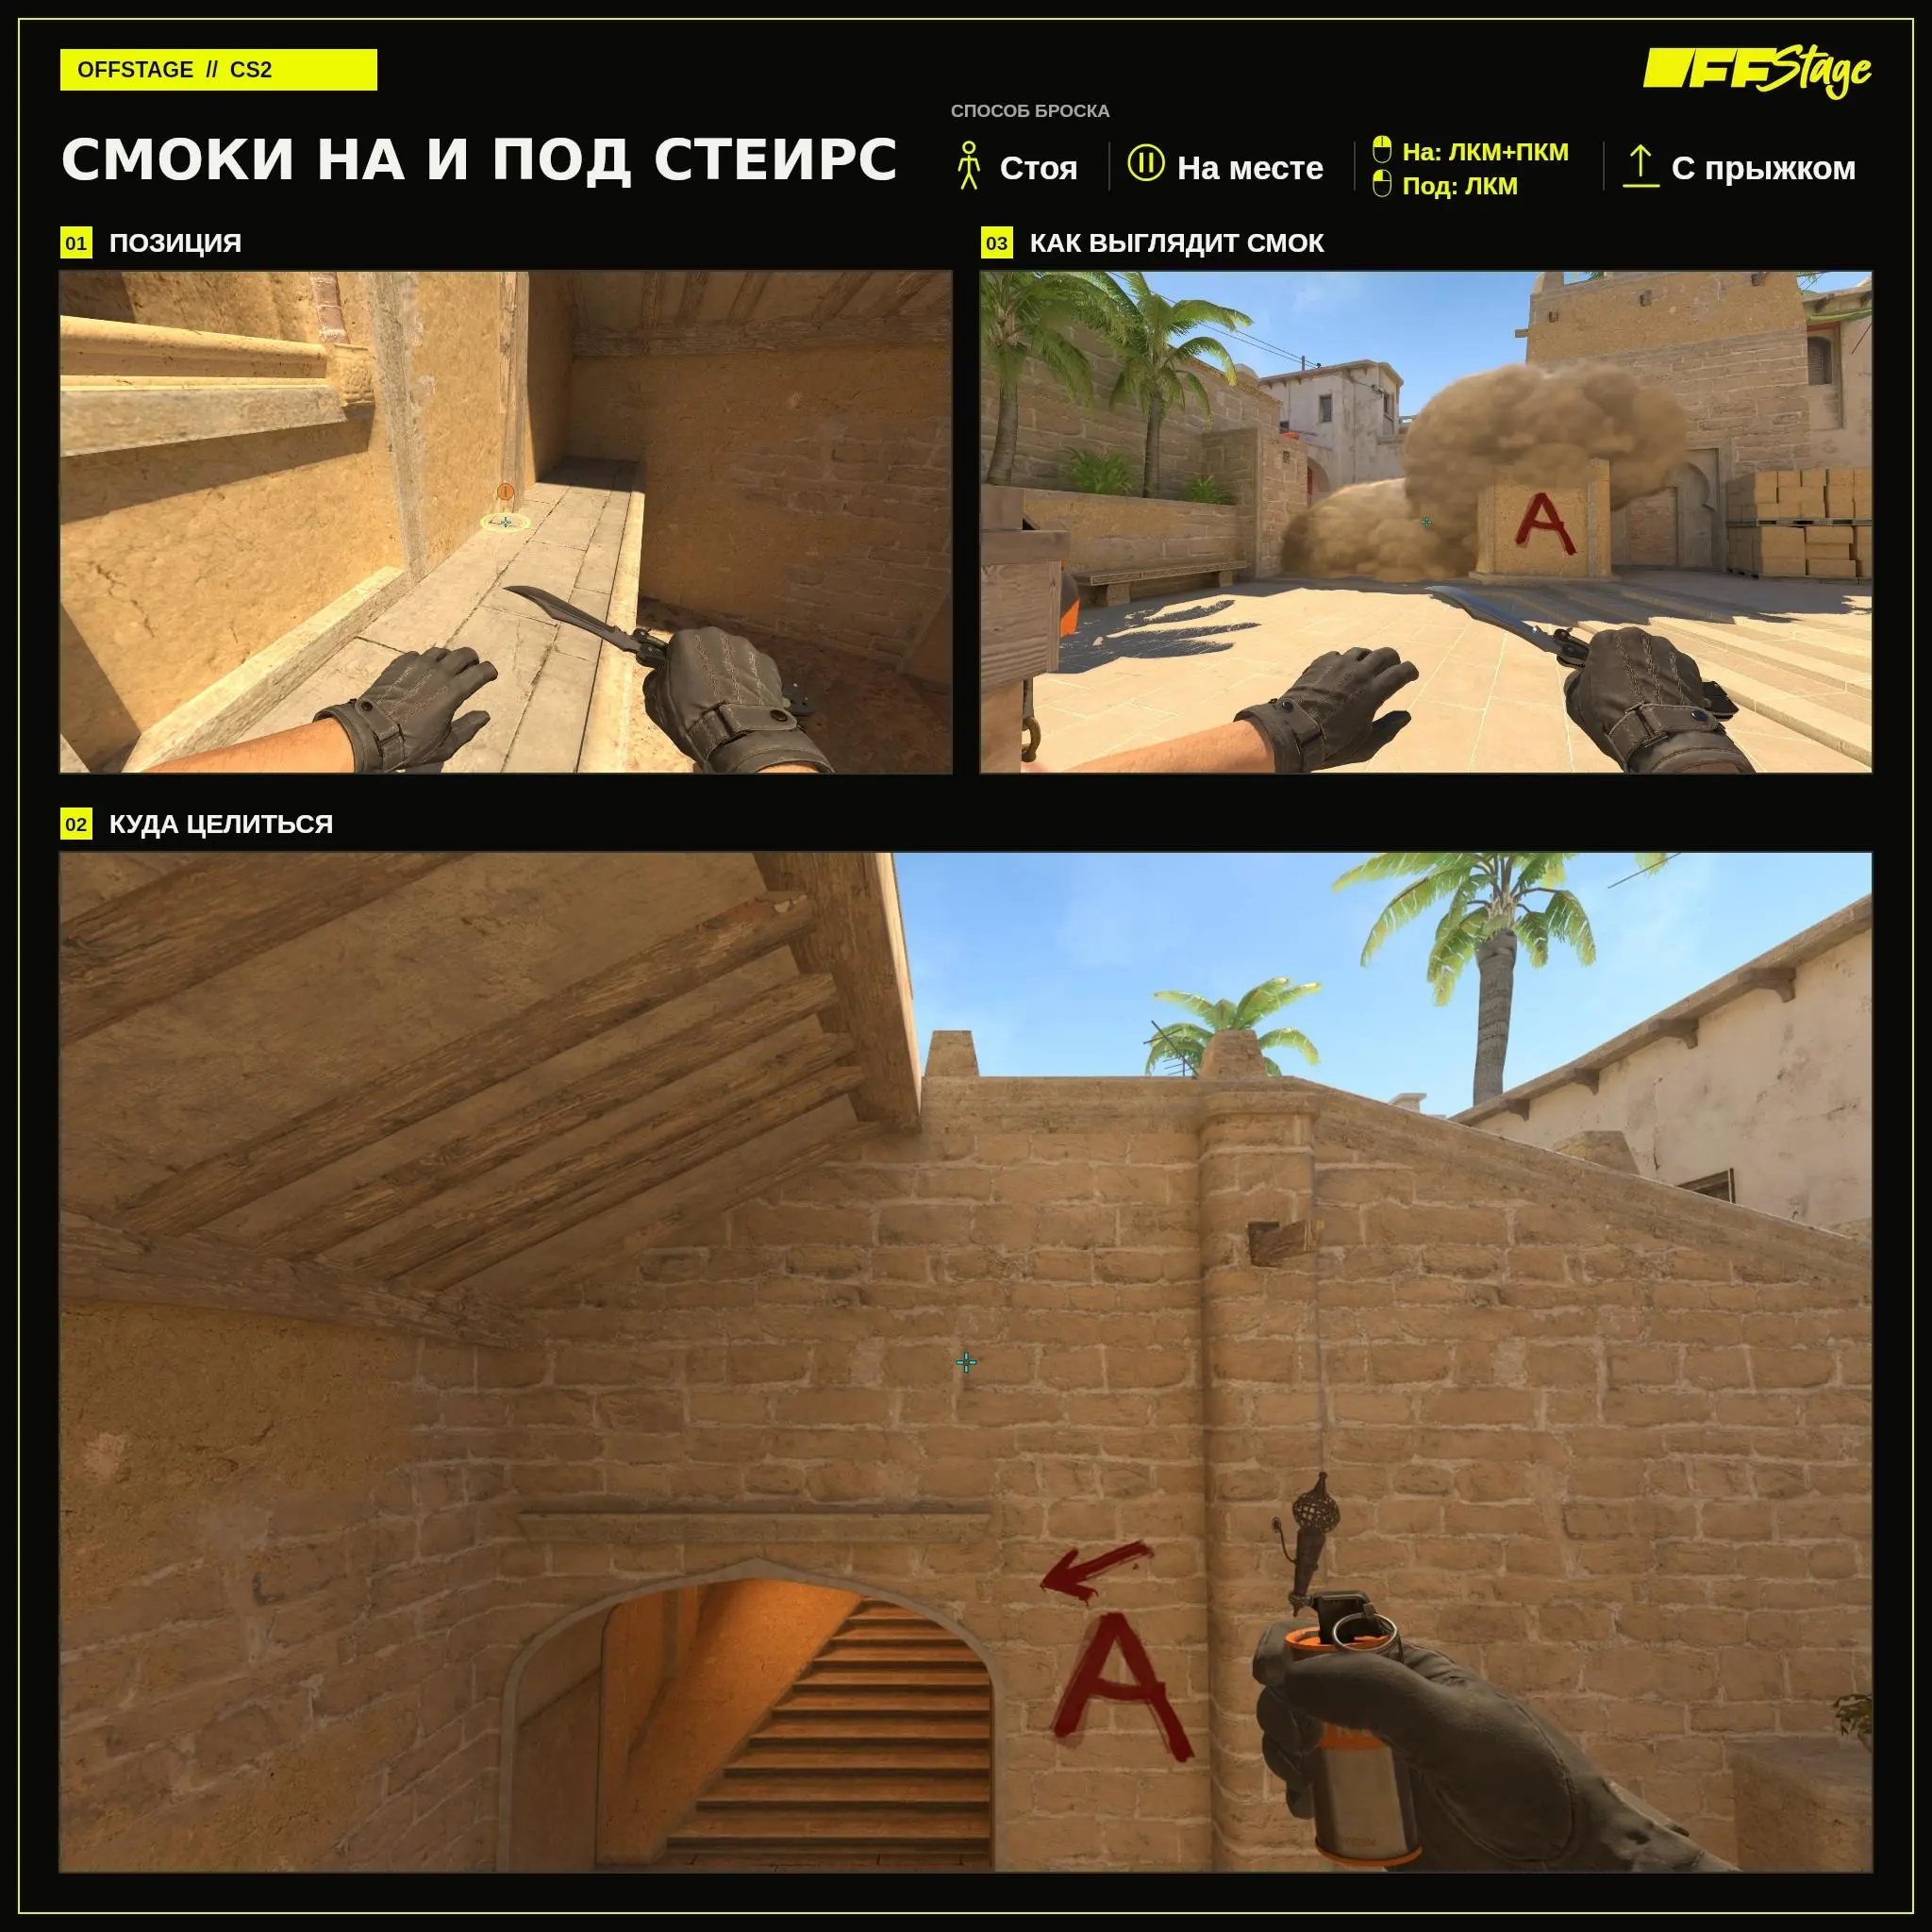
Smoke Grenades on and Under the Stairs
These two smoke grenades are useful for exiting to A from the ramp and from the carpets. One covers the stairs, the other lands beneath them. The diagram shows the result of both grenades: you won’t be able to get two smokes with a single throw. If you need both, assign them to your teammates in advance.
Stand on the ledge by the wall in front of the ramp and aim at the wall above the arch as shown in the diagram. For the smoke on the stairs, hold down the left mouse button (LMB) and right mouse button (RMB), jump, and release both buttons. For a smoke under the stairs, you only need the left mouse button, also while jumping. In both cases, stay in place; the throw point and aim are the same.
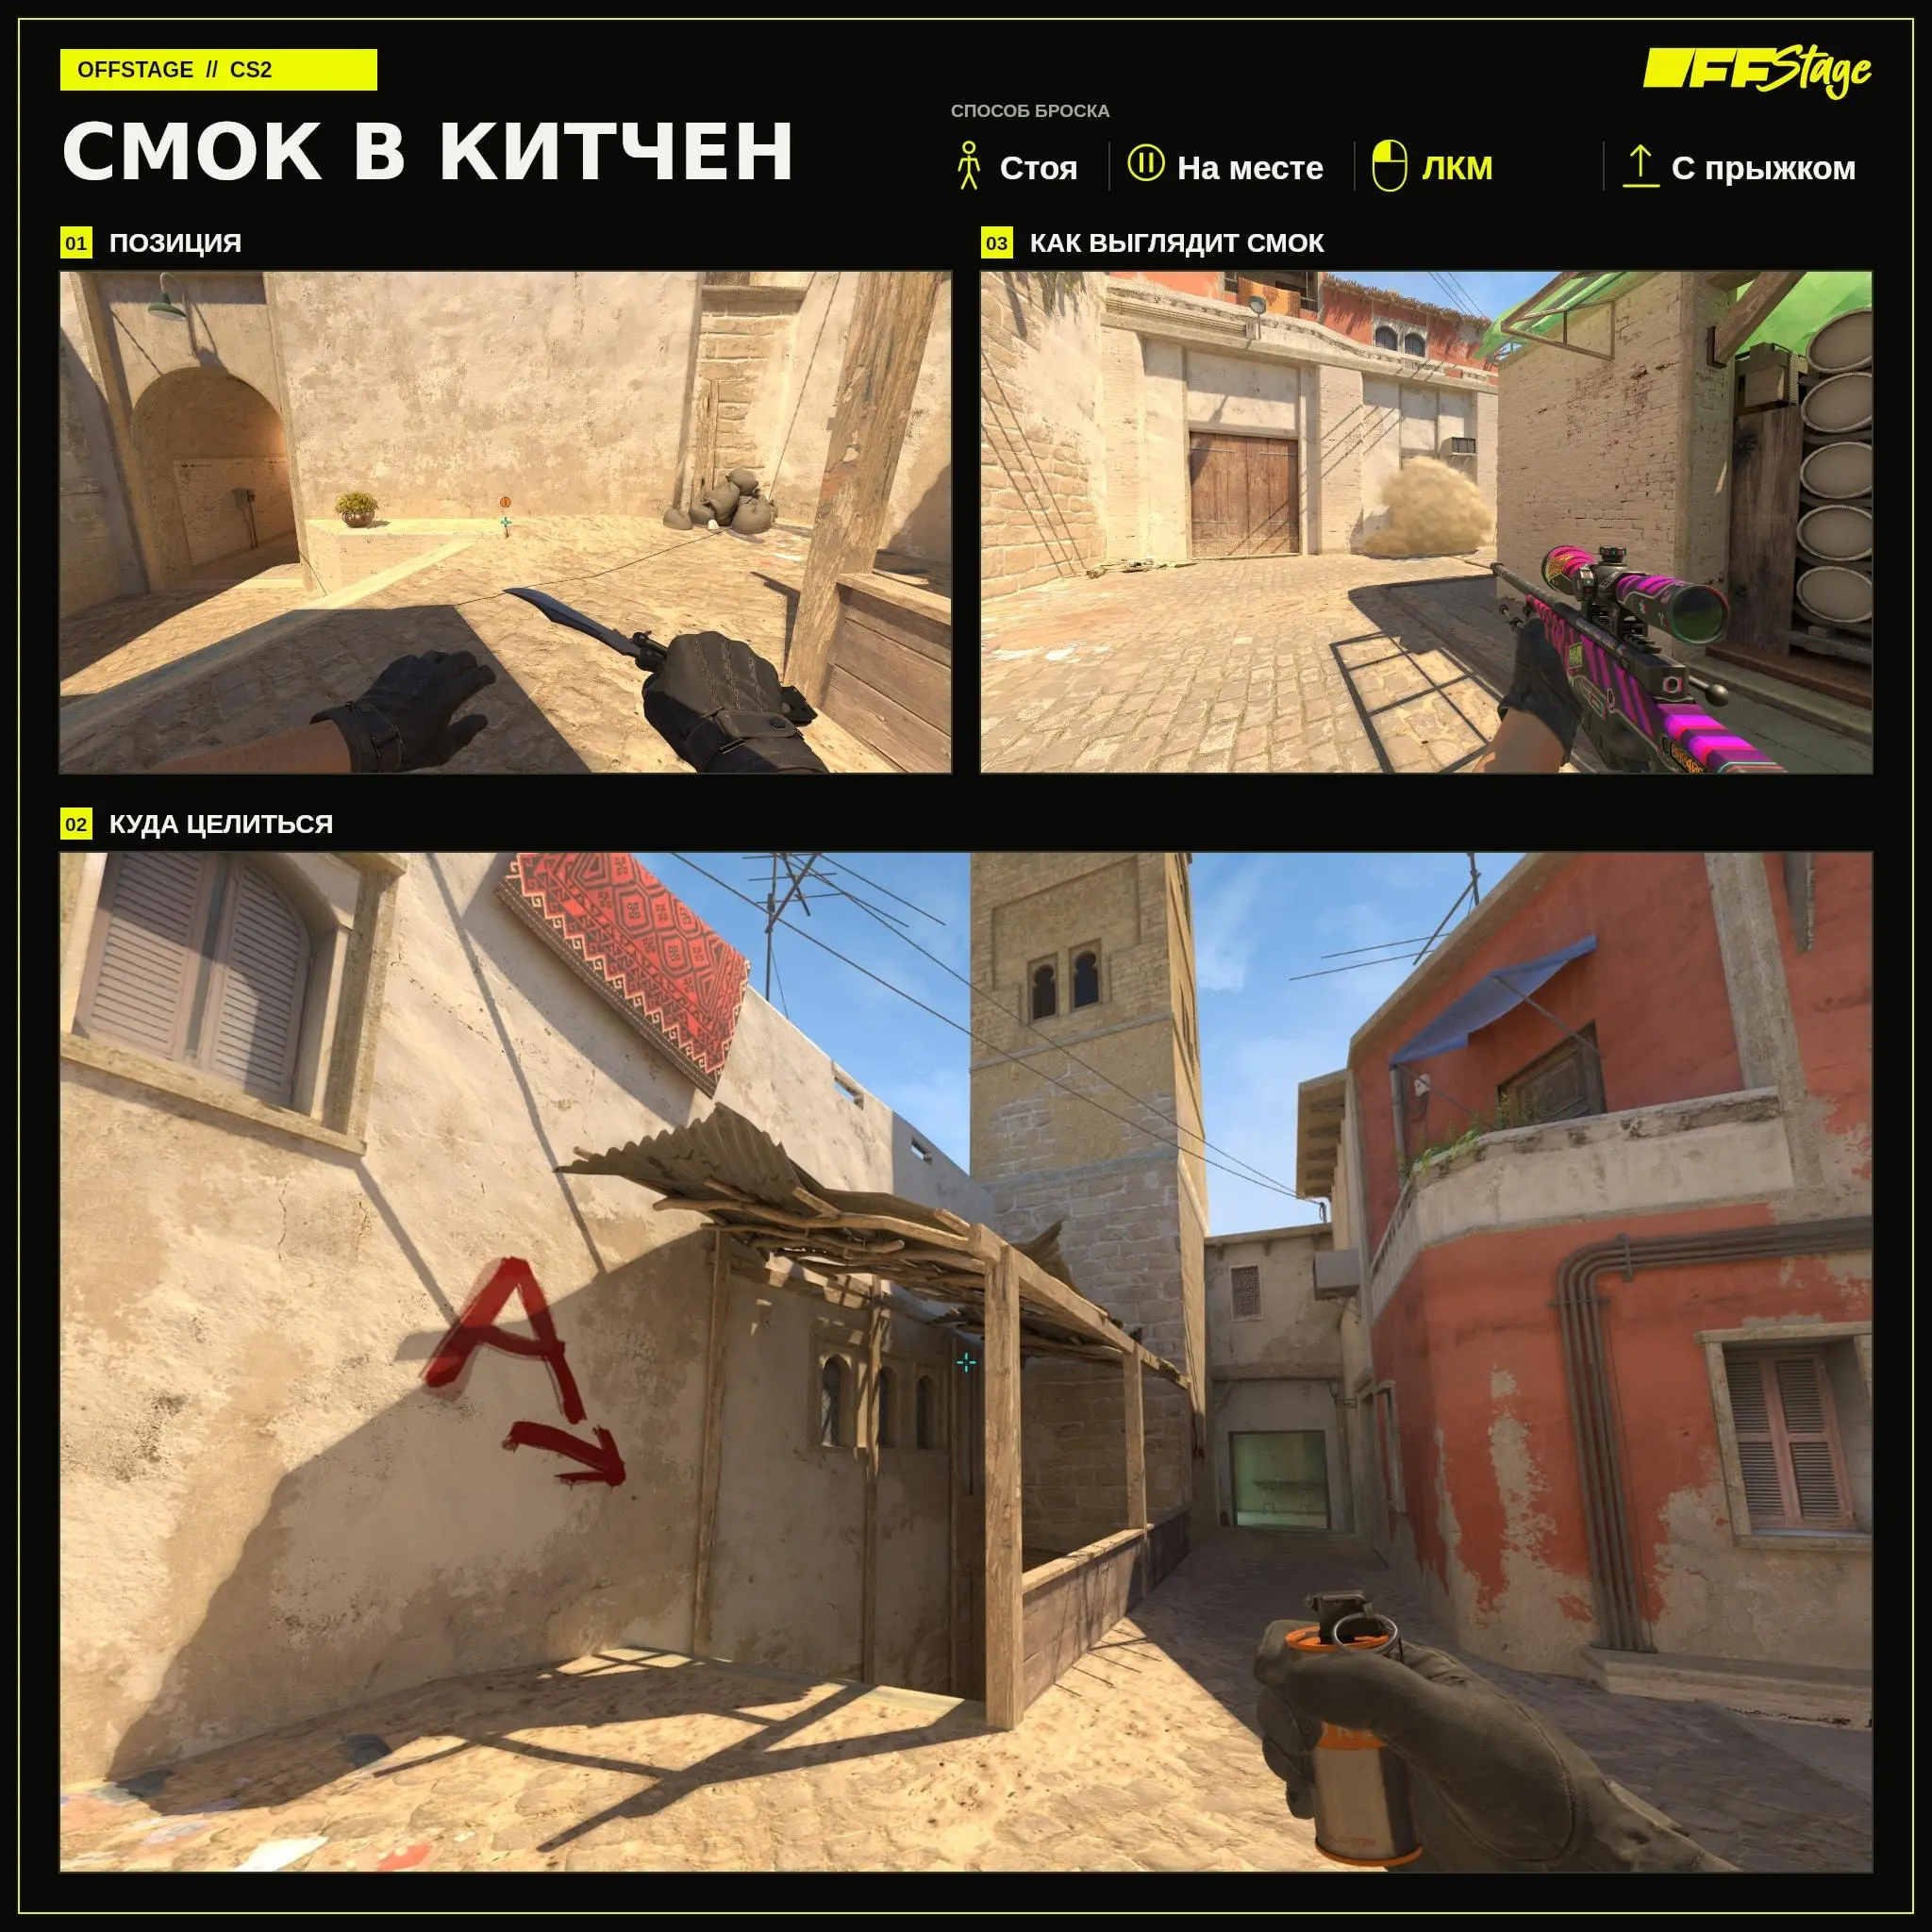
Smoke in the Kitchen
You need smoke in the kitchen before exiting to B. It covers one of the approaches to the platform so the team can deal with the B defenders first. Deploy the smoke when your teammates are ready to exit the house: if you deploy it too early, it will start to dissipate at the worst possible moment.
Stand by the light-colored wall next to the flowerpot, in front of the B house. Turn toward the wooden awning: the crosshair on the map is positioned on the dark object to the left of its support. Throw the smoke grenade while jumping from a standing position. As you exit, check the other positions on B—one smoke grenade in the kitchen isn’t enough to cover the entire area.
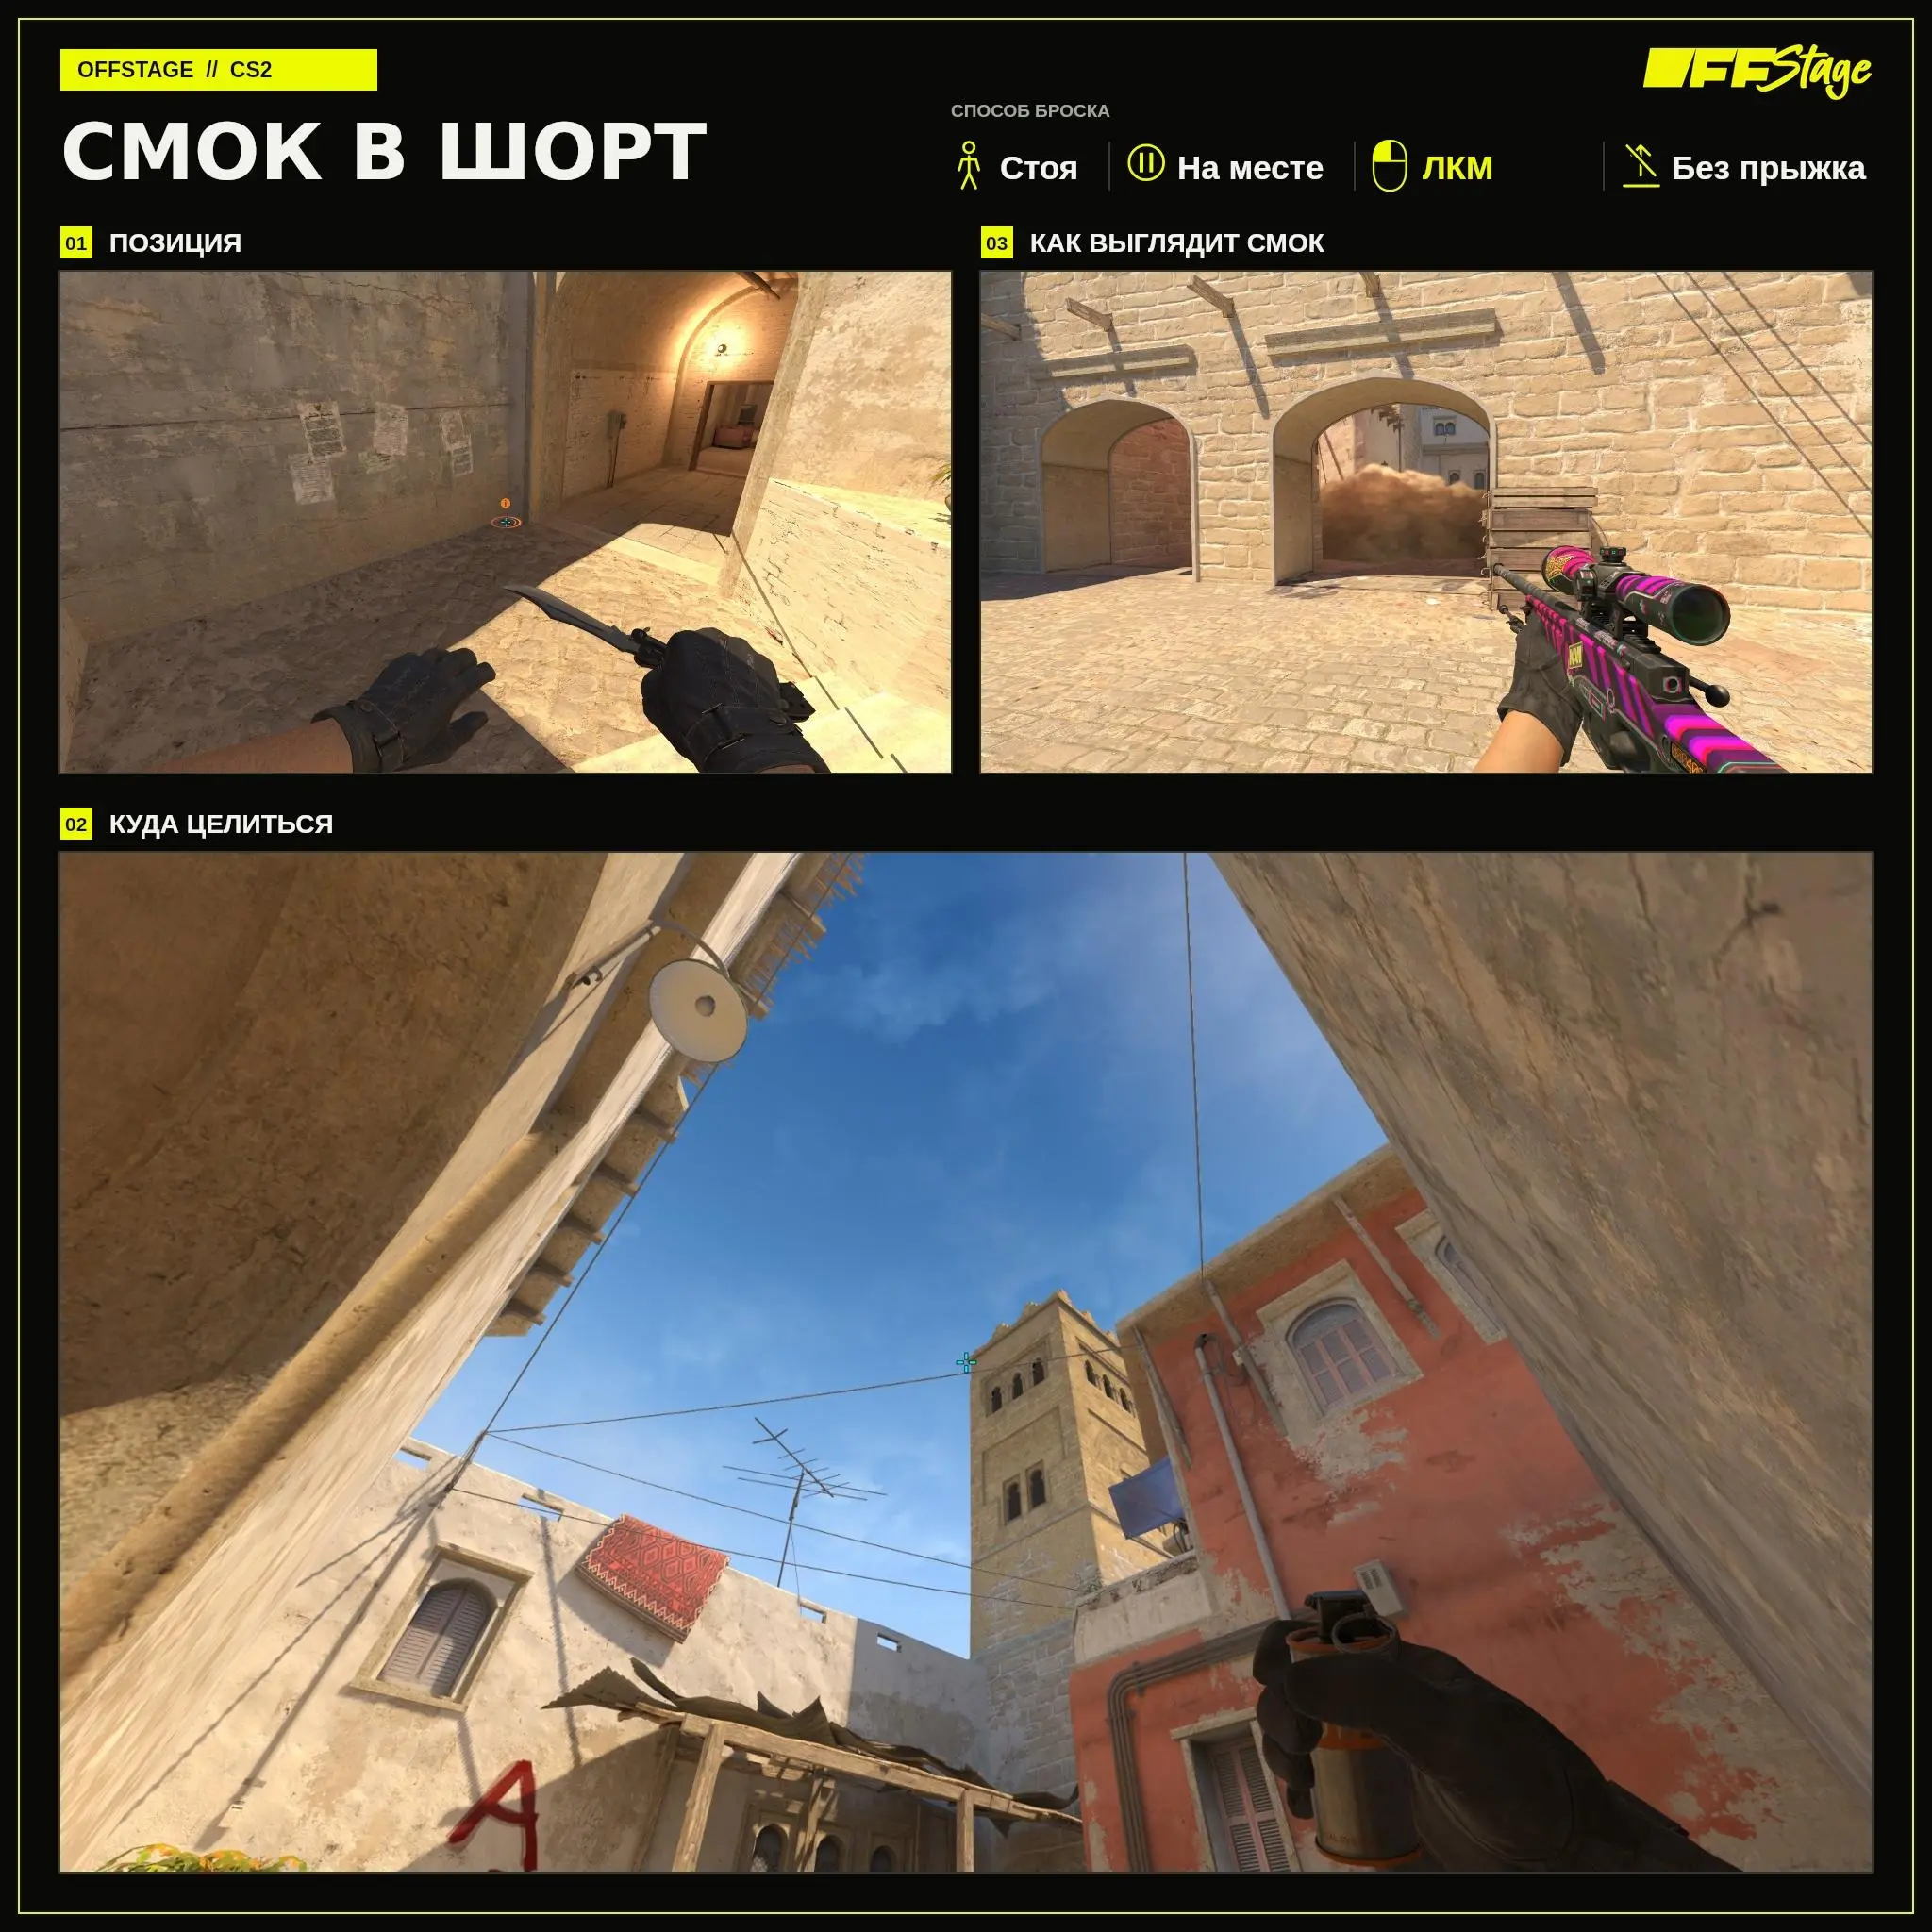
Smoke on the short route from Building B
This smoke grenade on the short route lands in the archway at the B-house and helps you exit the building. Paired with the kitchen, it covers two directions from which an attack might come. Meanwhile, B support players remain on the plinth: the first players should check the nearby positions, and the next ones should be ready to trade shots.
Take the marked corner in front of the B-house, under the passageway roof. Aim for the left edge of the tower just above the wire, as shown in the diagram. Shoot while standing, left-click from a stationary position, without jumping. This is the option for pushing to B; the smoke from the cart to mid is needed to push to the control point.
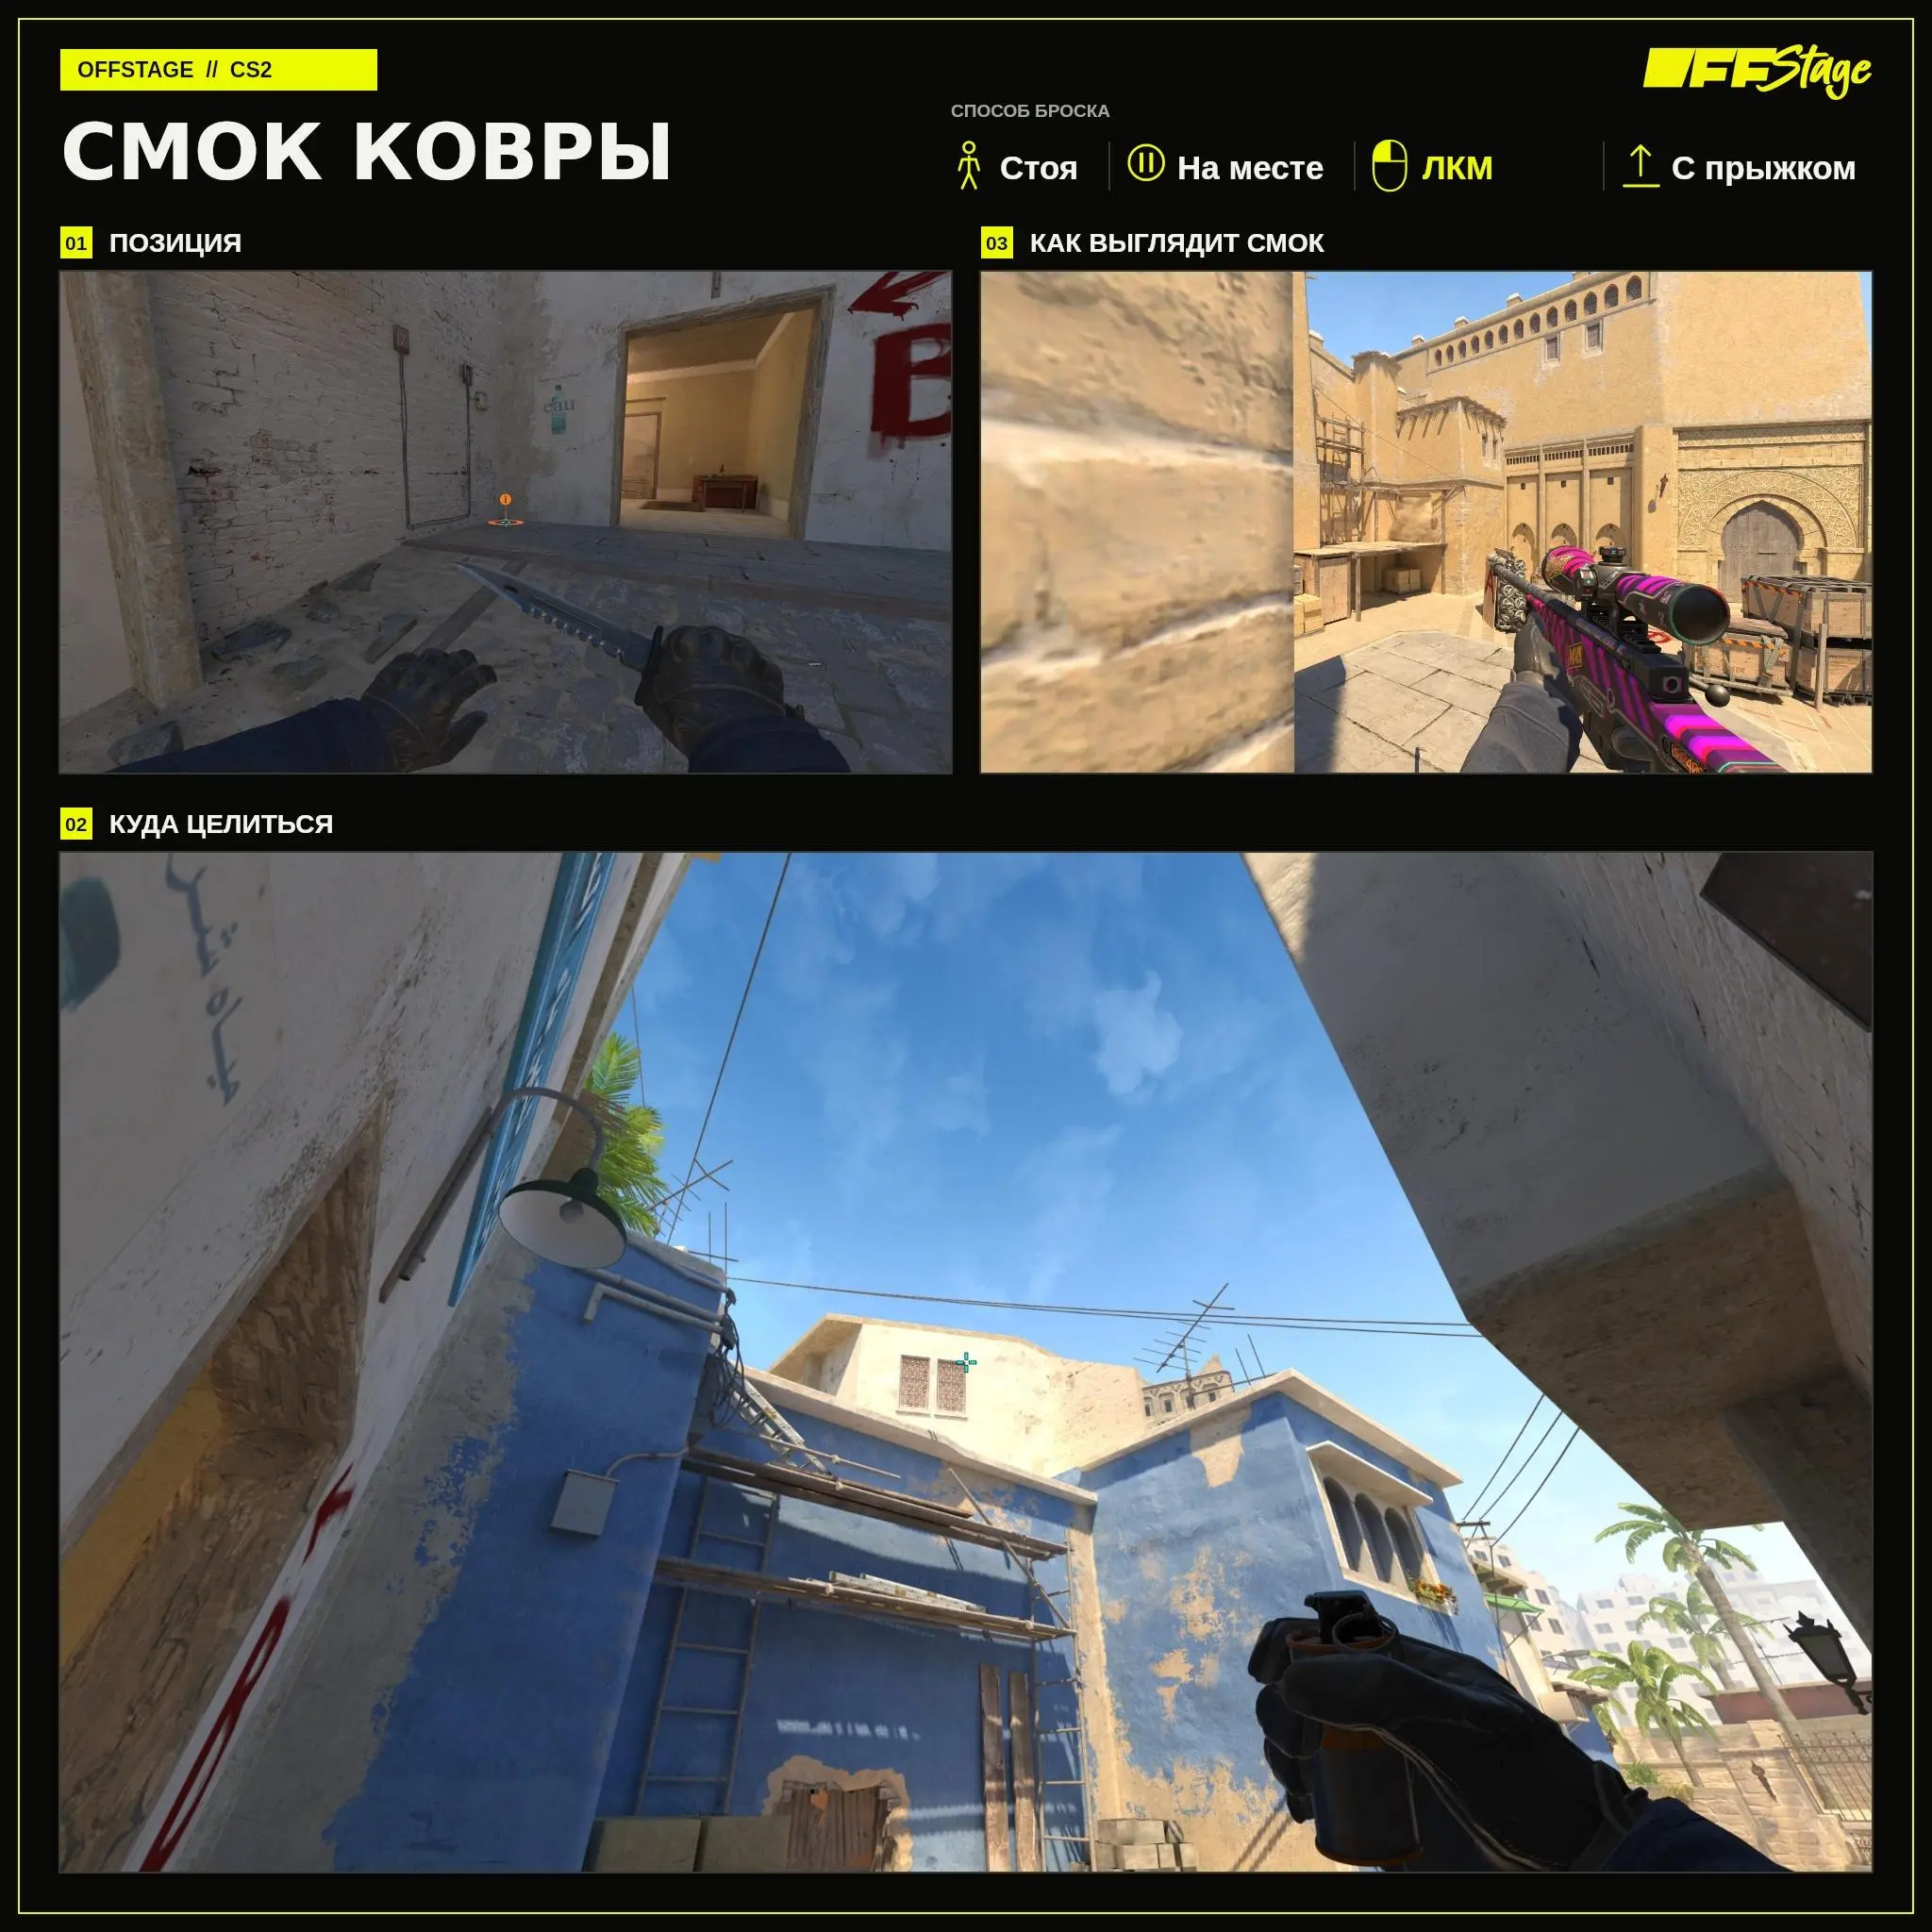
Smoke into the carpets
This grenade can help the A-side support by blocking the exit from the carpets. It comes in handy if your teammate needs to focus on the ramp and has run out of smoke. Another option is to throw it during a retake when the opponent is still in the carpets after planting the bomb. Warn your team about the throw so everyone knows which exit is about to be blocked.
Stand to the left of the entrance to the TV room, next to the wall with the red letter B. Above the blue building, find two barred windows: aim for the upper-right corner of the right window. Left-click while jumping from a standing position. The grenade takes time to fly, so throw it in advance—not the moment your partner runs out.
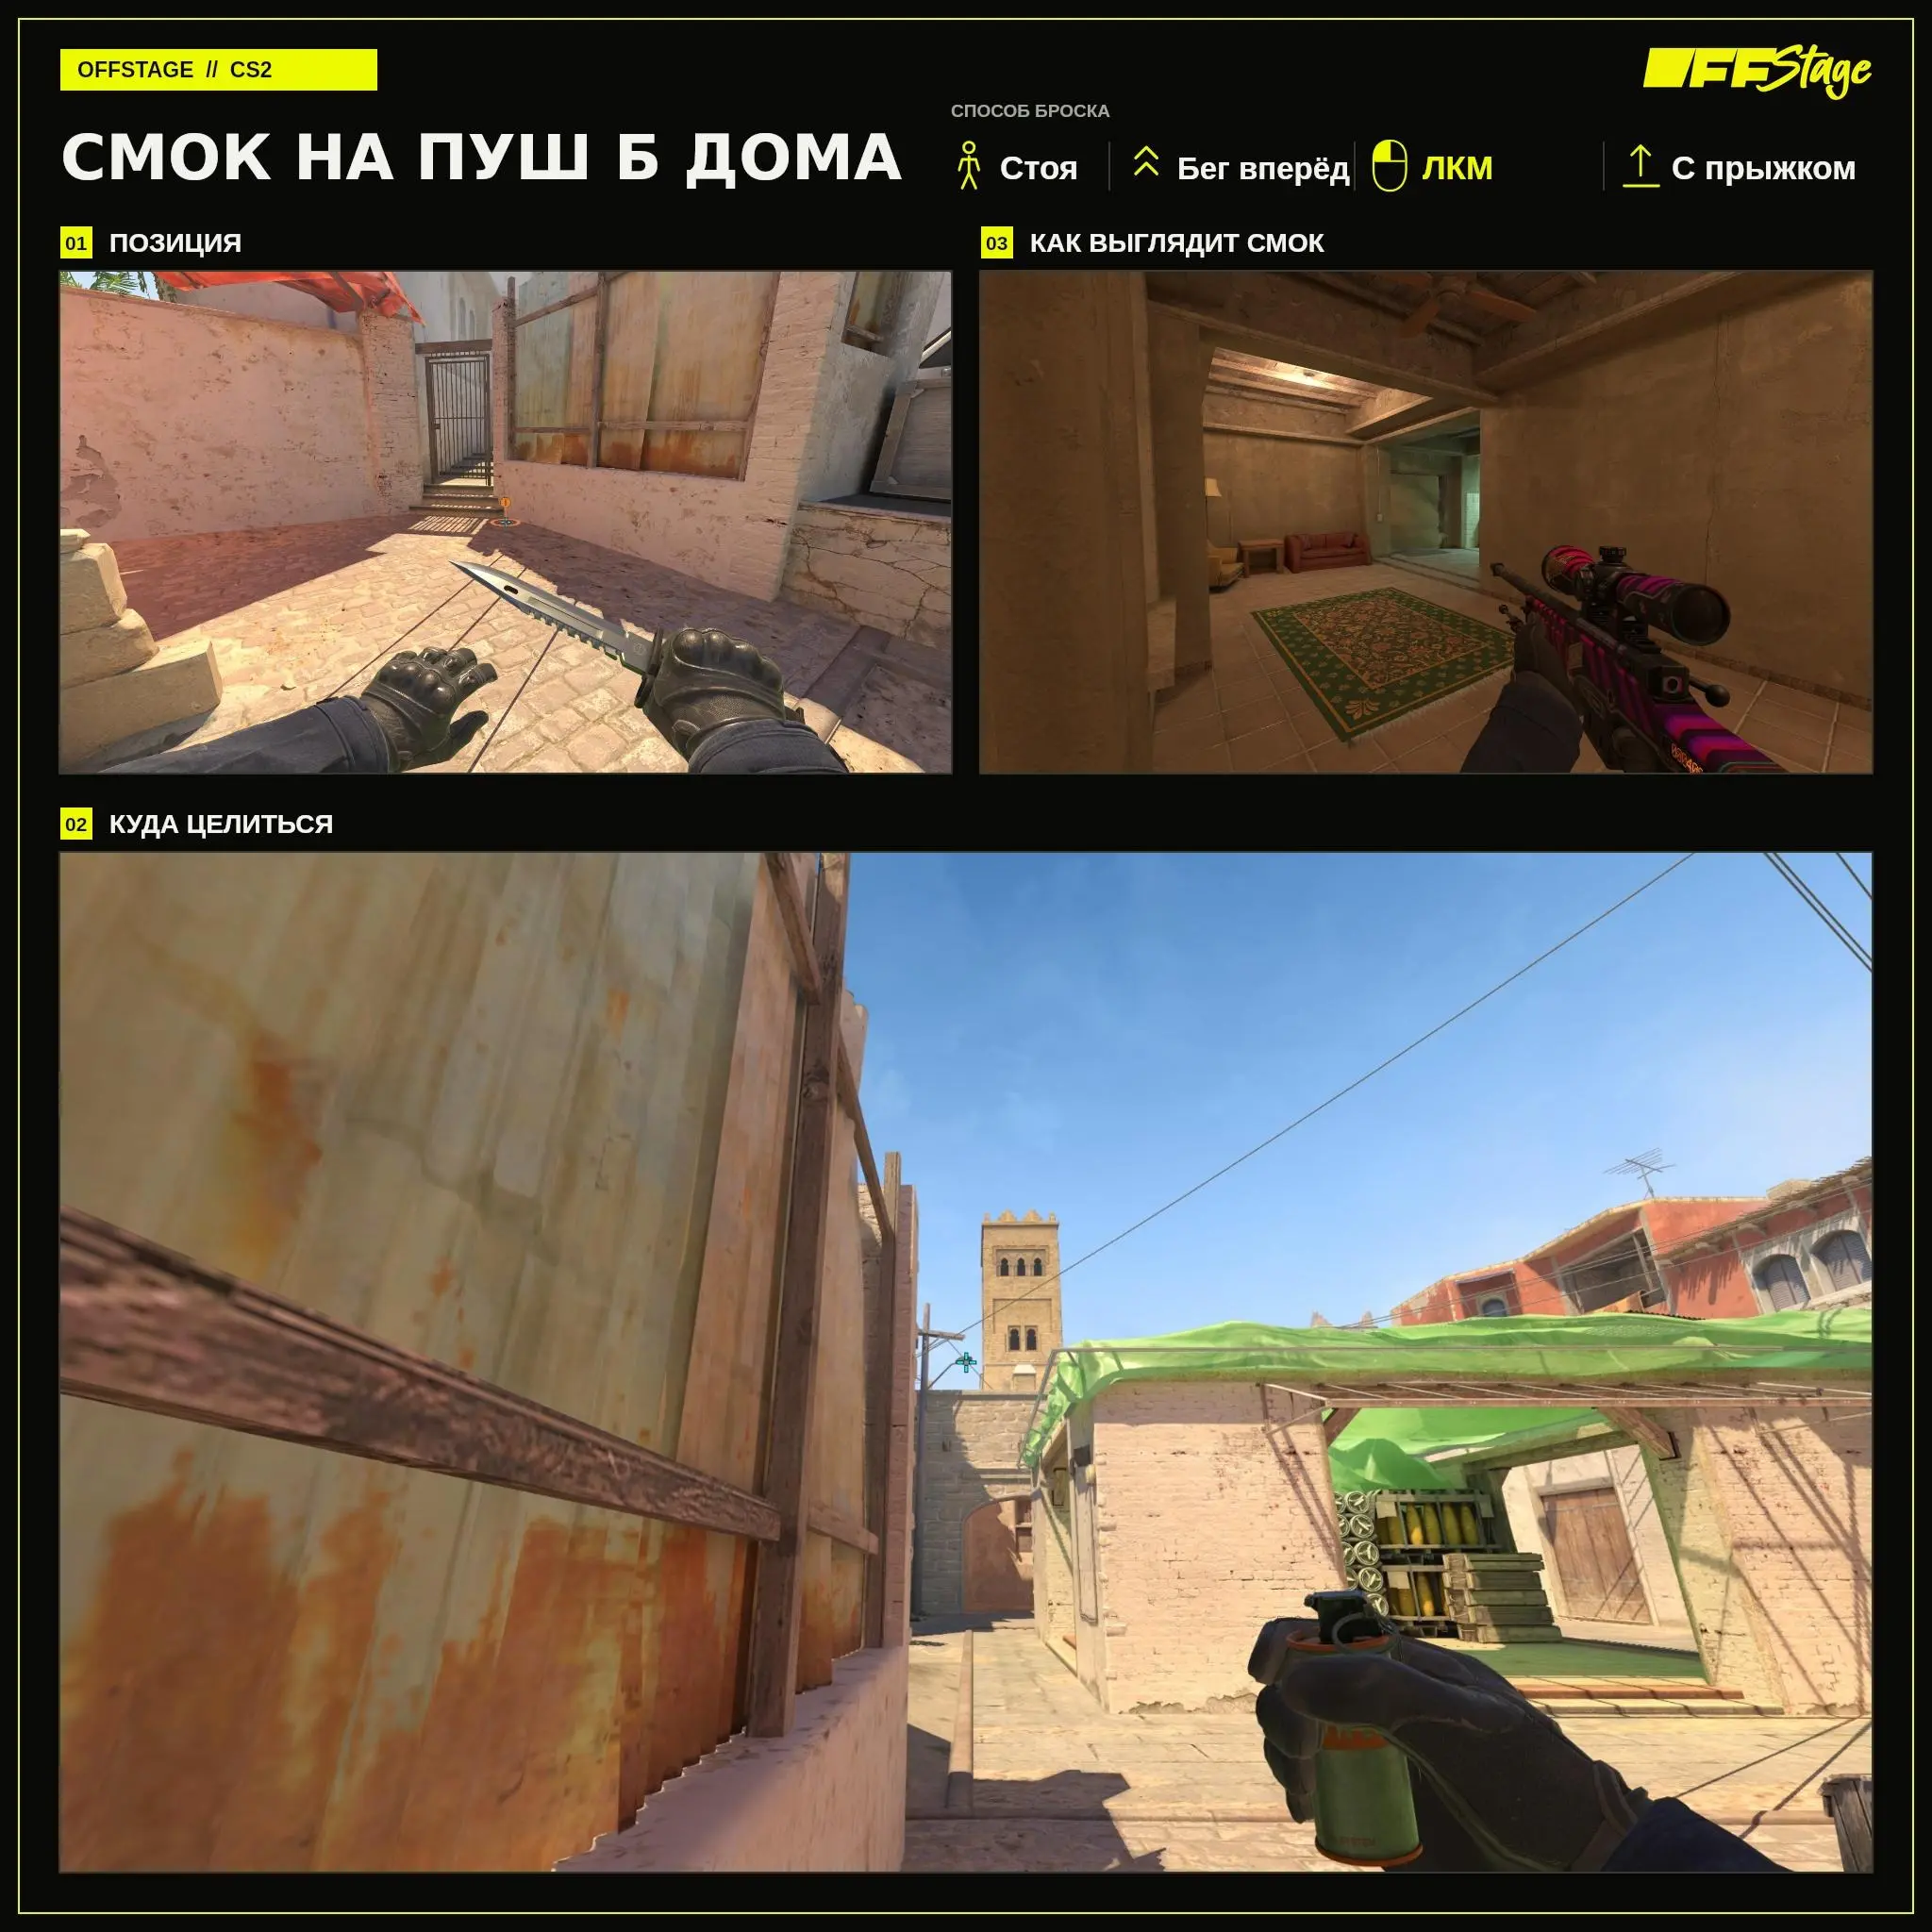
Smoke for the B-House push
Smoke for the B-house push helps B-side players play more aggressively. It blocks the far passage inside the house while the CTs check the nearby corners. It’s best to push as a pair: one searches for the opponent, while the other is ready to trade. Don’t assume the building is empty just because of the smoke—one of the T players might have gotten closer before the smoke was thrown.
Take up the position by the wall on B, marked on the map. Aim for the end of the sloped support to the left of the tower, hold down the left mouse button, and start running forward. Throw while jumping, without holding Shift. Practice your grenade release timing: when throwing from a running start, both your aim and where you land are crucial.
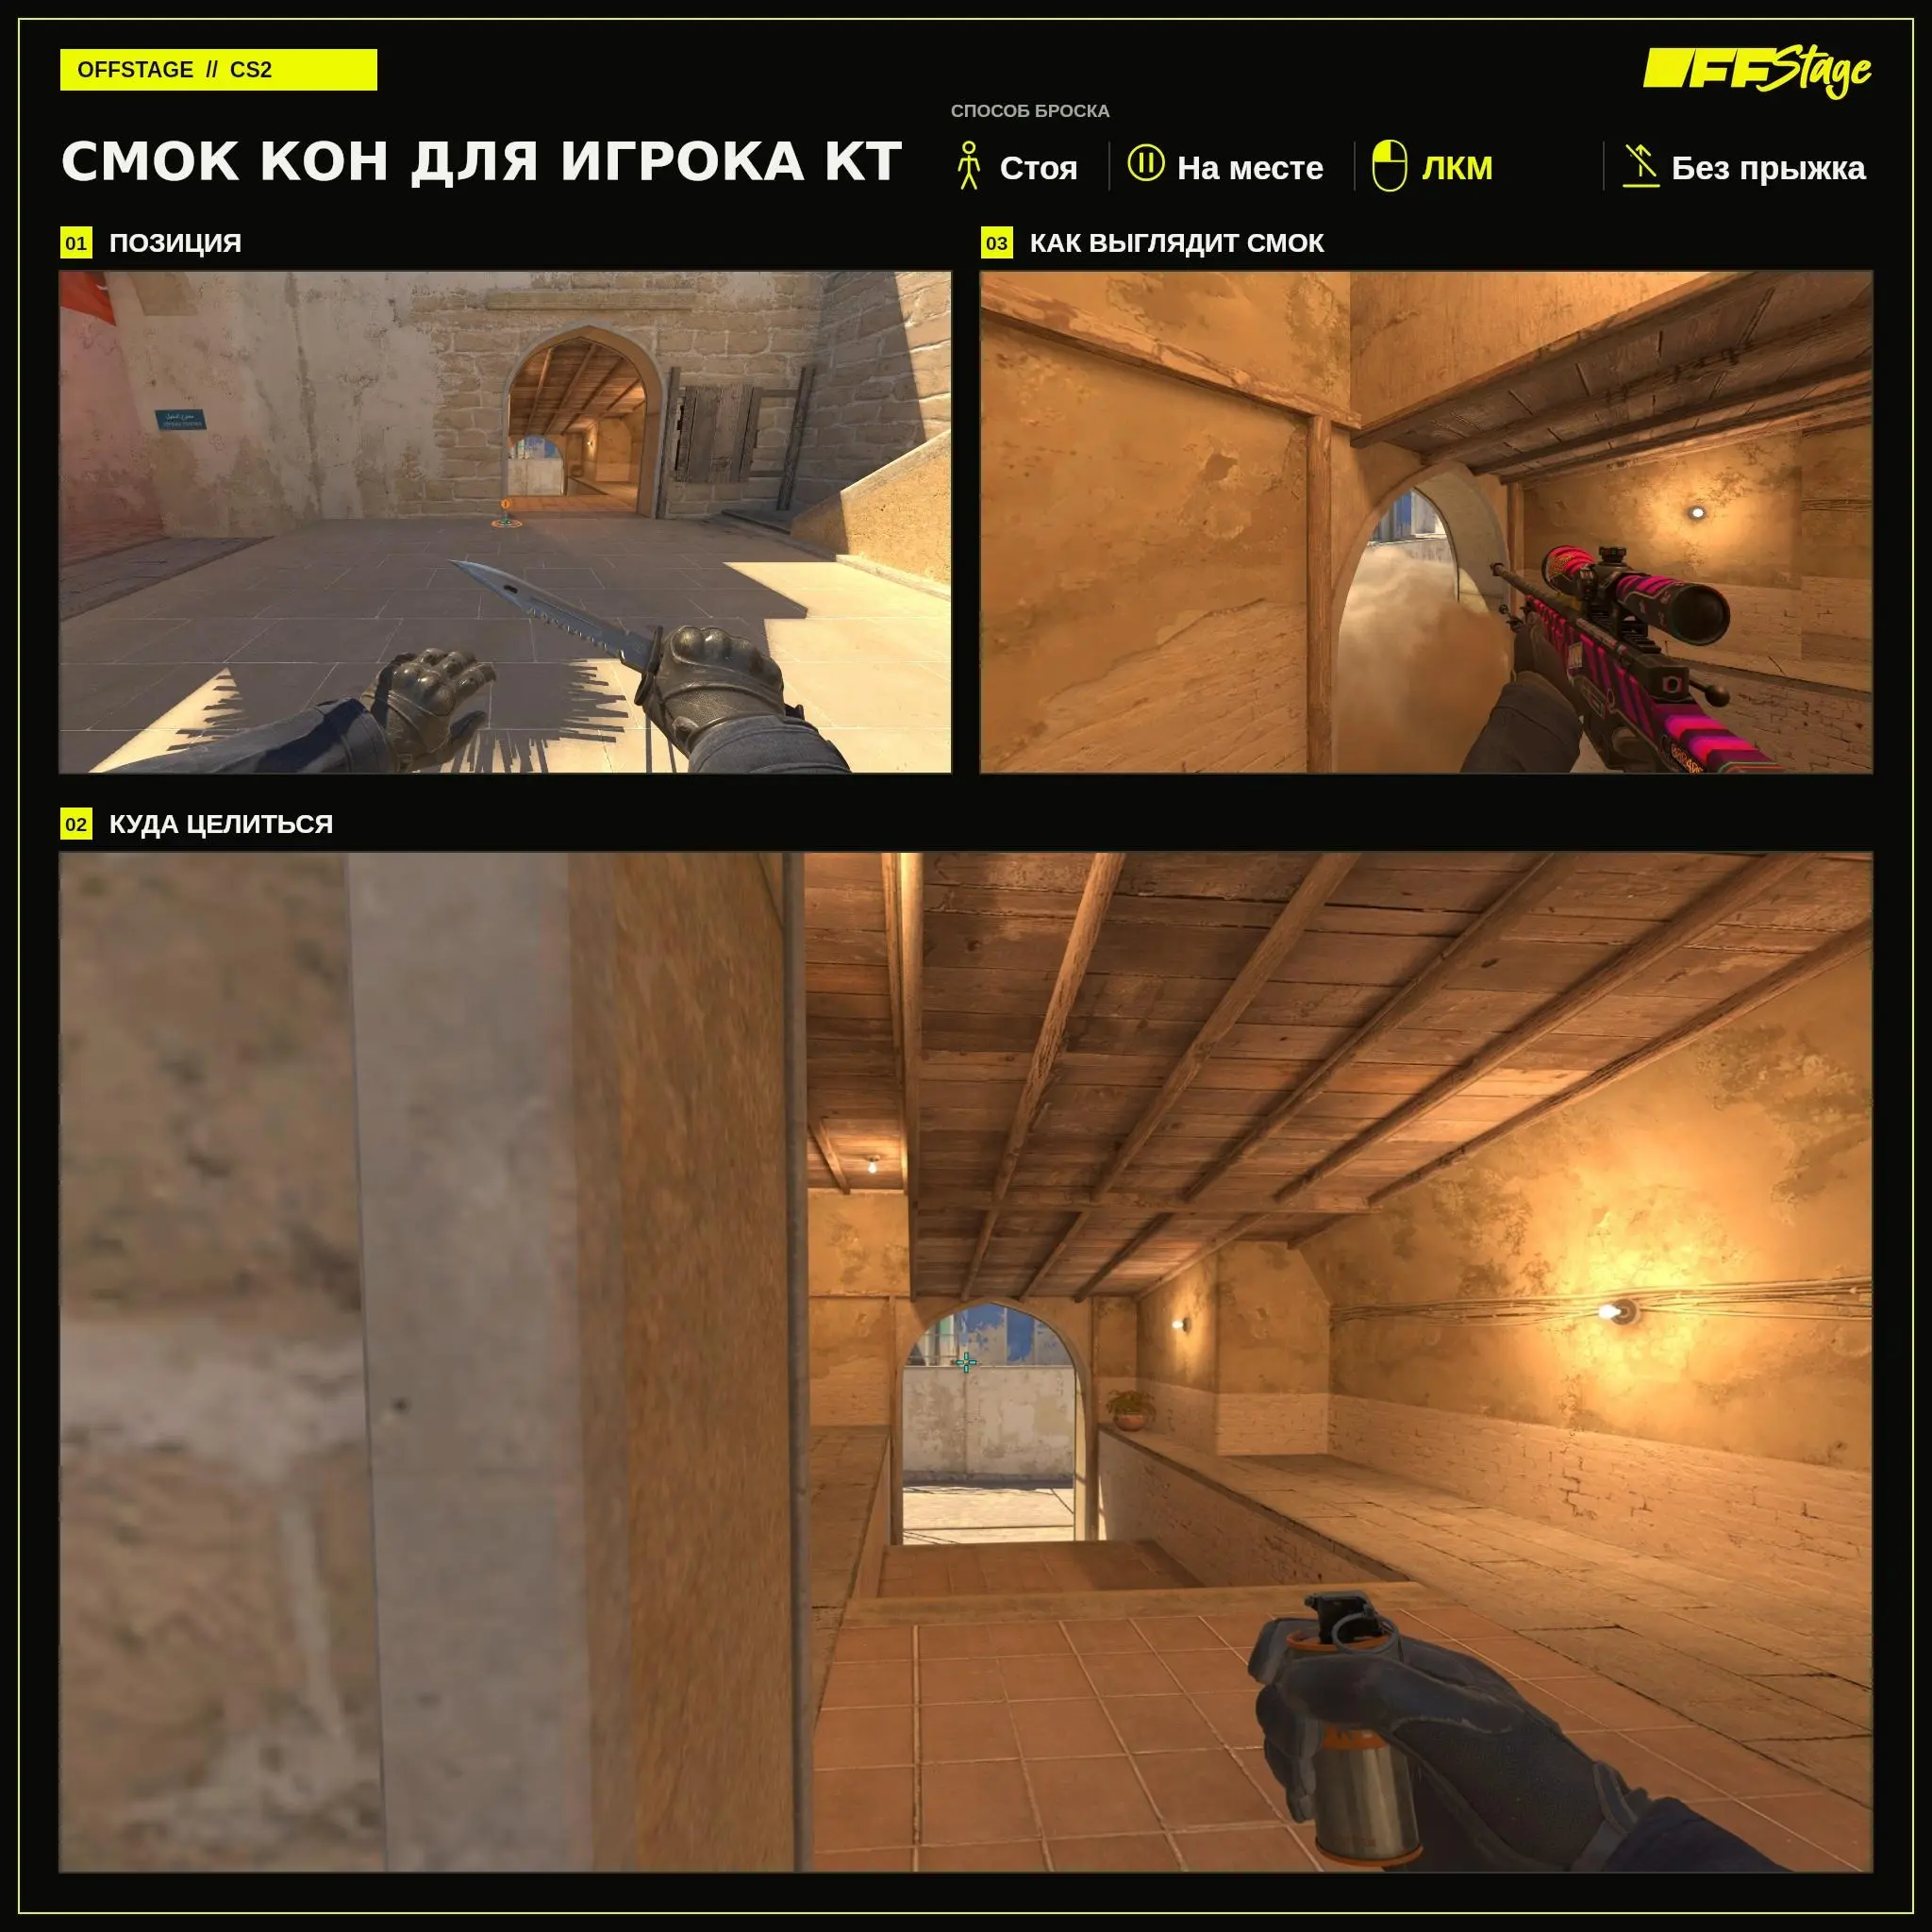
Smoke into the connector behind CT
Support A can cover the bottom of the connector from their side if the attack has taken mid. This same throw is useful for refreshing smoke that’s about to expire. It gives you time to help a teammate or check the ramp. If you hear footsteps in the connector, draw your weapon immediately: an opponent might come out through the smoke.
Move to the left edge of the cone entrance on the A side and look through it toward mid. Aim at the top edge of the light-colored wall in the far arch, as shown in the diagram. Left-click from a standing position, without jumping. For the grenade, it’s enough to stay at the entrance—you don’t need to go down the stairs.
Frequently Asked Questions (FAQ)
Для мида начните с окна и нижнего кона. Под выход на А добавьте КТ и оба смока на стеирс, под Б — китчен и шорт от дома. Опорнику А пригодится дым в кон со своей стороны. Лучшие раскидки на Мираже для начала — те, которые вы сможете сразу использовать в своих раундах.
Нет, здесь показан бросок от урны с движением вправо на D и Shift. Инста-смок в окно на Мираже дают сразу с определённого респауна, чтобы закрыть окно как можно раньше. Для него нужен отдельный прицел под место появления. В нашем варианте сначала нужно подойти к урне.
Сверьте позицию у урны и прицел на перилах, затем проверьте движение. D и Shift должны быть зажаты вместе, а прыжок делается уже при движении вправо. На тренировке меняйте по одному действию за попытку — так проще найти ошибку.
Эти броски можно разучить на обычной Mirage в тренировочном режиме. Отдельная карта не обязательна. Если нужны подсказки прямо в игре, ищите карты для тренировки раскидок в мастерской и проверяйте, что они сделаны для CS2, а не для CS:GO.
После удачного броска отойдите от позиции, вернитесь и повторите всё заново. Затем посмотрите на дым с другой стороны: нет ли просвета, через который вас увидят. Когда граната начнёт получаться несколько раз подряд, попробуйте дать её вместе с раскидкой напарника.
Сначала проверьте их в CS2. Знакомый ориентир ещё не гарантирует, что дым ляжет куда нужно. Повторите бросок и посмотрите на результат, прежде чем использовать его в матче. Схемы в этой подборке сняты в CS2.