How to Set Up OBS Studio for Streaming on Twitch and Recording Videos: A Complete Guide

OBS Studio is a free program for streaming on Twitch and recording video from your computer. It lets you show your game, desktop, and webcam, transmit microphone audio, and display donation notifications. In this guide, we’ll walk you through how to set up OBS for streaming on Twitch, recording games and your screen, and we’ll also show you how to choose a bitrate, connect a microphone, and prepare for your first stream.
How to Set Up OBS Studio Before Your First Launch
Download the installer from the official website, install it, and open OBS. If the interface is in English, go to File > Settings > General, select Russian, and restart the program.
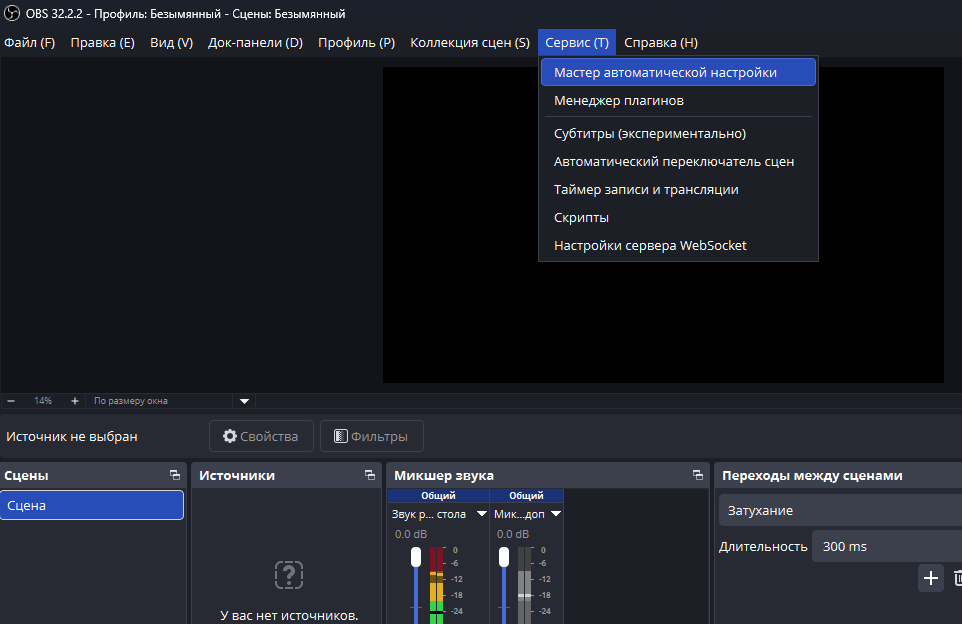
You can start by using the automatic configuration:
- Open “Tools” — “Auto-Configuration Wizard.”
- Select your priority: streaming or recording.
- Specify the resolution and frame rate.
- To stream, connect your platform account and run a connection test.
- Apply the suggested settings.
The wizard takes into account your computer’s capabilities and internet connection. You can use its recommendations as a starting point and then adjust the settings after a test recording or stream.
How to Set Up OBS for Gaming and Screen Capture
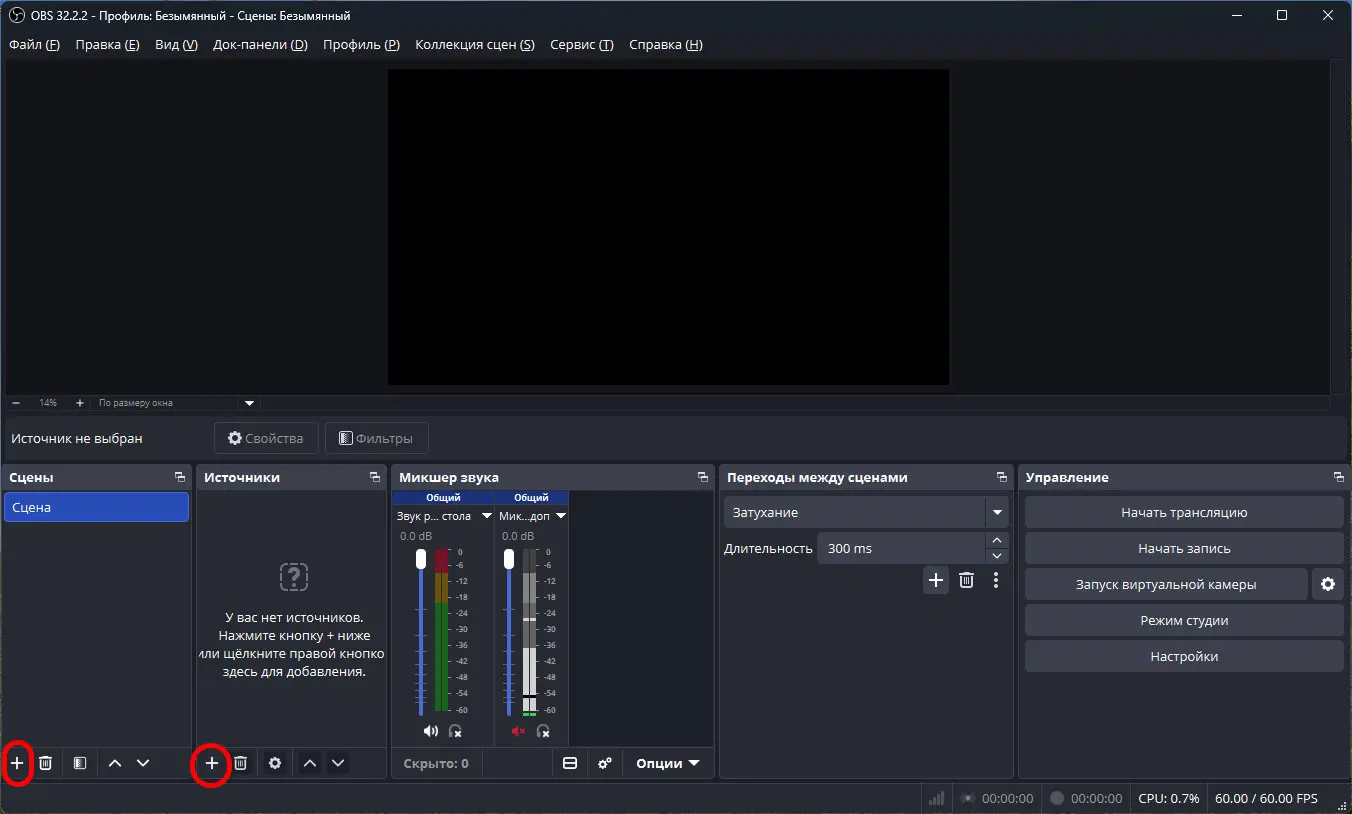
The image in OBS is composed of scenes and sources. A scene is a ready-to-broadcast composition, and sources are its content: a game, a camera, text, an image, or notifications. For example, you can create three scenes: “Game,” “Chat,” and “Break.” The first will feature gameplay and a webcam, the second will feature a close-up camera shot, and the third will feature a splash screen.
To set up OBS for gaming, click the + button in the Scenes panel and enter a name. Then add a source by clicking the + button in the adjacent panel.
- Game Capture — shows gameplay;
- Window Capture — shows the content of a specifically selected window;
- Screen Capture — captures the selected monitor. Be careful with this setting if you have only one monitor, so you don’t show unnecessary information on the stream;
- Video Capture Device — webcam or capture card;
- Image — frames, logos, ads, etc.;
- Browser — donations, chat, and other widgets.
How to Add a Webcam to OBS
In Sources, click + and select Video Capture Device. Select your camera and confirm the settings. Drag the image to the desired corner and crop it so it doesn’t extend beyond the frame. Make sure the camera doesn’t cover the minimap, your character’s health bar, or other important interface elements. You can move it by clicking or by dragging it as usual.
How to Set Up Audio in OBS
Open “Settings” > “Audio.” In the “Devices” section, select your headphones or speakers to capture your computer’s audio, and in the “Microphone/Additional Audio” field, select your microphone.
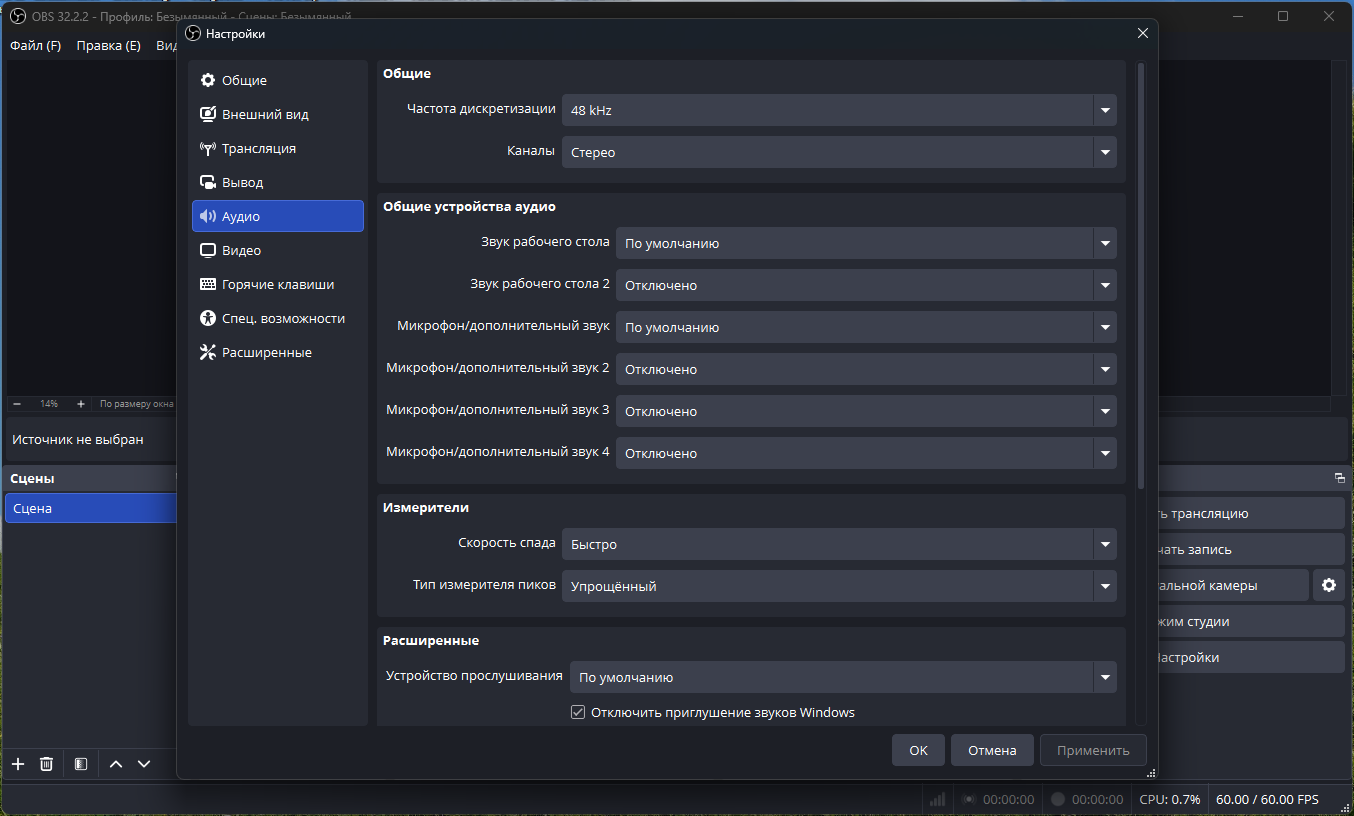
Return to the main window. While audio is playing and you’re speaking, the meters in the “Audio Mixer” should move. The sliders adjust the volume, and the speaker button mutes the selected source.
To configure the audio in OBS, make a short recording: launch the game and say a few phrases. Listen to the result. If gunshots and music drown out your speech, lower the game’s volume in the mixer.
You can stream audio only from the desired application. To do this, add “Application Audio Capture” or enable audio capture in the properties of the game or window source. Be sure to disable general desktop audio capture so that the same audio isn’t streamed twice.
How to Set Up a Microphone in OBS
First, make sure the correct microphone is selected: the program may capture audio from your webcam instead of your headset. Then adjust the volume based on a test recording. When speaking loudly, the meter should not hit 0 dB.
You can also customize your microphone settings in OBS using filters. Open the microphone menu in the mixer and select Filters.
How to Set Up OBS for Streaming on Twitch
Once the video and audio are ready, connect to a channel:
- Go to “Settings” > “Stream.”
- Select Twitch from the list of services.
- Click the button to connect your account.
- Log in to your profile and confirm access.
- Save your changes.
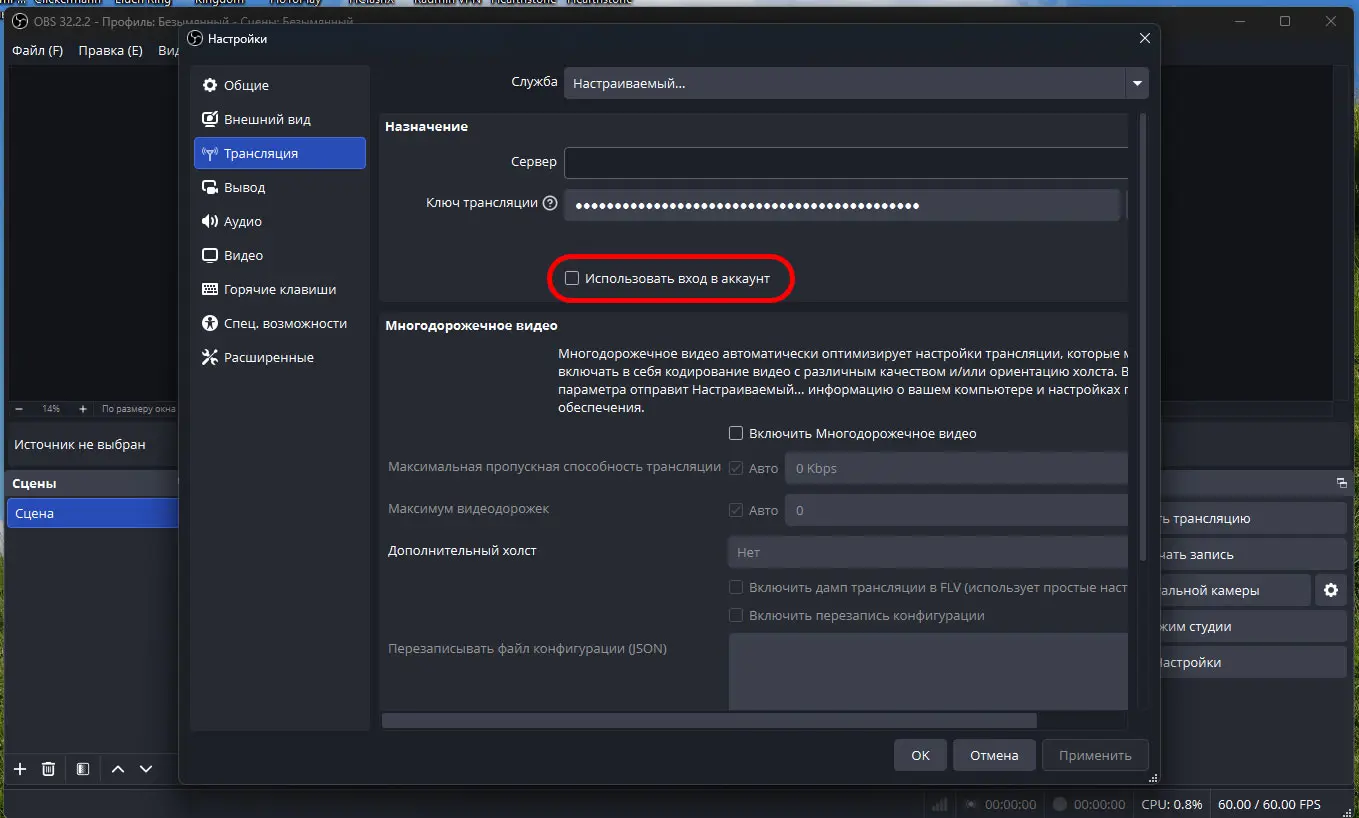
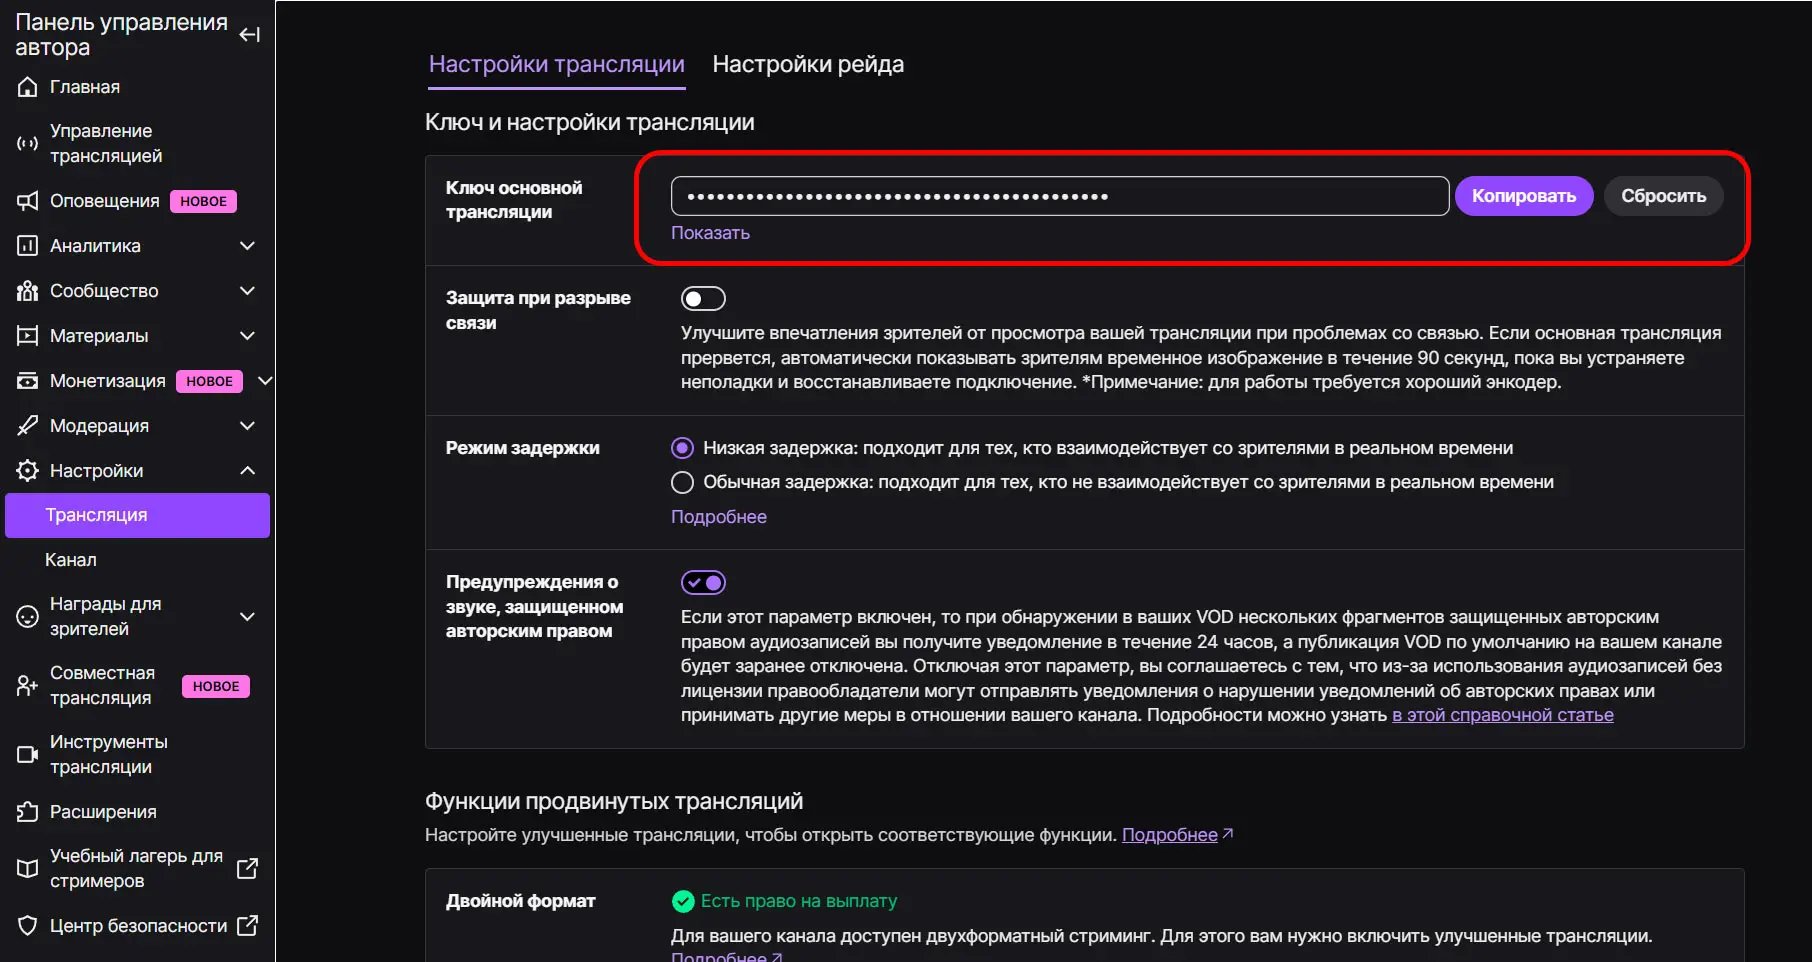
Another way is to use a stream key. You can copy it from the broadcaster’s control panel on Twitch: “Settings” > “Streaming.” Paste the key into the corresponding field in OBS. Do not reveal it on air or in screenshots; it is used to stream to your channel.
After connecting your account, chat and stream information panels may appear in the program. You can also change the stream title and category via the broadcaster’s control panel in your browser.
Before going live, check your selected scene, microphone, and game volume. Then click “Start Stream.” To end the stream, use the “Stop Stream” button.
Best OBS Settings for Streaming
There are no one-size-fits-all settings for every computer. Quality depends on resolution, frame rate, encoder, and bitrate. Start by using the automatic settings, then manually adjust any parameters that prevent you from achieving a stable stream.
What Bitrate to Set in OBS
Bitrate is the amount of data the program transmits per second. With the same resolution and encoder, a bitrate that’s too low leads to a loss of detail and blocky visuals, especially during motion. A bitrate that’s too high for your connection can cause frame drops and interruptions.
| Resolution | Frame Rate | Bitrate |
| 1280x720 | 30 | 3,000 |
| 1280x720 | 60 | 4,500 |
| 1920×1080 | 30 | 4,500 |
| 1920×1080 | 60 | 6,000 |
How to Choose an Encoder in OBS
An encoder compresses video for transmission to the platform or storage on a disk. Available options depend on the hardware.
| Encoder | When |
| NVIDIA NVENC | If your NVIDIA graphics card supports hardware encoding |
| AMD HW / AMF | If an AMD graphics card hardware encoder is available |
| Intel Quick Sync / QSV | If compatible Intel graphics are used |
| x264 | If there is no hardware encoder or you know what you're doing |
For game streaming, it’s usually best to start with the primary graphics card’s hardware encoder: it takes a significant amount of the load off the CPU. Quality depends on the hardware generation, codec, and settings.
How to set the resolution and FPS in OBS
Open “Settings” > “Video.” The base resolution sets the scene size, while the output resolution determines the resolution of the final video.
For fast-paced games, start with 60 FPS; for talk shows, start with 30 FPS. If your computer can’t handle it, lower the output resolution from 1920x1080 to 1280x720 or the frame rate from 60 to 30. If your graphics card is fully occupied by the game, limit the FPS within the game itself and lower the graphics settings. OBS also requires resources to process the video feed.
How to set up OBS for video recording
You don’t need to connect Twitch to record to your computer. Set up your scene, video, and audio, then go to “Settings” > “Output.”
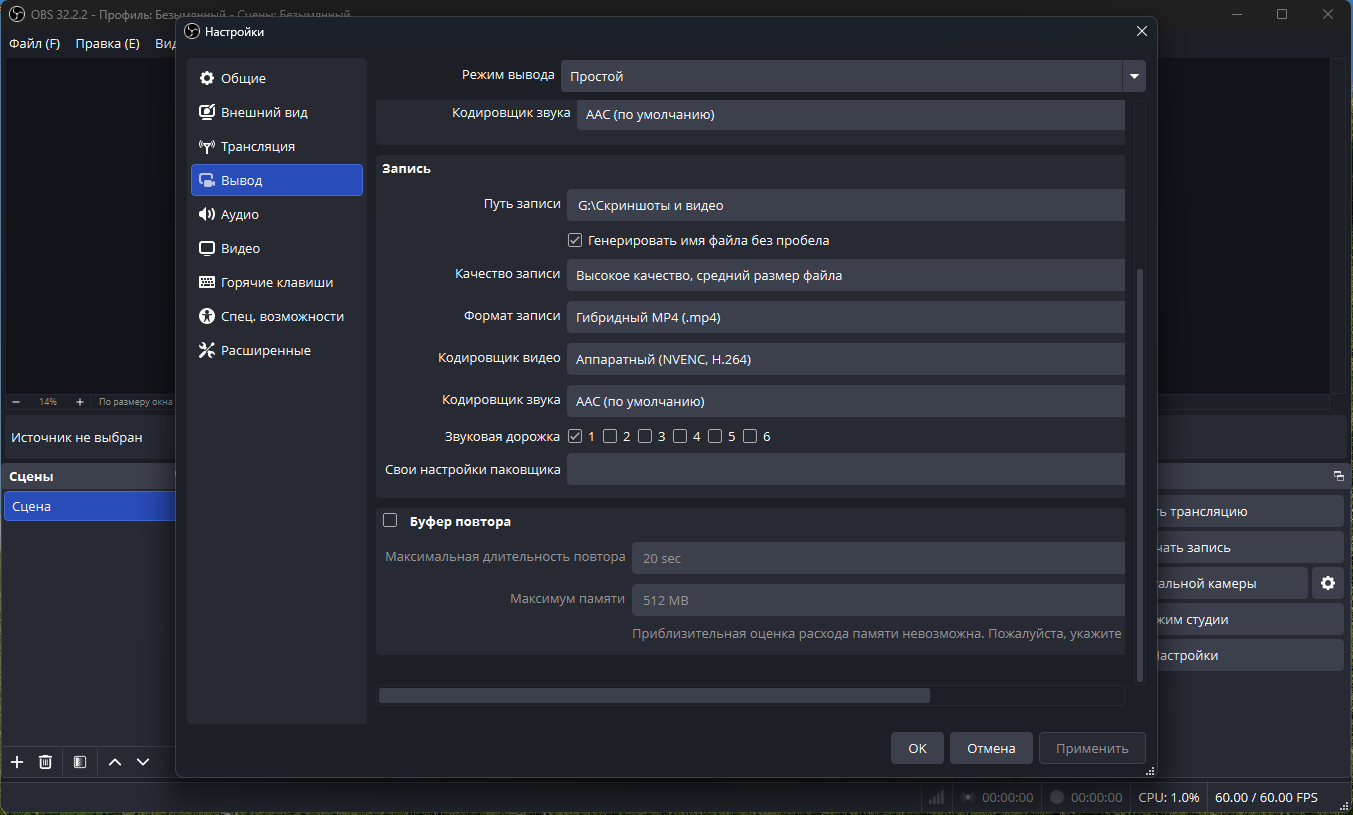
To configure OBS Studio for recording:
- Select Simple Output Mode.
- Specify a folder to save the files.
- Select the “High Quality, Medium File Size” setting.
- Set the format to MKV.
- Select an available hardware encoder.
- Apply the settings and click “Start Recording.”
MKV is more resilient to unexpected recording termination: a crash shouldn’t render the entire file unreadable. If you need an MP4 file for editing, after recording, go to “File” > “Remultiplex Recordings” and convert the container without re-encoding the video.
How to Set Up OBS for Game Recording
Add “Game Capture,” select the desired application, and check the audio. Set the output resolution and frame rate, then record a few minutes of gameplay.
Test the settings in a typical gameplay scenario, not just in the menu: the load during combat can be significantly higher. If the recording stutters, lower the FPS or resolution to free up graphics card resources.
How to Set Up OBS for Screen Recording
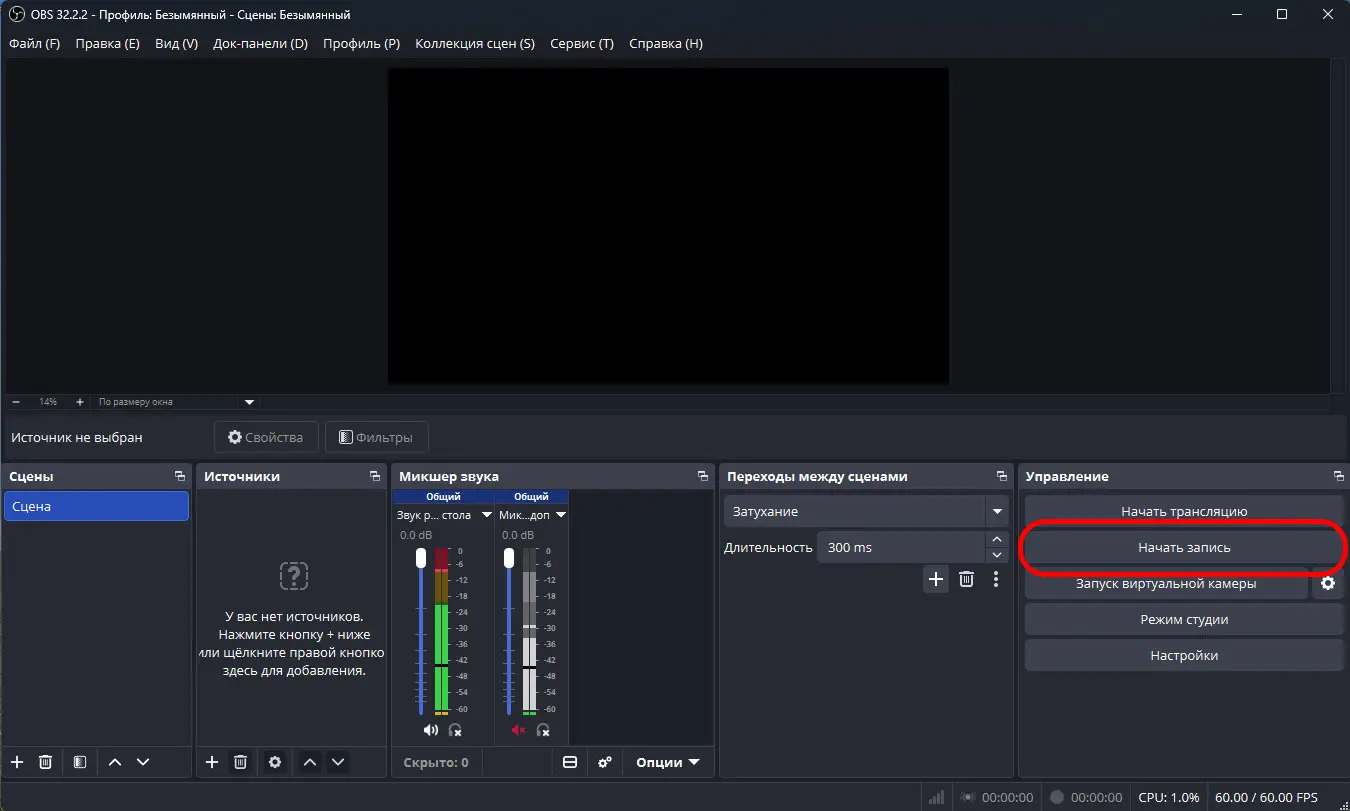
In “Sources,” add “Screen Capture” and select your monitor. If you need to record only one program, use “Window Capture.”
Before recording your screen, close any private chats and disable pop-up notifications. Check the preview: everything visible in the selected capture area will be included in the file.
How to Set Up Donations on OBS
OBS displays donation notifications via a browser widget. To accept payments, you’ll need a separate service, such as DonationAlerts.
- Log in to the donation service and set up a page for your viewers.
- Open the notifications section.
- Select the notification style and sound.
- Copy the link to embed the widget.
- In OBS, add a “Browser” source.
- Paste the link into the address field and save.
- Send a test notification from the donation service.
Place the widget above the game screen in the source list. Post the public link to the donation page on your channel, and use the widget’s address only in OBS.
Frequently Asked Questions (FAQ)
Запустите мастер автоматической настройки, добавьте игру и микрофон, затем сделайте пробную запись.
В разделе «Трансляция» выберите Твич и подключите аккаунт либо вставьте ключ трансляции.
Подключение к площадке не требуется: добавьте источники и нажмите «Начать запись».
Проверьте выбранное устройство в настройках аудио и убедитесь, что микрофон не выключен в микшере.
Начните с 720p и 30 фпс, используйте доступный аппаратный кодировщик и ограничьте фпс игры.